- Home
- China CloudFront SSL Plugin
China CloudFront SSL Plugin
What does this solution do?
The "China CloudFront SSL Plugin V2" solution from Amazon Web Services in the China region helps you generate, update, and download free SSL/TLS certificates. It also supports integration with Amazon CloudFront and automates the process of updating associated SSL certificates. SSL utilizes data encryption, authentication, and message integrity verification mechanisms to ensure the security of data transmission over networks. This can help protect sensitive information on websites, such as personal identification and credit card details, guarding against theft by hackers.
Key Features
-
Almost Free*: Built using serverless architecture and open-source tools, charged based on serverless service invocations, with default calls occurring only once every 30 days.
-
Ready to Use: Deployment of the solution and certificate issuance can be completed in just three minutes, with support for certificate downloads and integration with Amazon CloudFront for automatic updates.
-
Easy to Use: After one-click deployment, you can issue certificates for domain collections across multiple projects through a graphical frontend interface, and manage certificates for multiple projects.
-
Completely Open Source: All code in this solution is provided as open source. If you have different requirements, you can also customize development based on the source code.
*This solution uses serverless architecture, which generates minimal costs for each certificate issuance, such as serverless resource running costs, small amounts of Amazon S3 and Amazon DynamoDB storage fees, and Amazon CloudWatch log storage fees. However, due to domain control validation requirements for certificate issuance, using Amazon Route 53 for domain hosting will incur a fee of 3.575 CNY per month.
About this tutorial
Estimated deployment time:3 Minutes
Cost:Almost Free
Theme:Free SSL/TLS Certificate Issuance, Download SSL and Integrated with Amazon CloudFront Supported - China CloudFront SSL Plugin
Audience:Developer, Operation Specialist
Level:200
Related Products:Amazon Lambda, Amazon CloudFront, Amazon Route 53, Amazon EventBridge, Amazon S3, Amazon API Gateway, Amazon SNS, Amazon IAM, Amazon DynamoDB
Related industry:WebHositng, Content Delivery
Last updated date:2025.6.4
Solution Overview
You can use this solution's implementation guide and the accompanying Amazon CloudFormation template for automatic deployment in your Amazon Web Services account. The solution architecture diagram is shown below:
Architecture Description
This solution automates the deployment of a series of serverless resources through an Amazon CloudFormation template, including Amazon Lambda, Amazon SNS topics, Amazon EventBridge rules, Amazon API Gateway, and more. It enables automatic and periodic generation of free SSL/TLS certificates via Let's Encrypt and the open-source tool Certbot, and automatically uploads the issued certificates to Amazon IAM SSL certificate storage and Amazon S3. It also supports automatic updates of IAM SSL certificates in Amazon CloudFront. Additionally, this solution provides a front-end graphical certificate management interface for users to easily manage all domains and certificates in their account.
-
Let's Encrypt is a free, open, and automated certificate authority (CA).
-
Certbot is a free, open-source software tool that automates the acquisition, deployment, and updating of SSL certificates issued by Let's Encrypt.
-
Amazon Lambda is used to run the Certbot certificate issuance and update program, the certificate management interface frontend, and the IAM SSL certificate management API.
-
Amazon DynamoDB is a serverless non-relational database used in this solution to store project certificate issuance status and error information.
-
Amazon Route 53 is used for domain name resolution. The Certbot certificate issuance program will automatically generate and add DNS validation records based on the domain name and hosted zones in Amazon Route53 to meet Let's Encrypt's domain control validation requirements. If you haven't migrated your domain resolution to Amazon Route 53 yet, please refer to the reference documentation.
-
Amazon SNS is used to send email notifications about certificate issuance status.
-
Amazon EventBridge is used for event-driven operations, automatically running the Certbot certificate issuance program when the solution stack is successfully deployed or updated. It also uses scheduled tasks to generate free SSL certificates every 30 days by default for certificate renewal.
-
Amazon API Gateway is used to integrate and manage SSL certificate operations and provide calling interfaces.
-
Amazon S3 buckets are used to store backup SSL certificates, which can be downloaded locally through the Amazon S3 console.
-
IAM SSL Certificate Storage is used to store SSL certificates associated with Amazon CloudFront. In Amazon Web Services China Regions, if you need to use Amazon CloudFront to provide content via HTTPS, you need to use IAM SSL certificate storage. For details, please refer to Amazon CloudFront Feature Availability and Implementation Differences. This solution automatically adds the issued SSL certificates to IAM SSL certificate storage. You need to manually select the SSL certificate you want to associate in your Amazon CloudFront distribution, after which automatic updates of SSL certificates in Amazon CloudFront will be enabled.
Prerequisites
If you haven't registered an account in the Amazon Web Services China region, please register first. For business operations in the China region (requiring enterprise business license authentication), please click on “China Region Account" to create one.
According to Article 4 of the "Administrative Measures for Internet Information Services," if you intend to publish a publicly accessible website, you need to undergo ICP (Internet Content Provider) filing. If you haven't completed ICP filing yet, please refer to the ICP filing process or contact us to online technical experts for consultation.
Please ensure that you use Amazon Route 53 to resolve your domain name. If you haven't migrated domain name resolution to Amazon Route 53, please click on the reference documentation.
Operation Manual
Before starting, please confirm again that you are using Amazon Route 53 to resolve your domain. If you haven't migrated your domain resolution to Amazon Web Services Amazon Route 53 yet, please click reference documentation. We recommend reading this document completely to understand all operation steps and precautions.
Operation Manual
Open allDeploy the template through the CloudFormation service by clicking this deployment link , which will redirect you to the China Region CloudFormation console to create a stack. Click [Next] in the bottom right corner.
-
Stack Name: Name your stack, for example "cloudfront-ssl-plugin-v2". The stack name must be unique within the region for your current account.
-
Access Key: Specify an Access Key as the key for your API Gateway. The API Gateway key ensures that only authorized users can call backend functions through the API Gateway.
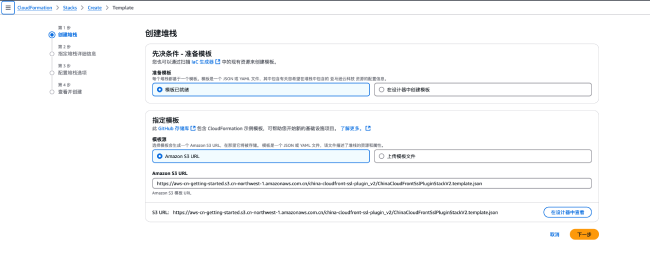
After confirming the information, click Next to proceed to Step 3 "Configure Stack Options".
Specify details for the stack, paying attention to the following parameters:
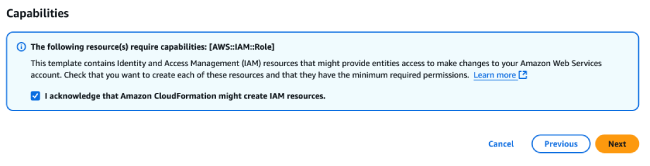
At the bottom of the current page, check the "I acknowledge" box in the blue window, and then click "Next" in the bottom right corner to proceed to Step 4 "Review and Create".
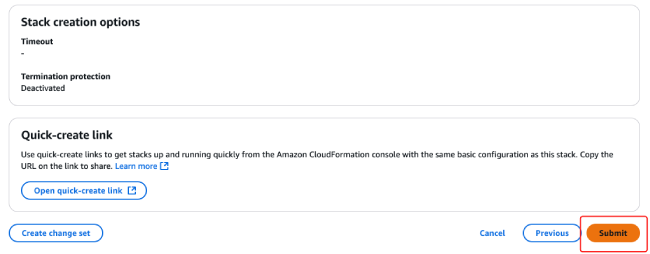
Please review your deployment information on the current page. After confirming all details are correct, click the "Submit" button in the bottom right corner of the page to submit your deployment.
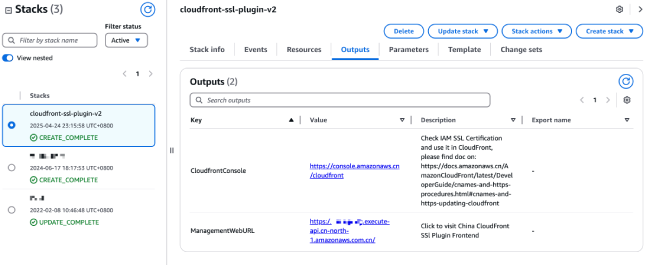
After submitting, you will see in the stack events panel that the resources within the stack are being created one after another. Wait for approximately 1 minute, and when the stack status changes to CREATE_COMPLETE, the creation process is finished.
-
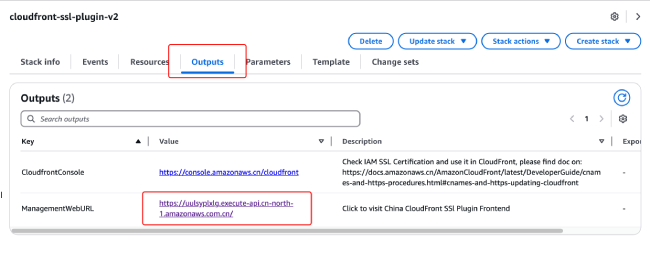
CloudfrontConsole: Access the Amazon CloudFront console to quickly bind the issued certificates
-
ManagementWebURL: Access the certificate management frontend page, where you'll see the frontend page with no project data and a dialog box for entering the key.
You can view the created resources by clicking on the Resources tab, which includes Lambda function resources with main functions as shown in the following table.
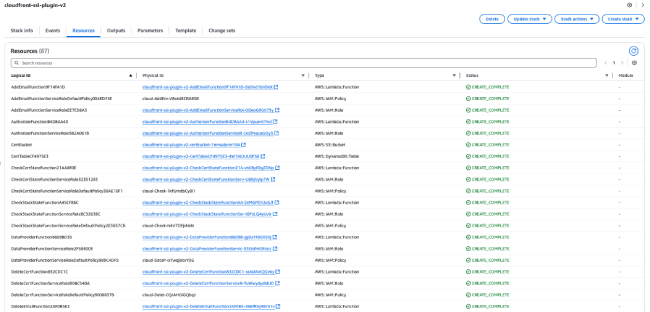
Lambda Functions and Their Corresponding Features
You can view quick links provided by the solution in the stack's "Outputs" tab:
|
Lambda Function Name |
Feature |
Lambda Function Name |
Feature |
|
AddEmail |
Add notification email addresses for a specified project |
DeleteProject |
Delete certificate issuance project and associated sub-stacks |
|
Authorizer |
Management interface and API authentication |
Frontend |
Function for running the frontend management page |
|
CheckCertState |
Search DynamoDB by project name to get the latest certificate issuance status |
GetCertByPath |
Get associated information for all certificates under a certificate path |
|
CheckStackState |
Get the status of associated stacks by project name |
GetMailByProject |
Get associated email addresses by project name |
|
DataProvider |
Get homepage data and list items |
Master |
Create certificate issuance stack based on project name, email address, and other information |
|
DeleteCert |
Input certificate name and delete it |
TriggerCertbot |
Trigger certificate issuance function, used for manually renewing certificates |
|
DeleteEmail |
Delete notification emails for a specified project by inputting email address |
UpdateProject |
Update project information, i.e., related information of the certificate issuance stack |
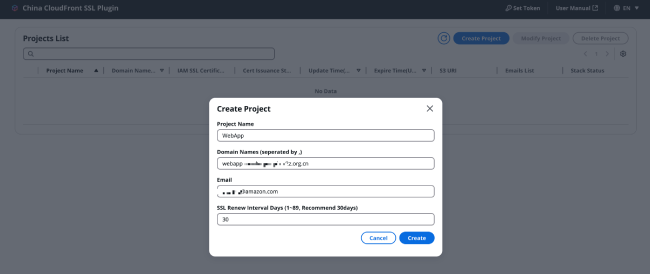
Step 2 - Project Creation
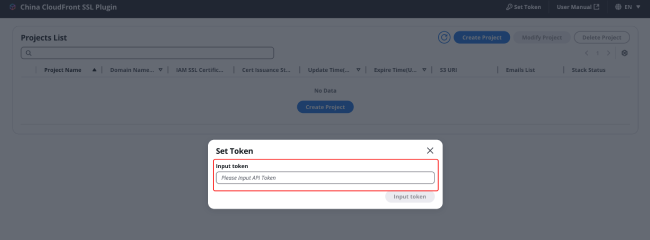
Open allIn the stack "Output" tab, find the ManagementWebURL, click on the URL link to enter the certificate management page.
Enter the access key (the Access Key specified in the parameters when creating the stack) to enter the certificate management page for operations.
-
Project Name: Cannot be the same as other projects in the project list
-
Domain(s) (separated by commas): All domains involved in the project (separated by commas), for which we will apply for SSL certificates.
-
Email: Email used to receive certificate issuance information. Only one email can be specified during the project creation stage, more emails can be added later.
-
SSL Certificate Renewal Interval (days, 1-89 days, 30 days recommended): Specify an integer as the SSL certificate renewal interval, the default value is 30.
Click on any of the "Create New Project" buttons
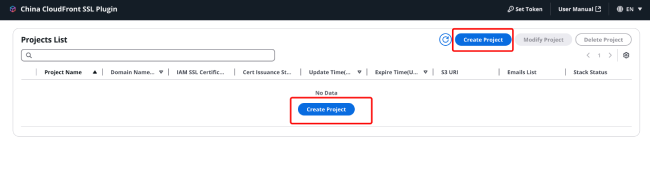
In the "Create New Project" dialog box, specify the following parameters:
After specifying all parameters, click [Create] in the bottom right corner to start creating the project.
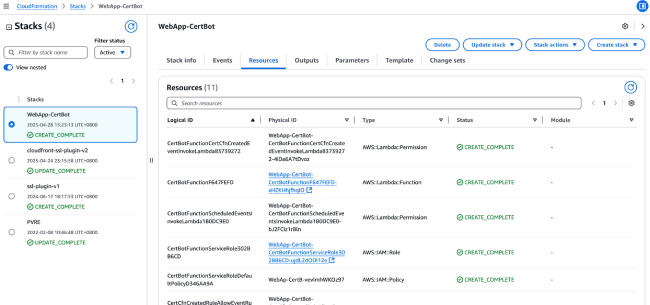
After clicking "Create Project," the certificate management platform will create a stack dedicated to this project in your account. Resources created in the stack include Lambda functions for issuing/renewing SSL certificates, EventBridge rules, SNS topics for sending certificate issuance status, and more.
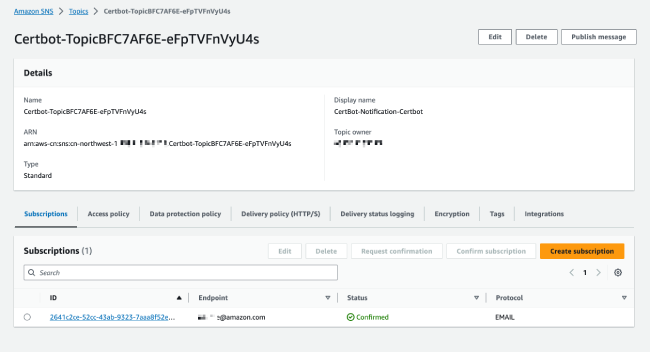
During the project creation process, you will receive an email from in your inbox, inviting you to subscribe to the SNS topic. Please check your inbox while waiting for the stack deployment and click the subscription confirmation link as soon as possible to receive SNS notifications in a timely manner, otherwise you may miss information about the first certificate issuance.
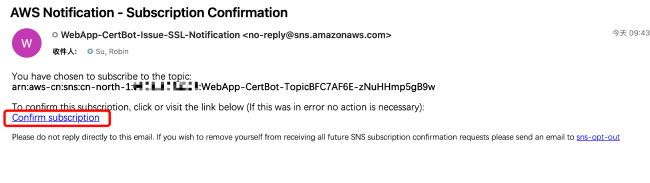
After successful subscription, the prompt will be as follows.

After completing the subscription, you can return to the certificate management page to check the project creation progress. You can also view the stack status in the CloudFormation console. When the certificate management page displays "Succeeded," or when the <project name>-CertBot stack status in the CloudFormation console shows CREATE_COMPLETE, it indicates that the project has been created successfully.

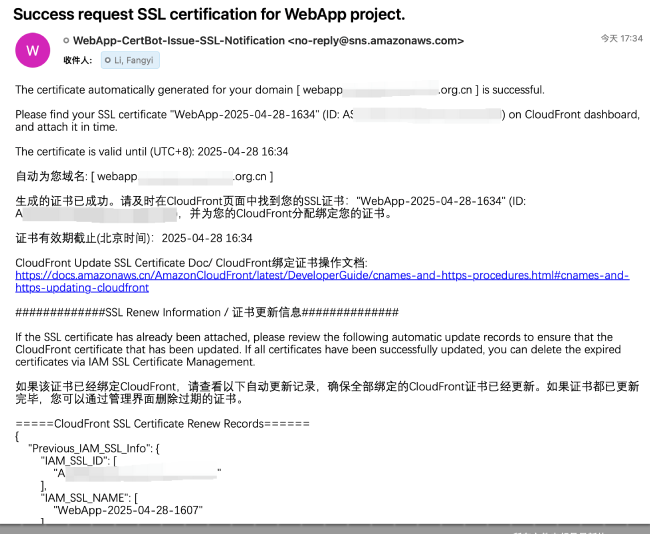
If you subscribed to the notification service in Step 3 in a timely manner, shortly after the project is successfully created, you will receive an email from <no-reply@sns.amazonaws.com>. The email will display the certificate issuance status and CloudFront update information. If the certificate is successfully issued, the email will show the certificate name and ID. The certificate name consists of the stack name and the SSL certificate expiration time. For example: certificate name WebApp-2025-04-28-1324 corresponds to a certificate expiration time of April 28, 2025, at 1:24 PM.
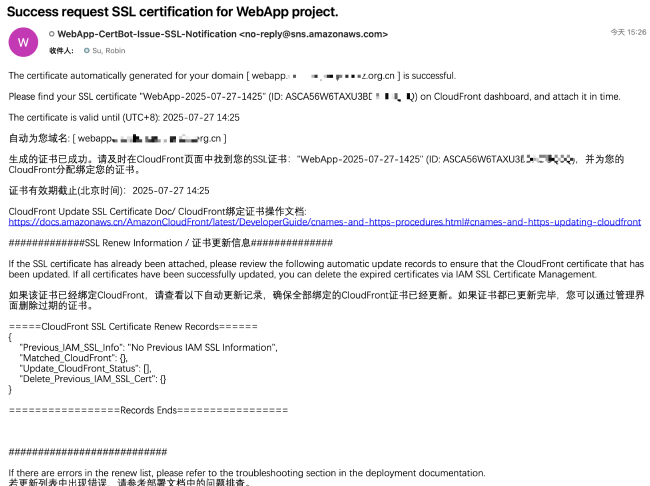
After the certificate is successfully issued, you can find the corresponding certificate in the CloudFront console using the certificate name/certificate ID. The next step is to bind CloudFront with the successfully issued SSL certificate.
Open the CloudFront console, create or select your existing distribution, and find the option to edit alternate domain names and SSL certificates.
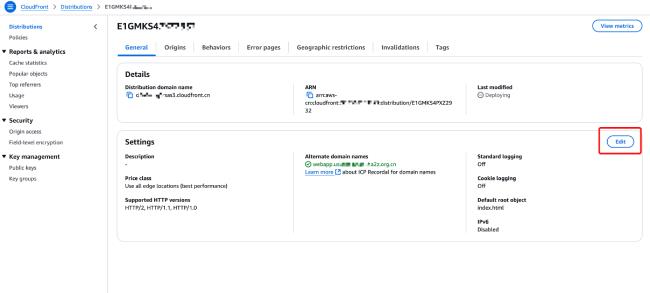
In the settings menu, enter the domain name for which you applied for the SSL certificate in the "Alternate Domain Names" field, and select the corresponding SSL certificate from the "Custom SSL Certificate" dropdown menu. Then save the changes.
.3aa8f8832bf56eca2a502a611d0932f1afda5aae.jpg)
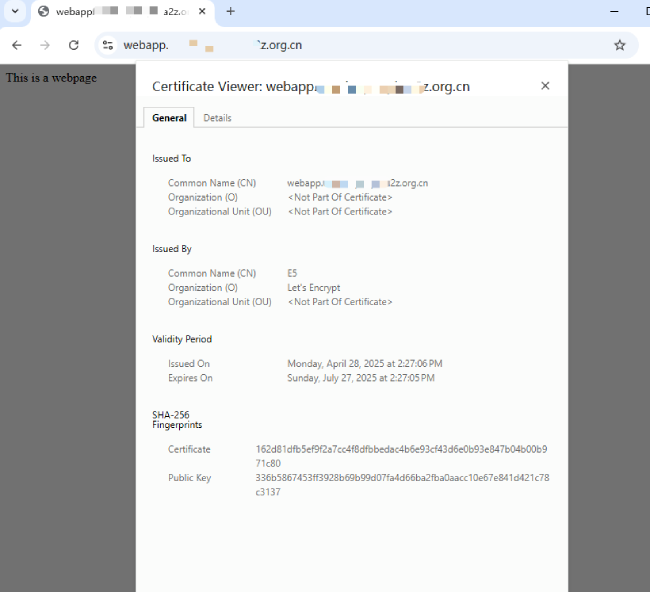
After deployment is complete, you can access the site accelerated by Amazon CloudFront through the alternate domain name from your browser, and view the SSL certificate information issued by Let's Encrypt.
Step 3 - Project Management and Certificate Managemenht
Open all-
Domain: The collection of domains involved in the project, which are also the domains for which you apply for SSL certificates.
-
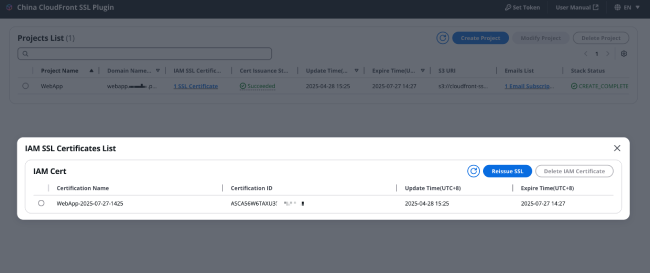
Certificate List: Basic information about all certificates for the current domain, including certificate name, certificate ID, update time (certificate issuance time), and expiration time.
-
Certificate Issuance Status: Click to view the record of the last certificate issuance status.
-
Update Time: The most recent update time among all certificates owned by this domain.
-
Expiration Time: The most recent expiration time among all certificates owned by this domain.
-
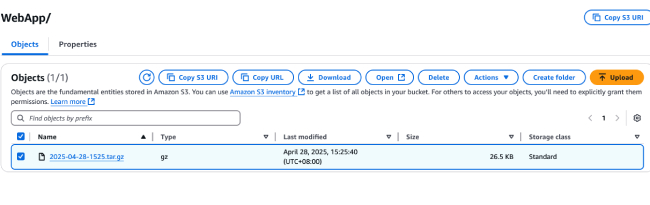
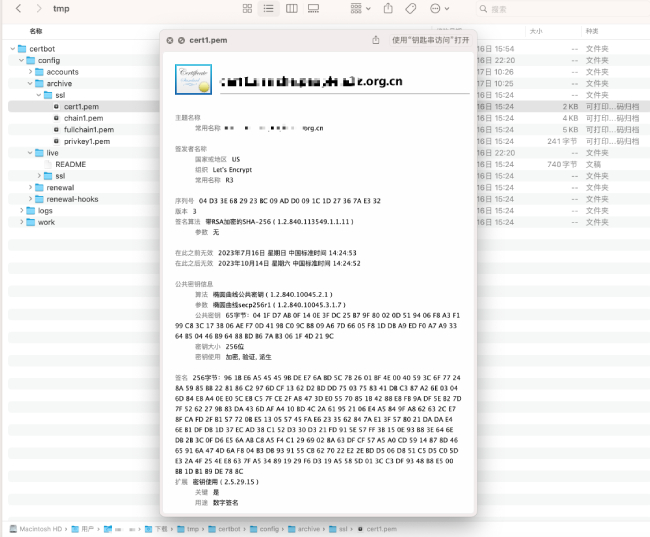
S3 URI: The S3 directory that stores all certificates for this project. When you enter this directory, you can see compressed files named after the certificate issuance time. Download and extract this file to get a folder named "tmp".
-
Access the path /tmp/certbot/config/archive/ssl in the extracted folder to see the generated SSL certificate, certificate private key, certificate chain, and other files.
-
Notification Email List: All email addresses that have subscribed to the message notification service.
-
Stack Status: The status of the stack for this project, consistent with the stack status displayed in the CloudFormation console. Each project corresponds to one stack, which contains Lambda functions responsible for certificate issuance and renewal for the project, EventBridge rules, message notification services responsible for sending certificate issuance status, etc.
-
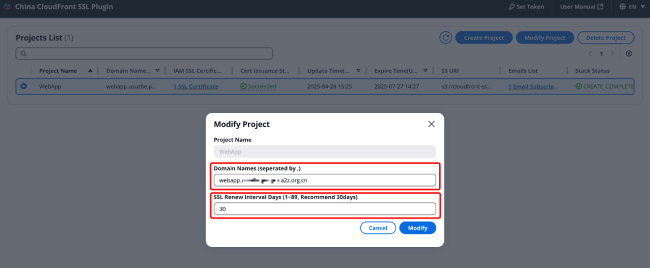
Domain name: Note that the modified domain name must include the domain name before modification, otherwise the newly issued SSL certificate after modification will not include the previous domain names, which may cause a mismatch between the SSL certificate and the website domain name.
-
SSL certificate renewal time interval
-
Previous_IAM_SSL_Info: Information about the previously issued SSL certificate.
-
Matched_CloudFront: The Amazon CloudFront distribution ID matched using the previously issued SSL certificate information. In the example below, the previously issued certificate was already bound to a CloudFront distribution starting with "E", so the Matched_CloudFront field contains the ID of that CloudFront distribution.
-
Update_CloudFront_Status: Amazon CloudFront update status, please compare with the matched Amazon CloudFront ID information. In the example below, the CloudFront distribution starting with "E" has an update status of "Success", indicating that the certificate for that CloudFront distribution has been replaced with the latest certificate.
-
Delete_Previous_IAM_SSL_Cert: If there are no matching Amazon CloudFront distributions or all Amazon CloudFront distributions have been successfully updated, the previously issued SSL certificate will be automatically deleted. In the example below, since the new certificate was successfully issued and the Amazon CloudFront distribution was successfully updated, the status of the old certificate in the Delete_Previous_IAM_SSL_Cert field is successfully deleted.
1.1 View Project Basic Information

The specific meaning of each column is as follows:
1.2 Modify Project
Select the project you want to modify, and click [Modify Project] in the upper right corner to make changes to the project.

After each project modification, an SSL certificate will be reissued. The parameters that can be modified include:
The successful result of the update record is shown in the figure:

The meaning of the data structure is as follows:
1.3 Deleting a Project
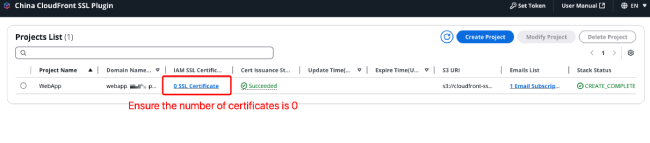
Before deleting a project, you need to check whether the certificates in the project are associated with CloudFront distributions. If associations exist, you must first remove these associations. After ensuring all associations are removed, manually delete all certificates from the certificate list; otherwise, the project cannot be deleted.
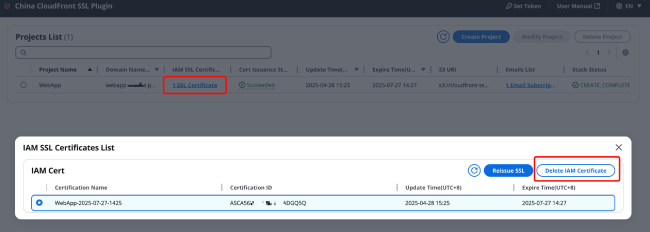
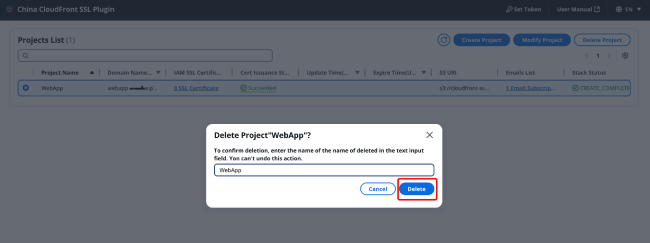
After all certificates in the project have been deleted, select the project you want to delete, and click "Delete Project" in the upper right corner.
Enter the project name and then click "Delete" in the lower right corner.
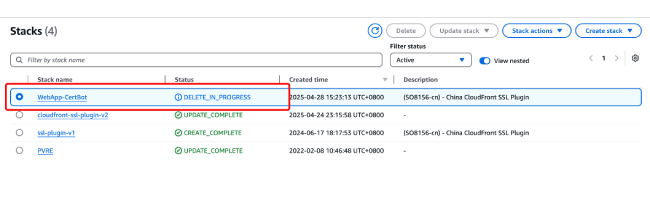
After clicking delete, the project's data and stacks will also be deleted.
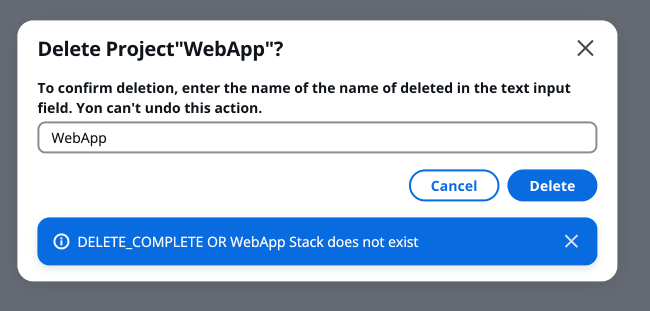
After successful deletion, you will see a prompt on the certificate management page as shown in the figure below.
-
Previous_IAM_SSL_Info: Information about the previously issued SSL certificate.
-
Matched_CloudFront: The Amazon CloudFront distribution ID matched through the previously issued SSL certificate information.
-
Update_CloudFront_Status: Amazon CloudFront update status, please compare with the matched Amazon CloudFront ID information.
-
Delete_Previous_IAM_SSL_Cert: If there is no matching Amazon CloudFront distribution or all Amazon CloudFront updates have been successful, the previously issued SSL certificate will be automatically deleted.
-
If the certificate is updated successfully, the certificate stored in IAM SSL storage will be automatically deleted to save quota, but the backup certificate in the Amazon S3 bucket will not be deleted.
-
If certificate issuance fails or Amazon CloudFront SSL certificate update fails, please replace it manually in time to avoid interruption to your website access.
-
The CloudFront SSL Certificate Renew Records in the email is a JSON object containing CloudFront certificate update information displayed on the certificate management page, and the meaning of each field is described above.
-
Previous_IAM_SSL_Info: Information about the previously issued SSL certificate.
-
Matched_CloudFront: Amazon CloudFront distribution IDs that match the previously issued SSL certificate information.
-
Update_CloudFront_Status: Amazon CloudFront update status, please compare this with the matched Amazon CloudFront ID information.
-
Delete_Previous_IAM_SSL_Cert: If there are no matching Amazon CloudFront distributions or all Amazon CloudFront distributions have been successfully updated, the previously issued SSL certificate will be automatically deleted.
2.1 Automatic Certificate Renewal
This solution can automatically renew SSL certificates before they expire, and automatically replace the certificates associated with Amazon CloudFront based on the ID and certificate name generated from the previous certificate.
Note: Each generated free certificate is valid for 90 days. After the initial SSL certificate is generated, a new certificate will be automatically generated after a specified number of days (default is 30 days) through Amazon EventBridge rules, and a notification email will be sent regarding the successful SSL certificate issuance and Amazon CloudFront SSL certificate update record.
Email addresses subscribed to the SNS topic will receive a message about the certificate issuance status and CloudFront update information.
The meaning of each field in the certificate issuance status in the email is as follows:
Please read this email carefully and note the following:
If you encounter certificate issuance failure during automatic certificate renewal, please resolve the associated issues, and it is recommended that you manually issue a certificate following the steps in section 2.2.
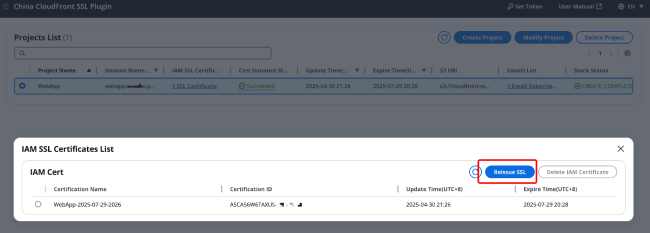
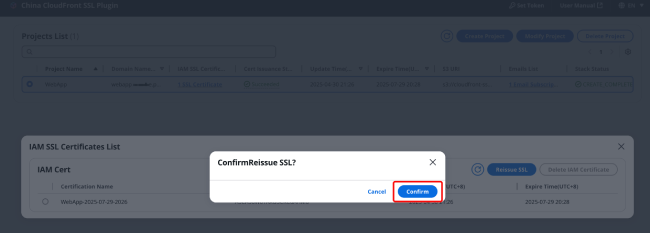
2.2 Reissue Certificate
In the certificate list, click [Reissue] in the upper right corner and click [Confirm] in the pop-up window.
After clicking confirm, the certificate management page will trigger a Lambda function to issue the certificate and replace the certificate bound to CloudFront with the newly issued certificate. You can see the execution progress of this Lambda function on the certificate management page.
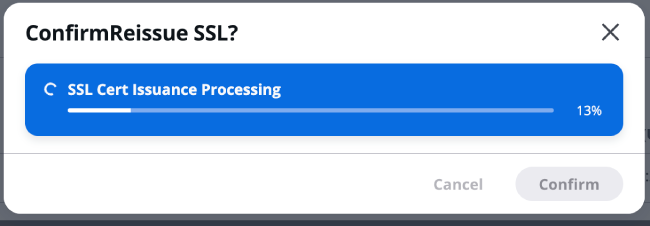
When the certificate management page displays "Succeeded", it indicates that the certificate has been successfully issued. The JSON object below records the information about the CloudFront certificate update.
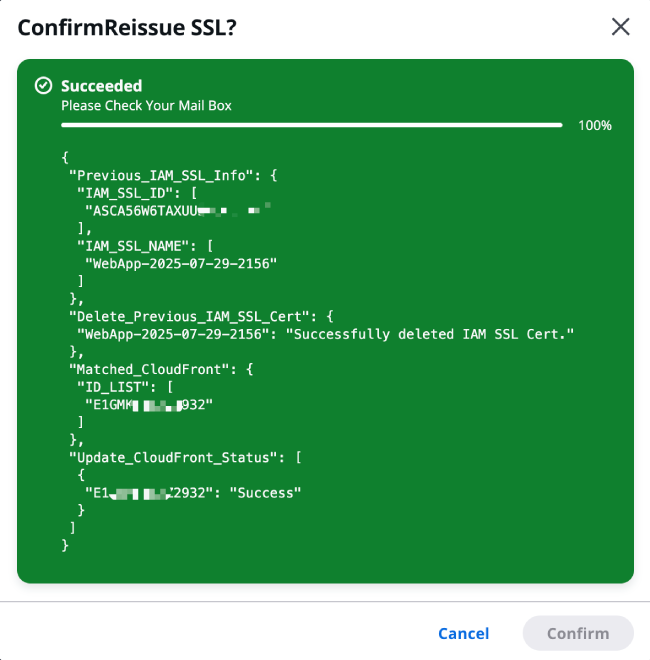
The meaning of the data structure is as follows:
Similarly, email addresses subscribed to the SNS topic will receive an email about the certificate issuance status and CloudFront update information.
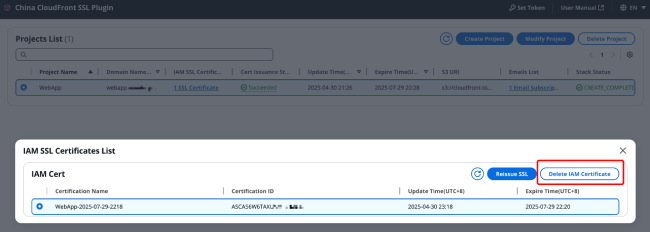
2.3 Deleting a Certificate
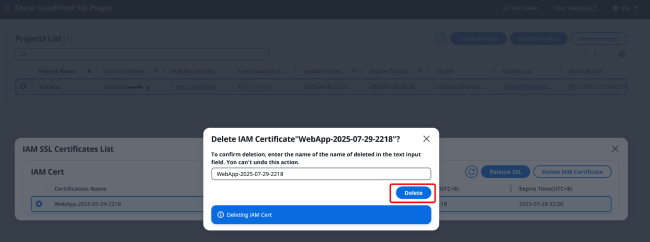
In the certificate list, select the certificate you want to delete, click [Delete Certificate] in the upper right corner, and then enter the certificate name in the popup window before clicking [Delete].
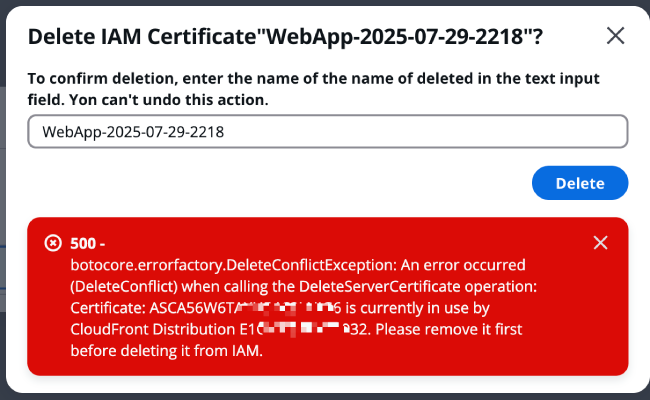
Note: Before deleting a certificate, please ensure that no CloudFront distribution is bound to the certificate. Otherwise, the deletion operation will result in a 500 error as shown in the image below, and the deletion cannot proceed.
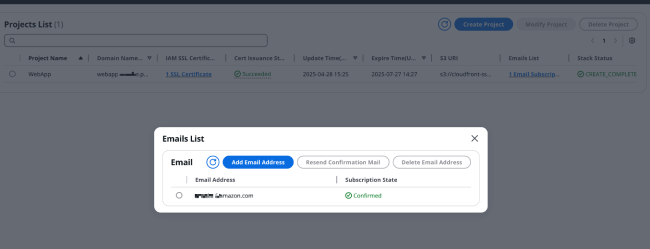
When creating a project, you can specify an Email to receive certificate issuance and update information. Later, you can click on "x Email subscriptions" in the notification Email list to manage the Email addresses subscribed to the message notification service.

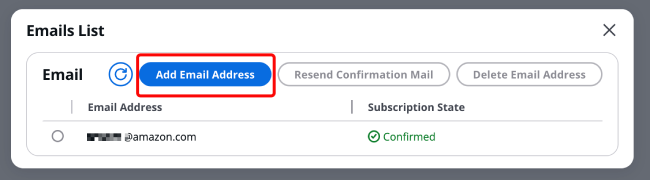
3.1 Adding Email
After clicking "x Email subscriptions", a pop-up window titled "Email Notification List" will appear as shown in the image. Click [Add Email].
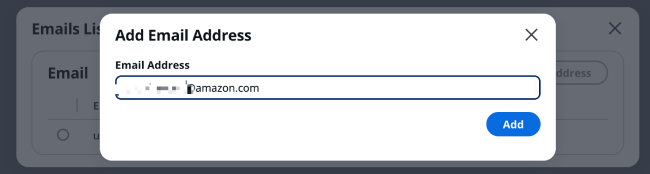
Enter the Email address you want to add in the box, such as somebody@example.com, then click [Add].
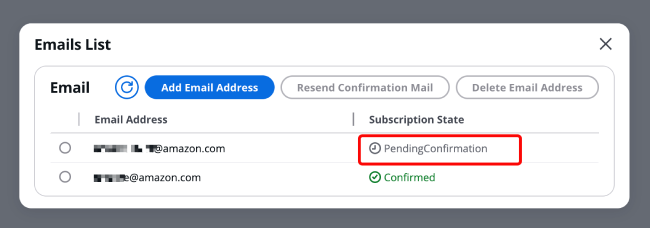
After clicking add, you will see that the status of the Email address somebody@example.com is "PendingConfirmation".
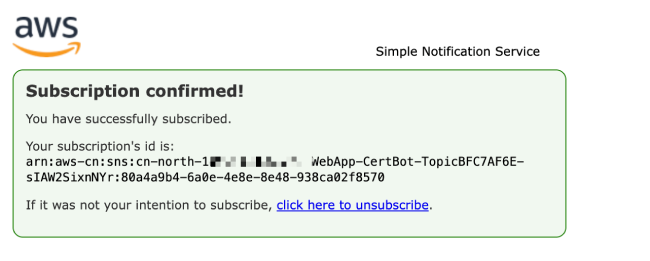
Later, you will receive a subscription invitation email from in the somebody@example.com mailbox. Click "Confirm subscription" to confirm the subscription.

After successful subscription, you can see the page shown in the image below.
Return to the certificate management page and click the refresh button in the top right corner. We can now see that the subscription status has changed to "Confirmed".
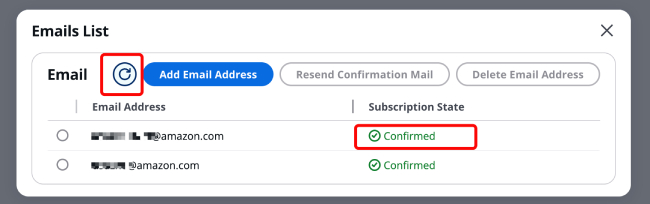
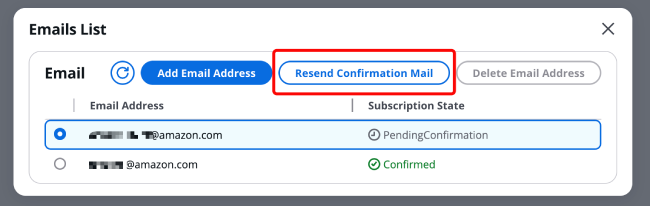
3.2 Resend Confirmation Email
If the subscription invitation email was accidentally deleted before confirming the subscription, you can select that Email address and click [Resend Confirmation Email].
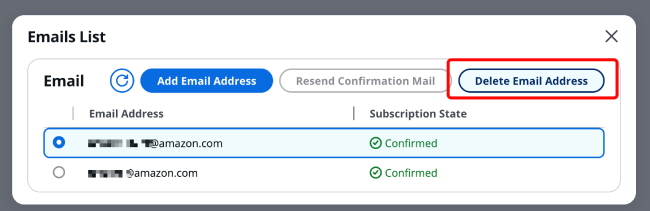
3.3 Delete Email
Select the Email address you want to delete, then click [Delete Email] in the top right corner.
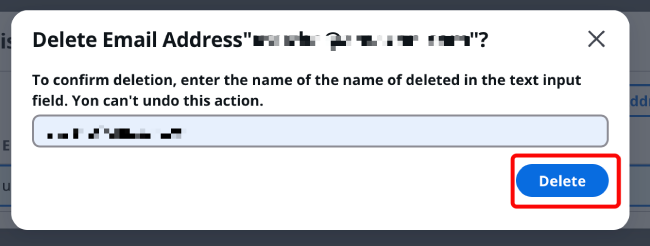
Enter the Email address you want to delete in the dialog box for confirmation, then click [Delete] in the bottom right corner.
Common Questions and Troubleshooting
Open all-
How many certificates can be generated for one domain name? Are there rate limits?
According to Let's Encrypt documentation, you can issue up to 50 certificates per registered domain per week, and up to 5 certificates for duplicate domains per week. For details, please check the documentation: https://letsencrypt.org/docs/rate-limits/. -
How many SSL certificates can be stored in IAM?
According to documentation, there are limits on certificates in the IAM service. By default, each account cannot upload more than 20 SSL certificates. This quota can be increased to 1,000. Please click the link "Server certificates per account" to submit an IAM certificate quota request. -
What if I cannot access the certificate management interface?
Please ensure you have completed the ICP filing process. If you deployed this solution before completing the ICP filing, you may need to redeploy the solution.
-
Error message: "acme.messages.Error: urn:ietf:params:acme:error:rateLimited :: There were too many requests of a given type ::"
-
The email shows that the certificate application was successful, but the Delete_Previous_IAM_SSL_Cert field in the CloudFront update record in the email or certificate management page shows "Delete_IAM_Cert_Error: ..." or "Delete_SSL_Res_Error: ..." information
-
The email shows that the certificate application was successful, but the Matched_CloudFront field in the CloudFront update record in the email or certificate management page shows "Error"
-
The email shows that the certificate application was successful, but the Update_CloudFront_Status field in the CloudFront update record in the email or certificate management page shows "Failed"/"Update_Dist_Error"/"Get_Dist_Error"
-
If there are error messages in the email that are not mentioned above, how should I troubleshoot?
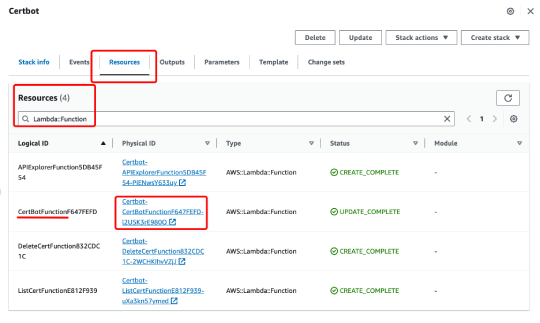
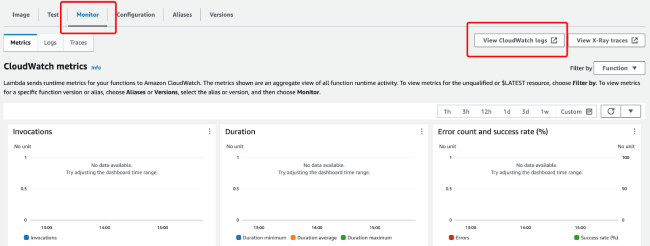
You can check the execution logs of the Certbot Lambda Function. The specific method is as follows:
During new project creation, certificate reissuance, or automatic certificate renewal operations, the backend will submit certificate issuance requests and update the certificates bound to CloudFront distributions (removing the association between CloudFront distributions and old certificates and binding them to new certificates). During this process, you may encounter the following common errors:
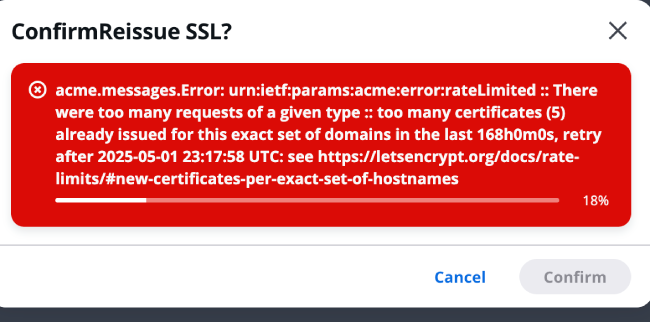
If you see an error message as shown in the image below on the certificate management page:
Or if you see a similar error message in an email:
 ss
ss
This indicates that you have applied for certificates for your domain 5 times within a short period (exceeding Let's Encrypt's limit of issuing only 5 certificates per week for repeated domains), therefore the certificate issuance request failed.
This information indicates that the backend failed to delete the old certificate in the IAM Certificate service. The reason for the failure can be found in the specific content after "Delete_IAM_Cert_Error:" or "Delete_SSL_Res_Error:".
This indicates that the backend encountered an error while searching for CloudFront distributions bound to the old certificate. The reason for the failure can be found in the specific content of the "Error" field.
If in the Update_CloudFront_Status field, content other than "Success" appears after a CloudFront distribution ID (such as "Failed"/{"Update_Dist_Error": "..."}/{"Get_Dist_Error": "..."}), it indicates that the backend encountered an error when updating the certificate for that distribution.
1. In the resources tab of the stack, search for "Lambda::Function" and select the Function that begins with CertBot.
2. After clicking into the function, go to the monitoring tab at the bottom of the page, then click on "View CloudWatch Logs" on the right side.
3. Based on the trigger time, look at the log streams tab at the bottom of the page and click to view the log information to troubleshoot the execution logs.

Other Troubleshooting
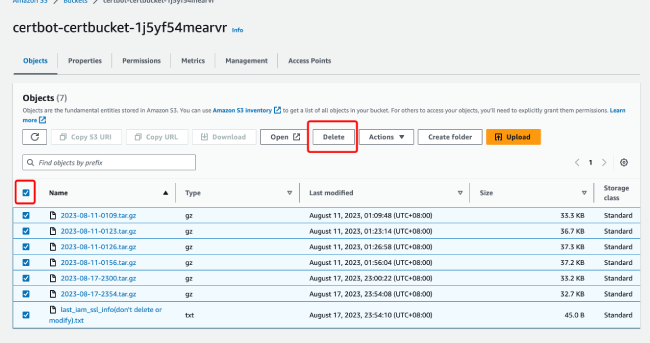
Open allPlease empty the contents of the corresponding Amazon S3 bucket first, and then proceed with deleting the stack.
- What should I do if I've confirmed the subscription status but still haven't received the issuance/renewal email?
-
If an error occurred during the issuance process, you can check the execution logs of the Certbot Lambda Function. If the issue is due to the automatic trigger rule not executing successfully, please check the Amazon EventBridge monitoring.
-
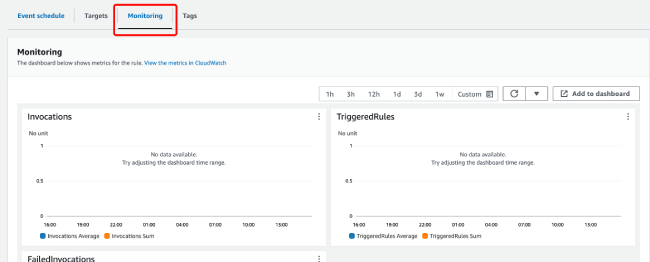
How do I check Amazon EventBridge monitoring?
In the resources tab of the stack, search for "Events::Rule", select the rule starting with CertScheduledRule, click to enter, and view the monitoring tab. Choose the time period to check the Invocation status.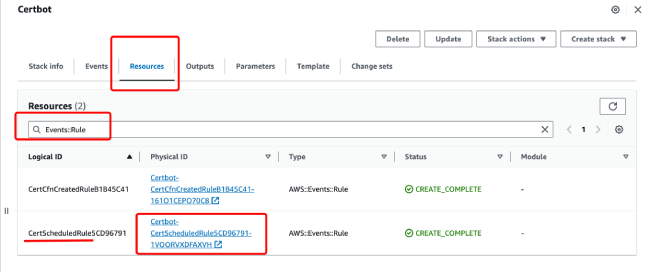
-
You can also get help with your issues through “Online Contact Us" or "Email Us".
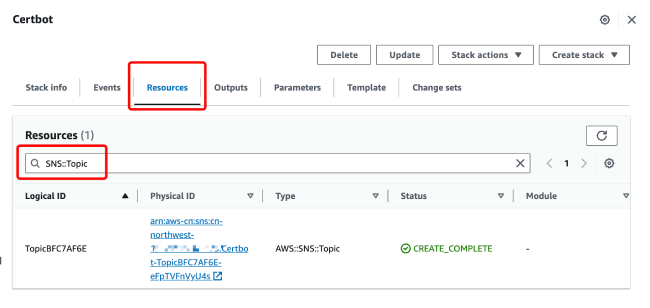
If you are creating a project, you may miss the notification because you confirmed the subscription too late. If you haven't received information about certificate updates, please make sure you have received the subscription email and clicked to subscribe. You can search for "SNS::Topic" in the resource tab of the stack to find the corresponding notification service and check the confirmation status.
Start building now on Amazon Web Services
Whether you are looking for computing power, databases, storage, content distribution, artificial intelligence and machine learning, big data analysis or other functions, Amazon Web Services has corresponding services to help you build more flexible, scalable and complex applications of reliability.
Go global or individuals experiencing
More than 200 cloud services
New customers get up to $200 in credits
Develop business in China
Nearly a hundred services
Over 20 products available for free trial in the Ningxia region