We use machine learning technology to do auto-translation. Click "English" on top navigation bar to check Chinese version.
Using and Managing Security Groups on Amazon Web Services Snowball Edge devices
This blog post is written by Jared Novotny & Tareq Rajabi, Specialist Hybrid Edge Solution Architects.
The
Security groups are used to protect EC2 instances by controlling ingress and egress traffic. Once a security group is created and associated with an instance, customers can add ingress and egress rules to control data flow. Just like the default VPC in a region, there is a default security group on Snow devices. A default security group is applied when an instance is launched and no other security group is specified. This default security group in a region allows all inbound traffic from network interfaces and instances that are assigned to the same security group, and allows and all outbound traffic. On Snowball Edge, the default security group allows all inbound and outbound traffic.
In this post, we will review the tools and commands required to create, manage and use security groups on the Snowball Edge device.
Some things to keep in mind:
- Amazon Web Services Snowball Edge is limited to 50 security groups.
- An instance will only have one security group, but each group can have a total of 120 rules. This is comprised of 60 inbound and 60 outbound rules.
- Security groups can only have allow statements to allow network traffic.
- Deny statements aren’t allowed.
- Some commands in the Snowball Edge client (Amazon Web Services CLI) don’t provide an output.
- Amazon Web Services CLI commands can use the name or the security group ID.
Prerequisites and tools
Customers must place an order for Snowball Edge from their
The
Customers can download and install the Snowball Edge client and Amazon Web Services OpsHub from
Getting Started
To get started, when a Snow device arrives at a customer site, the customer must unlock the device and launch an EC2 instance. This can be done via
Viewing security group information
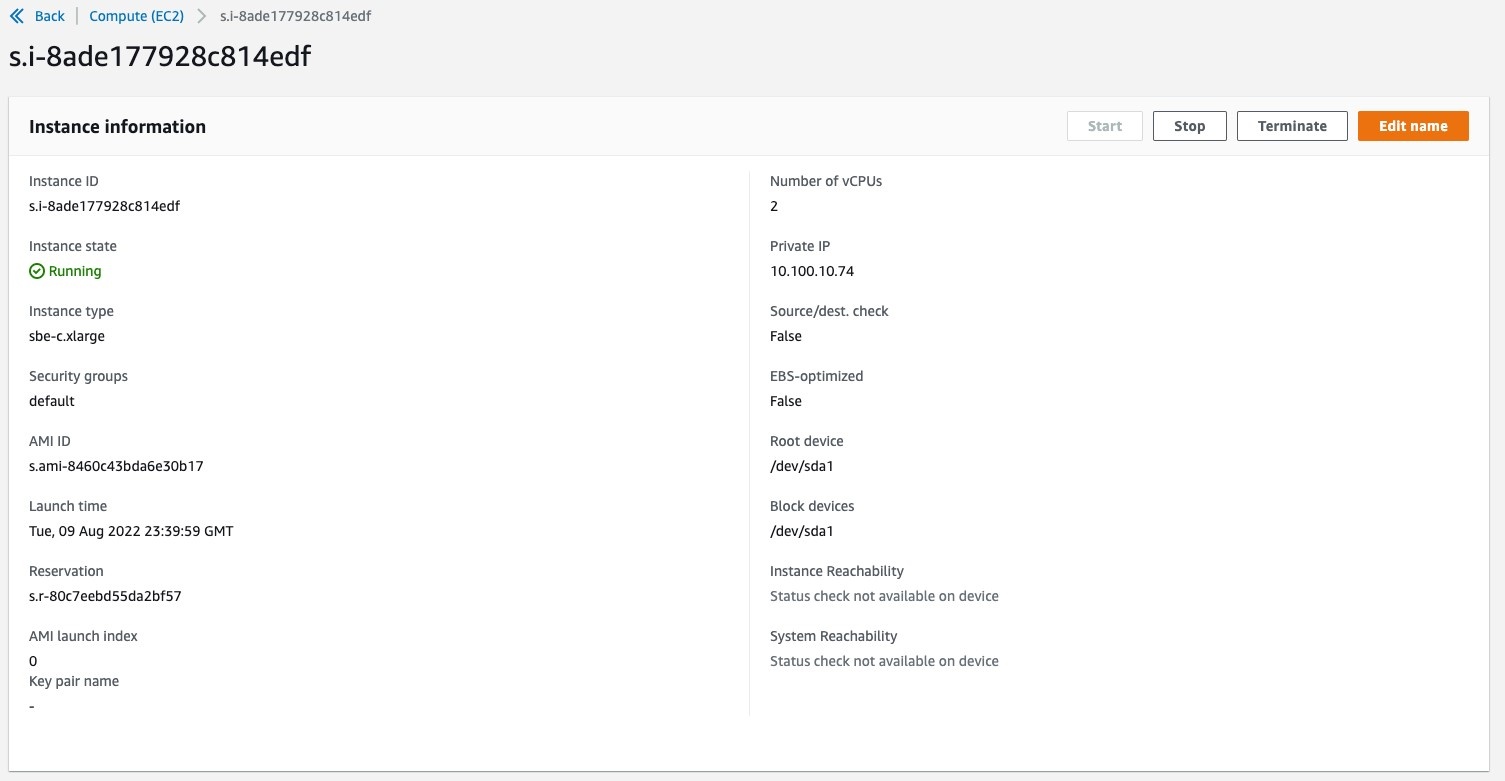
Once the Amazon Web Services Snowball Edge is unlocked, configured, and has an EC2 instance running, we can dig deeper into using security groups to act as a virtual firewall and control incoming and outgoing traffic.
Although the Amazon Web Services OpsHub tool provides various functionalities for compute and storage operations, it can only be used to view the name of the security group associated to an instance in a Snowball Edge device:
Every other interaction with security groups must be through the Amazon Web Services CLI.
The following command shows how to easily read the outputs describing the protocols, sources, and destinations. This particular command will show information about the default security group, which allows all inbound and outbound traffic on EC2 instances running on the Snowball Edge.

In the following sections we review the most common commands with examples and outputs.
View (all) existing security groups:
Create new security group:
aws ec2 create-security-group --group-name allow-ssh--description "allow only ssh inbound" --endpoint Http://MySnowIPAddress:8008 --profile SnowballEdge
The output returns a GroupId:
Add port 22 ingress to security group:
aws ec2 authorize-security-group-ingress --group-ids.sg-8f25ee27cee870b4a --protocol tcp --port 22 --cidr 10.100.10.0/24 --endpoint Http://MySnowIPAddress:8008 --profile SnowballEdge
Note that if you’re using the default security group, then the outbound rule is still to allow all traffic.
Revoke port 22 ingress rule from security group
aws ec2 revoke-security-group-ingress --group-ids.sg-8f25ee27cee870b4a --ip-permissions IpProtocol=tcp,FromPort=22,ToPort=22, IpRanges=[{CidrIp=10.100.10.0/24}] --endpoint Http://MySnowIPAddress:8008 --profile SnowballEdge
Revoke default egress rule:
aws ec2 revoke-security-group-egress --group-ids.sg-8f25ee27cee870b4a --ip-permissions IpProtocol="-1",IpRanges=[{CidrIp=0.0.0.0/0}] --endpoint Http://MySnowIPAddress:8008 --profile SnowballEdge
Note that this rule will remove all outbound ephemeral ports.
Add default outbound rule (revoked above):
aws ec2 authorize-security-group-egress --group-id s.sg-8f25ee27cee870b4a --ip-permissions IpProtocol="-1", IpRanges=[{CidrIp=0.0.0.0/0}] --endpoint Http://MySnowIPAddress:8008 --profile SnowballEdge
Changing an instance’s existing security group:
aws ec2 modify-instance-attribute --instance-id s.i-852971d05144e1d63 --groups s.sg-8f25ee27cee870b4a --endpoint Http://MySnowIPAddress:8008 --profile SnowballEdge
Note that this command produces no output. We can verify that it worked with the “aws ec2 describe-instances” command. See the example as follows (command output simplified):
aws ec2 describe-instances --instance-id s.i-852971d05144e1d63 --endpoint Http://MySnowIPAddress:8008 --profile SnowballEdge
Changing and instance’s security group back to default:
Note that this command produces no output. You can verify that it worked with the “aws ec2 describe-instances” command. See the example as follows:
aws ec2 describe-instances –instance-ids.i-852971d05144e1d63 –endpoint Https://MySnowIPAddress:8008 –profile SnowballEdge
Delete security group:
aws ec2 delete-security-group --group-ids.sg-8f25ee27cee870b4a --endpoint Http://MySnowIPAddress:8008 --profile SnowballEdge
Sample walkthrough to add a SSH Security Group
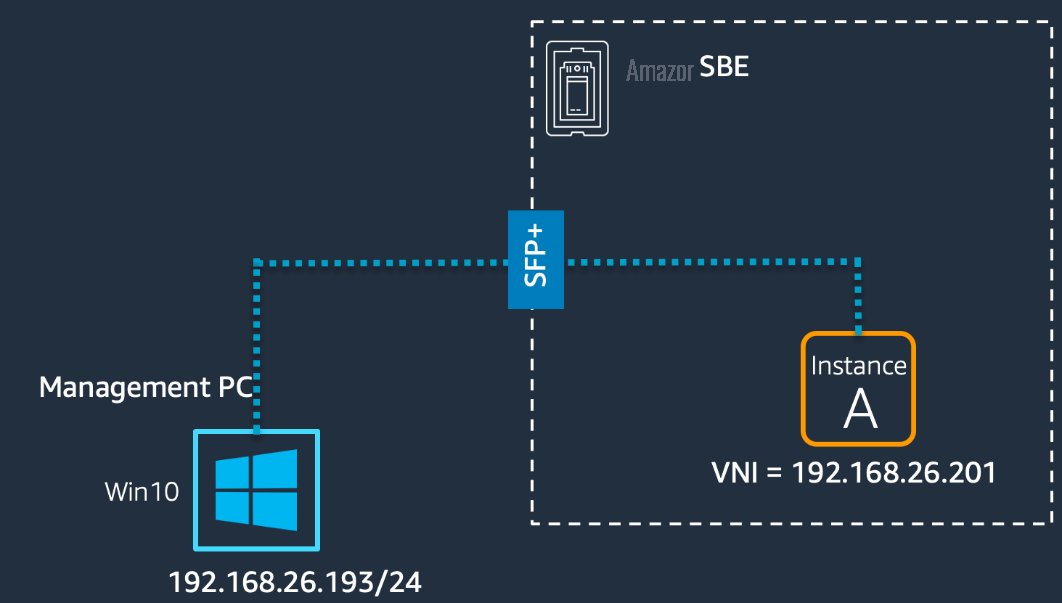
As an example, assume a single EC2 instance “A” running on a Snowball Edge device. By default, all traffic is allowed to EC2 instance “A”. As per the following diagram, we want to tighten security and allow only the management PC to SSH to the instance.
1. Create an SSH security group:
aws ec2 create-security-group --group-name MySshGroup--description “ssh access” --endpoint Http://MySnowIPAddress:8008 --profile SnowballEdge
2. This will return a “GroupId” as an output:
3. After the creation of the security group, we must allow port 22 ingress from the management PC’s IP:
aws ec2 authorize-security-group-ingress --group-name MySshGroup -- protocol tcp --port 22 -- cidr 192.168.26.193/32 --endpoint Http://MySnowIPAddress:8008 --profile SnowballEdge
4. Verify that the security group has been created:
aws ec2 describe-security-groups ––group-name MySshGroup –endpoint Http://MySnowIPAddress:8008 --profile SnowballEdge
5. After the security group has been created, we must associate it with the instance:
aws ec2 modify-instance-attribute –-instance-id s.i-8f7ab16867ffe23d4 –-groups s.sg-8a420242d86dbbb89 --endpoint Http://MySnowIPAddress:8008 --profile SnowballEdge
6. Optionally, we can delete the Security Group after it is no longer required:
aws ec2 delete-security-group --group-id s.sg-8a420242d86dbbb89 --endpoint Http://MySnowIPAddress:8008 --profile SnowballEdge
Note that for the above association, the instance ID is an output of the “aws ec2 describe-instances” command, while the security group ID is an output of the “describe-security-groups” command (or the “GroupId” returned by the console in Step 2 above).
Conclusion
This post addressed the most common commands used to create and manage security groups with the Amazon Web Services Snowball Edge device. We explored the prerequisites, tools, and commands used to view, create, and modify security groups to ensure the EC2 instances deployed on Amazon Web Services Snowball Edge are restricted to authorized users. We concluded with a simple walkthrough of how to restrict access to an EC2 instance over SSH from a single IP address. If you would like to learn more about the Snowball Edge product, there are several
The mentioned AWS GenAI Services service names relating to generative AI are only available or previewed in the Global Regions. Amazon Web Services China promotes AWS GenAI Services relating to generative AI solely for China-to-global business purposes and/or advanced technology introduction.