We use machine learning technology to do auto-translation. Click "English" on top navigation bar to check Chinese version.
Multi-Architecture Container Builds with CodeCatalyst
Background
Container images only run on a system with the same CPU architecture for which they were targeted. For example, an
amd64
image runs on Intel and AMD processors, while an
arm64
image runs on Amazon Web Services Graviton. Note that amd64 and x86_64 are often used interchangeable, and I have chosen to use amd64 in this post. Rather than maintaining multiple repositories for each image type, you can combine variants for multiple architectures in the same repository. In addition, you can create a manifest describing which image to use for each architecture. This is known as
Let us look at an example to further understand multi-arch images. In this screenshot from
hello-world
application. One image is tagged
latest-amd64
for AMD architectures and one tagged
latest-arm64
for ARM architectures.
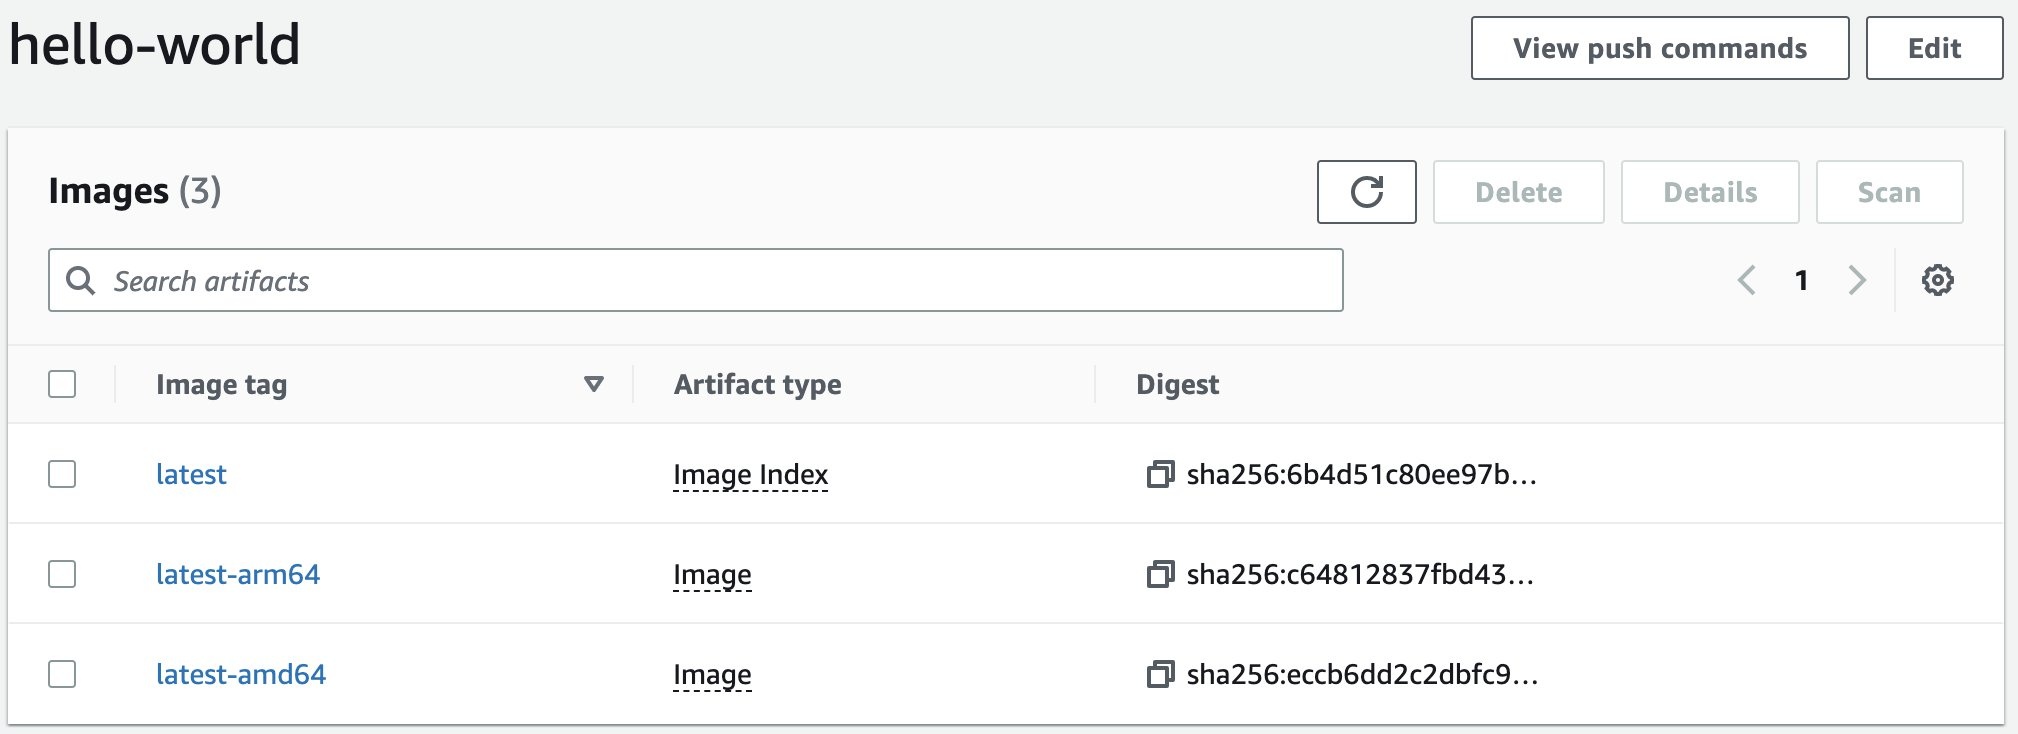
In addition, I have created an image manifest (or, in the ECR Console, Image Index) tagged
latest
. The image manifest is a map describing which image to use for each architecture. This allows my users to simply pull
hello-world:latest
and the manifest will identify the correct image based on the target platform. The image manifest contains the following manifest.
{
  "schemaVersion": 2,
  "mediaType": "application/vnd.docker.distribution.manifest.list.v2+json",
  "manifests": [
    {
	  "mediaType": "application/vnd.docker.distribution.manifest.v2+json",
	  "size": 1573,
	  "digest": "sha256:eccb6dd2c2dbfc9...",
	  "platform": {
	    "architecture": "amd64",
		"os": "linux"
	  }
	},
	{
	  "mediaType": "application/vnd.docker.distribution.manifest.v2+json",
	  "size": 1573,
	  "digest": "sha256:c64812837fbd43...",
	  "platform": {
	    "architecture": "arm64",
		"os": "linux"
	  }
	}
  ]
}
Now that I have explained what a multi-arch image is, I will explain how to create one in a CodeCatalyst workflow. A
Prerequisites
If you would like to follow along with this walkthrough, you will need:
-
A
CodeCatalyst space and associated Amazon Web Services account. -
An
empty CodeCatalyst project andsource repository in the space. -
An
Amazon ECR private repository in the associated Amazon Web Services account. -
A
CodeCatalyst environment connected to the associated Amazon Web Services account.
Walkthrough
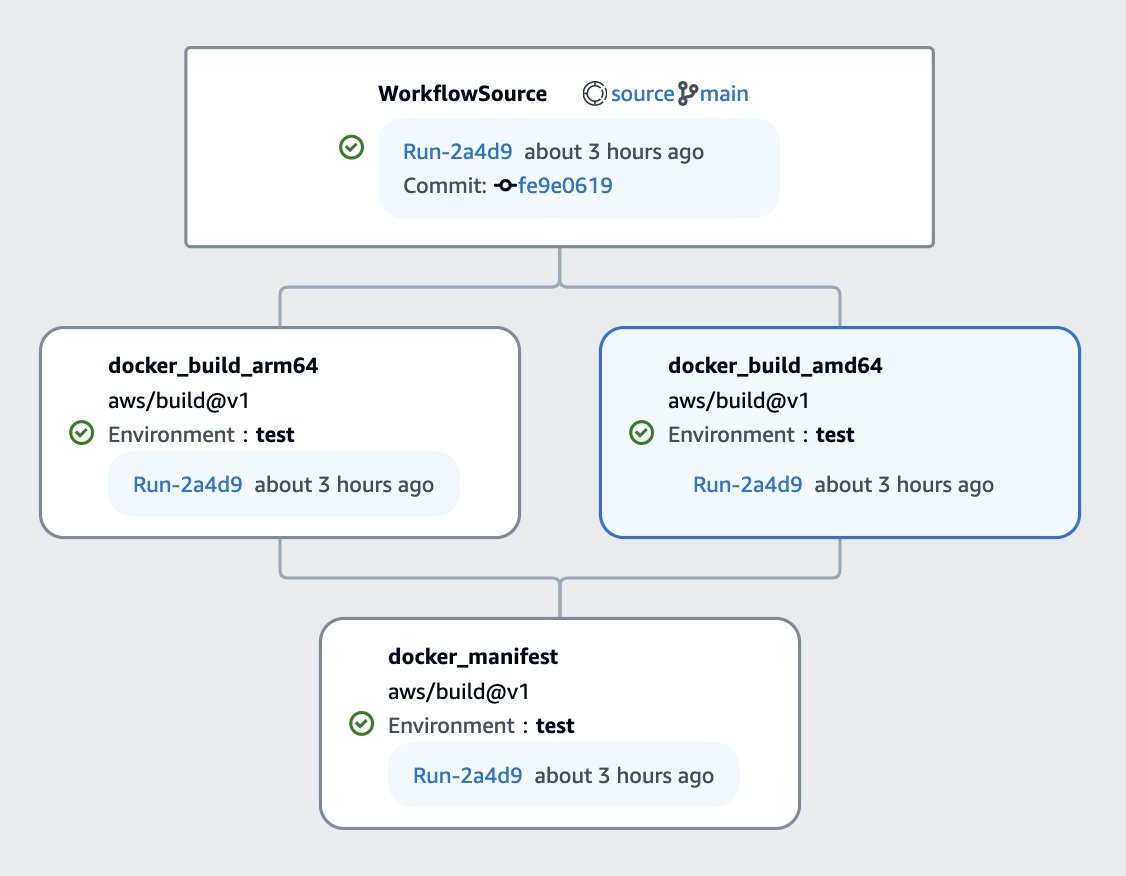
In this walkthrough I will create a simple application using an Apache HTTP Server serving a static hello world page. The workload is inconsequential. I will focus on the process of building the container image using a CodeCatalyst workflow. The Workflow will build two container images, one for amd64 and one for arm64. The two build tasks will run in parallel on different compute architectures. When both builds are complete, the workflow will build the docker manifest. At the end of this post, my workflow will look like this.
Note that docker also offers a plugin called
Sample Application
Initially the empty repository will only have a
README.md
file. By the end of this post, my repository will look like this.
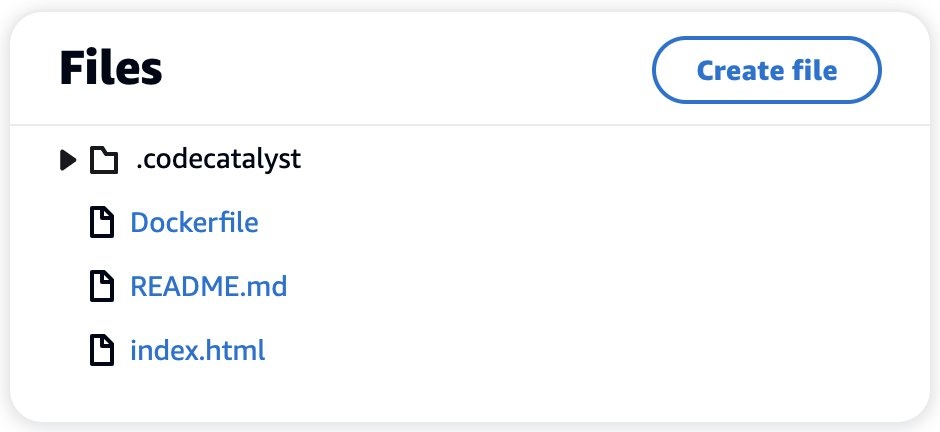
I’ll begin by creating the file named
index.html
. I used the
Create file
button in CodeCatalyst console shown previously. My
index.html
file has the following content:
<html>
    <head>
        <title>Hello World!</title>
    </head>
    <body>
        <h1>Hello World!</h1>
        <p>Hello from a multi-architecture container created in CodeCatalyst.</p>
    </body>
</html>
I’ll also create a
Dockerfile
that contains two commands. The first command instructs Docker to build a new image from the
httpd
. It is important to note that the httpd image already supports multiple architectures including
amd64
and
arm64
. When creating a multi-architecture image, the base image must also support these architectures. The second command simply copies the
index.html
file above into the new image. My
Dockerfile
file has the following content.
FROM httpd
COPY ./index.html /usr/local/apache2/htdocs/
With the source code for my sample application complete, I can turn my attention to the workflow.
CI/CD Workflow
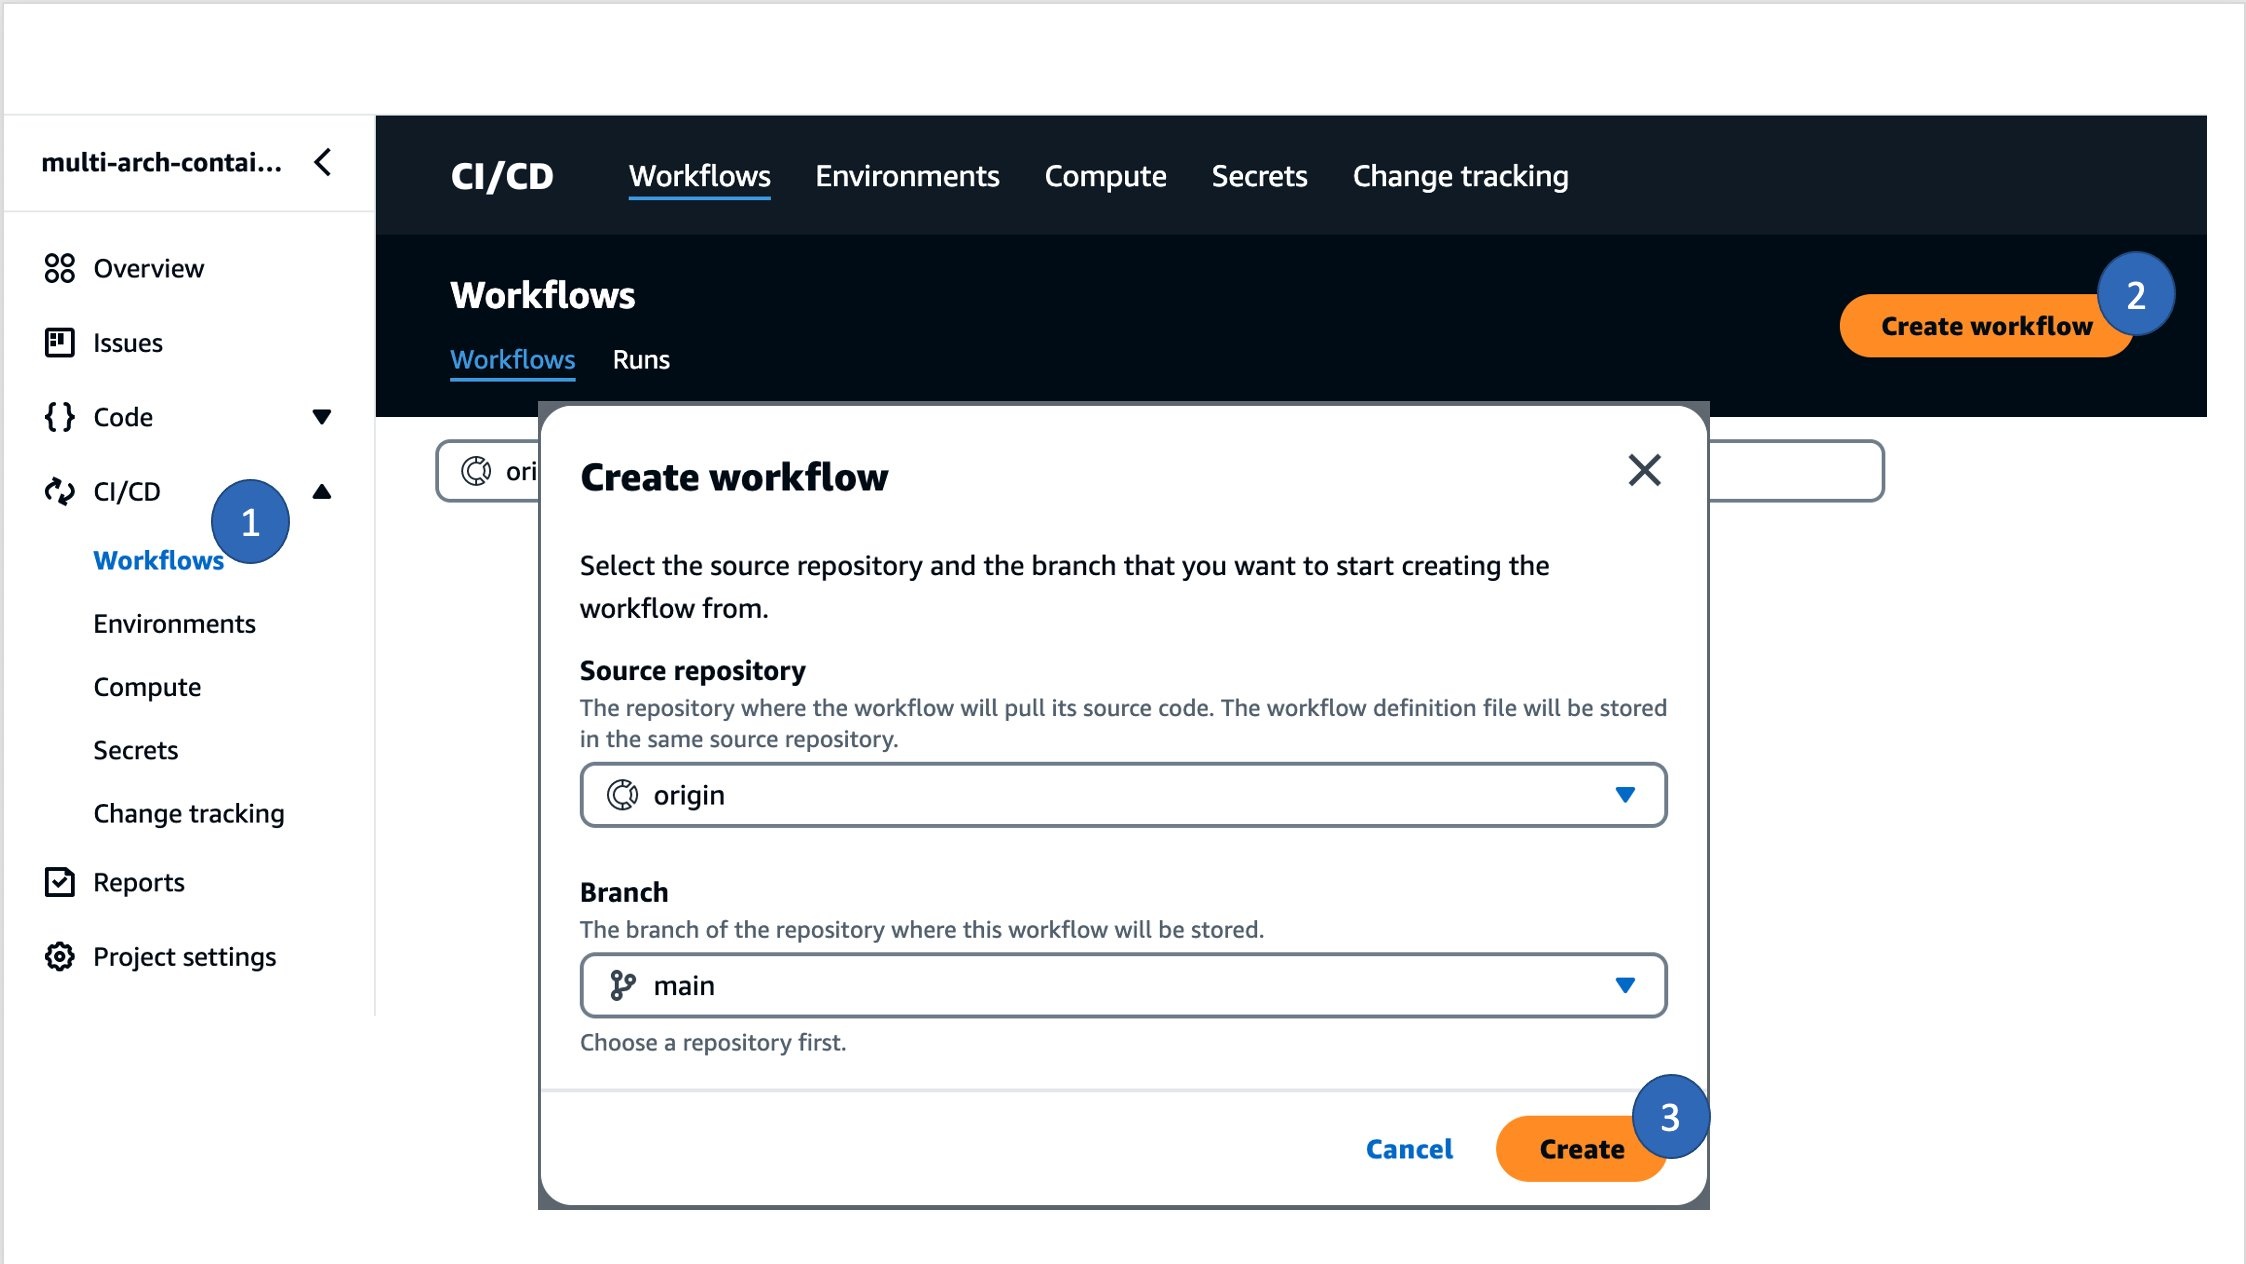
To create a new workflow, select CI/CD from navigation on the left and then select Workflows (1) . Then, select Create workflow (2), leave the default options, and select Create (3) .
If the workflow editor opens in YAML mode, select Visual to open the visual designer. Now, I can start adding actions to the workflow.
Build Action for the AMD64 Variant
I’ll begin by adding a build action for the amd64 container. Select “ + Actions ” to open the actions list. Find the Build action and click “ + ” to add a new build action to the workflow.
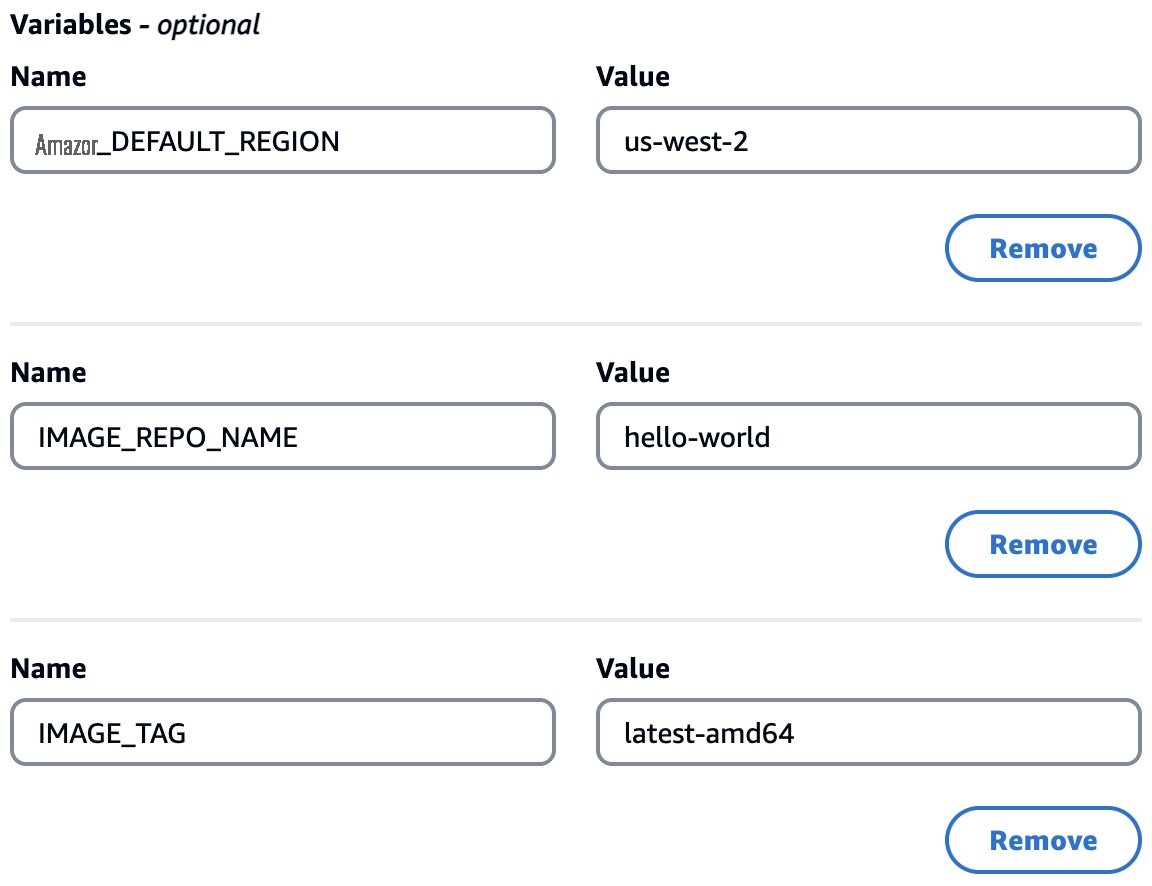
On the Inputs tab, create three variable named Amazon Web Services_DEFAULT_REGION, IMAGE_REPO_NAME, and IMAGE_TAG . Set the first two values equal to the region and **** name of your Amazon ECR repository**.** Set the third to latest-amd64 . For example:
Now select the Configuration tab and rename the action docker_build_amd64 . Select the Environment , Amazon Web Services account connection , and Role for the associated Amazon Web Services account where you created the Amazon ECR repository. For example:

Then, copy and paste the following code into the Shell commands . This code will build the image using the Dockerfile you created previously. Then, it logs into Amazon ECR, and finally, pushes the new image to ECR.
- Run: AWS_ACCOUNT_ID=`aws sts get-caller-identity --query "Account" --output text`
- Run: docker build -t $AWS_ACCOUNT_ID.dkr.ecr.$AWS_DEFAULT_REGION.amazonaws.com/$IMAGE_REPO_NAME:$IMAGE_TAG .
- Run: aws ecr get-login-password | docker login --username AWS --password-stdin $AWS_ACCOUNT_ID.dkr.ecr.$AWS_DEFAULT_REGION.amazonaws.com
- Run: docker push $AWS_ACCOUNT_ID.dkr.ecr.$AWS_DEFAULT_REGION.amazonaws.com/$IMAGE_REPO_NAME:$IMAGE_TAG
If you switch back to the YAML view, you can see that the designer has added the following action to the workflow definition.
  docker_build_amd64:
    Identifier: aws/build@v1
    Compute:
      Type: EC2
    Inputs:
      Sources:
        - WorkflowSource
      Variables:
        - Name: AWS_DEFAULT_REGION
          Value: us-west-2
        - Name: IMAGE_REPO_NAME
          Value: hello-world
        - Name: IMAGE_TAG
          Value: latest-amd64
    Environment:
      Name: demo
      Connections:
        - Role: CodeCatalystPreviewDevelopmentAdministrator
          Name: development
    Configuration:
      Steps:
        - Run: AWS_ACCOUNT_ID=`aws sts get-caller-identity --query "Account" --output text`
        - Run: docker build -t $AWS_ACCOUNT_ID.dkr.ecr.$AWS_DEFAULT_REGION.amazonaws.com/$IMAGE_REPO_NAME:$IMAGE_TAG .
        - Run: aws ecr get-login-password | docker login --username AWS --password-stdin $AWS_ACCOUNT_ID.dkr.ecr.$AWS_DEFAULT_REGION.amazonaws.com
        - Run: docker push $AWS_ACCOUNT_ID.dkr.ecr.$AWS_DEFAULT_REGION.amazonaws.com/$IMAGE_REPO_NAME:$IMAGE_TAG
With the amd64 image complete, you can move on to the arm64 image.
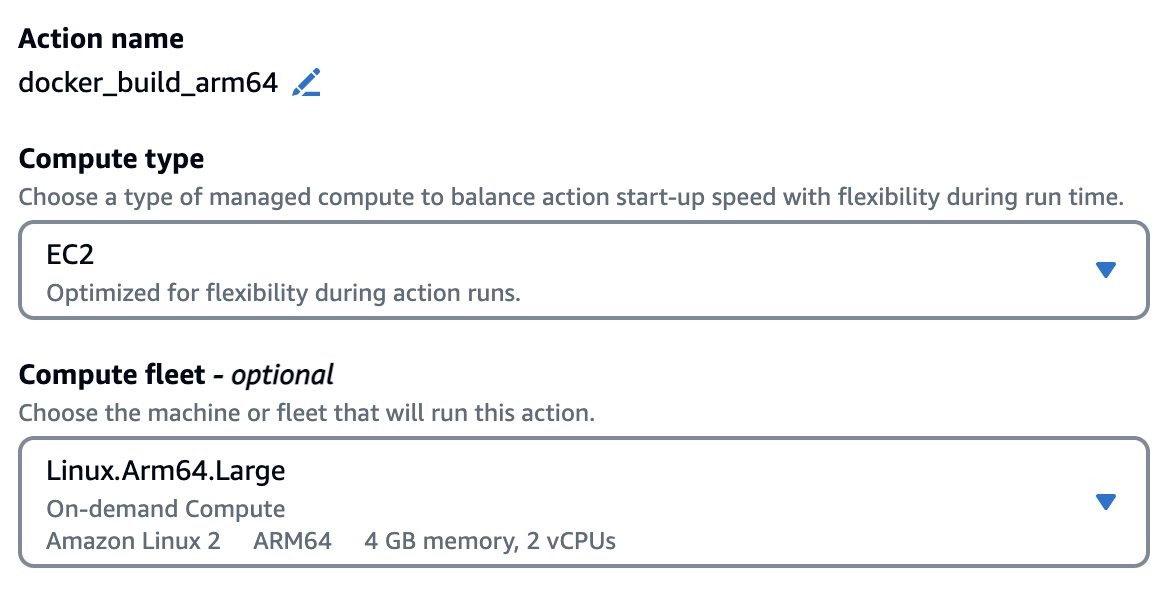
Build Action for the ARM64 Variant
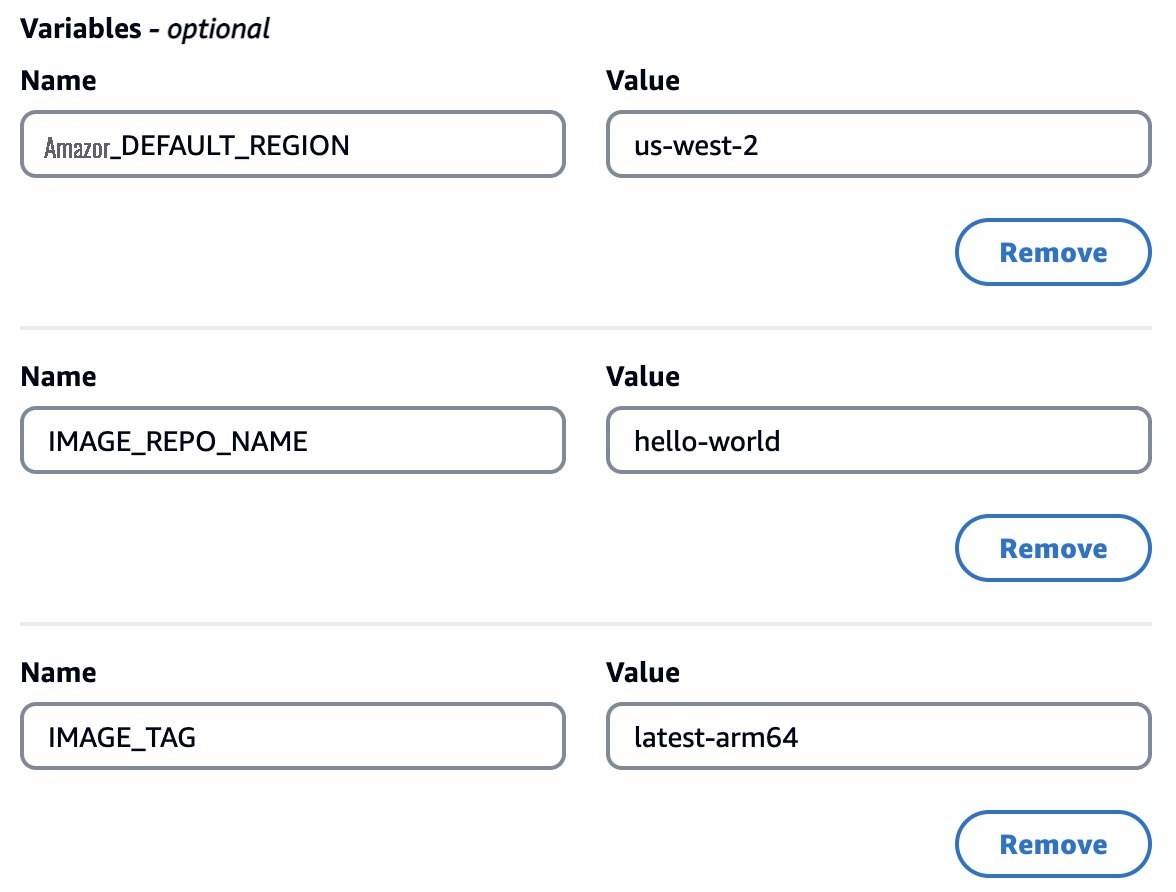
Add a second build action named docker_build_arm64 for the arm64 container. The configuration is nearly identical to the previous action with two minor changes. First, on the Inputs tab, I set the IMAGE_TAG to latest-arm64 .
Second, on the Configuration tab, change the compute fleet to Linux.Arm64.Large. That is all you need to do to run your action on Amazon Web Services Graviton. For example:
The Shell commands are identical to the arm64 build action. In addition, don’t forget to select the Environment , Amazon Web Services account connection , and Role on the configuration tab. The complete configuration for the second action looks like this:
  docker_build_arm64:
    Identifier: aws/build@v1
    Compute:
      Type: EC2
      Fleet: Linux.Arm64.Large
    Inputs:
      Sources:
        - WorkflowSource
      Variables:
        - Name: AWS_DEFAULT_REGION
          Value: us-west-2
        - Name: IMAGE_REPO_NAME
          Value: hello-world
        - Name: IMAGE_TAG
          Value: latest-arm64
    Environment:
      Name: demo
      Connections:
        - Role: CodeCatalystPreviewDevelopmentAdministrator
          Name: development
    Configuration:
      Steps:
        - Run: AWS_ACCOUNT_ID=`aws sts get-caller-identity --query "Account" --output text`
        - Run: docker build -t $AWS_ACCOUNT_ID.dkr.ecr.$AWS_DEFAULT_REGION.amazonaws.com/$IMAGE_REPO_NAME:$IMAGE_TAG .
        - Run: aws ecr get-login-password | docker login --username AWS --password-stdin $AWS_ACCOUNT_ID.dkr.ecr.$AWS_DEFAULT_REGION.amazonaws.com
        - Run: docker push $AWS_ACCOUNT_ID.dkr.ecr.$AWS_DEFAULT_REGION.amazonaws.com/$IMAGE_REPO_NAME:$IMAGE_TAG
Now that you have a build action for the amd64 and arm64 images, you simply need to create a manifest file describing which image to use for each architecture.
Build Action for the Manifest
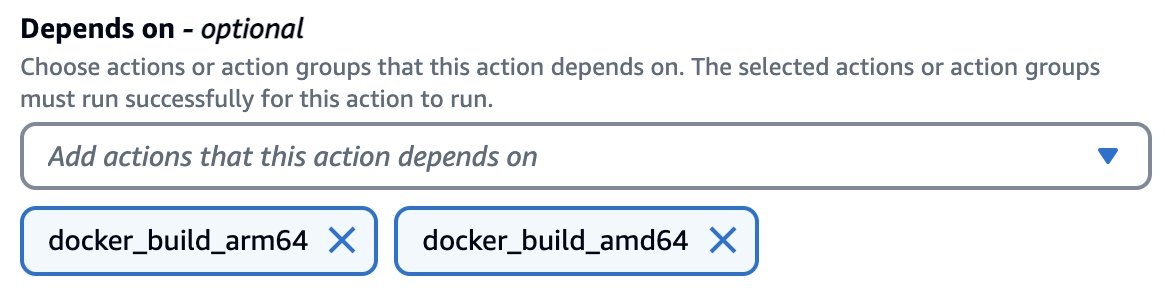
The final step in the workflow is to create the Docker manifest. Create a third build action named docker_manifest . You want this action to wait for the prior two actions to complete. Therefore, select the prior two actions from the Depends on drop down, like this:
Also configure four variables. A WS_DEFAULT_REGION and IMAGE_REPO_NAME are identical to the prior actions. In addition, IMAGE_TAG_AMD64 and IMAGE_TAG_ARM64 include the tags you created in the prior actions.

On the configuration tab, select the Environment , Amazon Web Services account connection , and Role as you did in the prior actions. Then, copy and paste the following Shell commands .
- Run: AWS_ACCOUNT_ID=`aws sts get-caller-identity --query "Account" --output text`
- Run: aws ecr get-login-password | docker login --username AWS --password-stdin $AWS_ACCOUNT_ID.dkr.ecr.$AWS_DEFAULT_REGION.amazonaws.com
- Run: docker manifest create $AWS_ACCOUNT_ID.dkr.ecr.$AWS_DEFAULT_REGION.amazonaws.com/$IMAGE_REPO_NAME $AWS_ACCOUNT_ID.dkr.ecr.$AWS_DEFAULT_REGION.amazonaws.com/$IMAGE_REPO_NAME:$IMAGE_TAG_ARM64 $AWS_ACCOUNT_ID.dkr.ecr.$AWS_DEFAULT_REGION.amazonaws.com/$IMAGE_REPO_NAME:$IMAGE_TAG_AMD64
- Run: docker manifest annotate --arch amd64 $AWS_ACCOUNT_ID.dkr.ecr.$AWS_DEFAULT_REGION.amazonaws.com/$IMAGE_REPO_NAME $AWS_ACCOUNT_ID.dkr.ecr.$AWS_DEFAULT_REGION.amazonaws.com/$IMAGE_REPO_NAME:$IMAGE_TAG_AMD64
- Run: docker manifest annotate --arch arm64 $AWS_ACCOUNT_ID.dkr.ecr.$AWS_DEFAULT_REGION.amazonaws.com/$IMAGE_REPO_NAME $AWS_ACCOUNT_ID.dkr.ecr.$AWS_DEFAULT_REGION.amazonaws.com/$IMAGE_REPO_NAME:$IMAGE_TAG_ARM64
- Run: docker manifest push $AWS_ACCOUNT_ID.dkr.ecr.$AWS_DEFAULT_REGION.amazonaws.com/$IMAGE_REPO_NAME
The shell commands create a manifest and then annotate it with the correct image for both amd64 and arm64. The final action looks like this.
  docker_manifest:
    Identifier: aws/build@v1
    DependsOn:
      - docker_build_arm64
      - docker_build_amd64
    Compute:
      Type: EC2
    Inputs:
      Sources:
        - WorkflowSource
      Variables:
        - Name: AWS_DEFAULT_REGION
          Value: us-west-2
        - Name: IMAGE_REPO_NAME
          Value: hello-world
        - Name: IMAGE_TAG_AMD64
          Value: latest-amd64
        - Name: IMAGE_TAG_ARM64
          Value: latest-arm64
    Environment:
      Name: demo
      Connections:
        - Role: CodeCatalystPreviewDevelopmentAdministrator
          Name: development
    Configuration:
      Steps:
        - Run: AWS_ACCOUNT_ID=`aws sts get-caller-identity --query "Account" --output
            text`
        - Run: aws ecr get-login-password | docker login --username AWS
            --password-stdin $AWS_ACCOUNT_ID.dkr.ecr.$AWS_DEFAULT_REGION.amazonaws.com
        - Run: docker manifest create
            $AWS_ACCOUNT_ID.dkr.ecr.$AWS_DEFAULT_REGION.amazonaws.com/$IMAGE_REPO_NAME
            $AWS_ACCOUNT_ID.dkr.ecr.$AWS_DEFAULT_REGION.amazonaws.com/$IMAGE_REPO_NAME:$IMAGE_TAG_ARM64
            $AWS_ACCOUNT_ID.dkr.ecr.$AWS_DEFAULT_REGION.amazonaws.com/$IMAGE_REPO_NAME:$IMAGE_TAG_AMD64
        - Run: docker manifest annotate --arch amd64
            $AWS_ACCOUNT_ID.dkr.ecr.$AWS_DEFAULT_REGION.amazonaws.com/$IMAGE_REPO_NAME
            $AWS_ACCOUNT_ID.dkr.ecr.$AWS_DEFAULT_REGION.amazonaws.com/$IMAGE_REPO_NAME:$IMAGE_TAG_AMD64
        - Run: docker manifest annotate --arch arm64
            $AWS_ACCOUNT_ID.dkr.ecr.$AWS_DEFAULT_REGION.amazonaws.com/$IMAGE_REPO_NAME
            $AWS_ACCOUNT_ID.dkr.ecr.$AWS_DEFAULT_REGION.amazonaws.com/$IMAGE_REPO_NAME:$IMAGE_TAG_ARM64
        - Run: docker manifest push
            $AWS_ACCOUNT_ID.dkr.ecr.$AWS_DEFAULT_REGION.amazonaws.com/$IMAGE_REPO_NAME
I now have a complete CI/CD workflow that creates a container images for both amd64 and arm64. When I commit the changes, CodeCatalyst will execute my workflow, build the images, and push to ECR.
Cleanup
If you have been following along with this workflow, you should delete the resources you deployed so you do not continue to incur charges. First, delete the Amazon ECR repository using the Amazon Web Services console. Second, delete the project from CodeCatalyst by navigating to Project settings and choosing Delete project.
Conclusion
Amazon Web Services Graviton processors are custom-built by Amazon Web Services to deliver the best price performance for cloud workloads. In this post I explained how to configure CodeCatalyst workflow actions to run on Amazon Web Services Graviton. I used CodeCatalyst to create a workflow that builds a multi-architecture container image that can run on both amd64 and arm64 architectures. Get started building your multi-arch containers in
The mentioned AWS GenAI Services service names relating to generative AI are only available or previewed in the Global Regions. Amazon Web Services China promotes AWS GenAI Services relating to generative AI solely for China-to-global business purposes and/or advanced technology introduction.