We use machine learning technology to do auto-translation. Click "English" on top navigation bar to check Chinese version.
Migrating Amazon Web Services Direct Connect to a new location
As new
Design considerations and best practices
-
Review the list of
Direct Connect locations to select your new location. -
Make sure that during the transition to the new location you have redundant network connectivity in line with the
Amazon Web Services Direct Connect resiliency recommendations and best practices . - Make sure you test the traffic over the new Direct Connect setup before switching production traffic to it.
-
Use BGP attributes for traffic engineering and setup an
active/passive BGP connection over Direct Connect to move the traffic between the existing and new Direct Connect connections. - Switch to the new Direct Connect connection during an agreed maintenance window.
Overview of the migration process
Migrating Direct Connect connections to a new location involves:
- Ordering a Direct Connect connection at a new location
- Configuring VIFs and on-premises devices
- Testing failover to confirm traffic flow over the new connection
- Shifting the traffic over to the new connection
- Decommissioning the old connection.
Our example in this post is moving a network connection from a location in Sydney, Australia to one in Auckland, New Zealand. However, the same steps apply to moving any Direct Connect connection, regardless of location and Amazon Web Services Region.
Migration process step-by-step
At the start of our migration project, we have two Direct Connect connections at two separate Direct Connect locations, both in Sydney. In the following diagram (figure 1), we show the primary connection at an Equinix Direct Connect location using a solid blue line on the left side. The secondary connection to the NextDC Direct Connect location in Sydney is shown on the right with a dotted purple line.
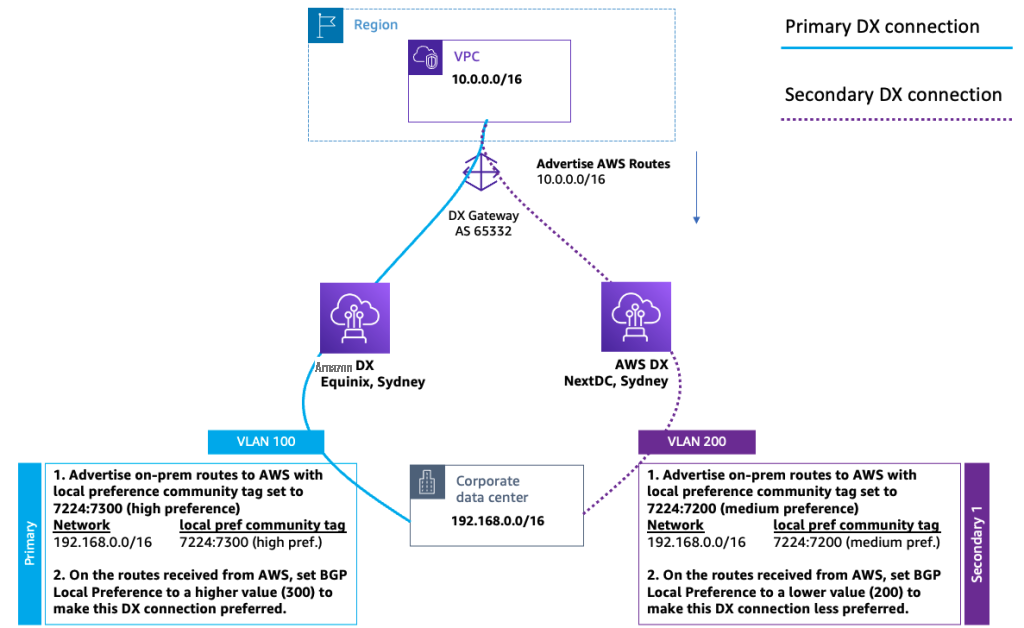
Figure 1: Starting State: Two Direct Connect connections at two Direct Connect locations
The primary connection is preferred for outbound traffic (on-premises network to Amazon Web Services) because the Local Preference on the routes (received from Amazon Web Services) has been set to a higher value (300) as compared to secondary connection (Local Preference is set to 200).
The primary connection is also preferred for inbound traffic (Amazon Web Services to the on-premises network) because we’re advertising on-premises routes to Amazon Web Services with local preference BGP community tag set to 7224:7300 (high preference). While on the secondary connection, we’re advertising on-premises routes to Amazon Web Services with local preference BGP community tag set to 7224:7200 (medium preference).
If you want more details on how to use BGP attributes to influence traffic over multiple Direct Connect connections, the knowledge center article
Step 1: Setup a third Direct Connect connection at a new Direct Connect location
First, you must establish a new dedicated or hosted Direct Connect connection at the new Direct Connect location using the steps described on the
Once the new Direct Connect connection is available in your
Complete the BGP configuration on your on-premises router to advertise and receive appropriate routes to test connectivity. Once the BGP status is showing “up” for this test VIF, use ping to verify that you can connect to the EC2 instance hosted inside your test VPC.
Now that you have confirmed that you can reach Amazon Web Services from your on-premises network, you can delete this test VIF. Next, we’ll create a new VIF over this new Direct Connect connection for carrying your actual workload traffic.
Step 2: Setup virtual interfaces (VIF) on the new Direct Connect connection
We strongly recommend that you perform the subsequent steps during an agreed maintenance window.
Create a new VIF of the same type that you have on your primary and secondary Direct Connect connection. If your primary and secondary connections are terminated on a Direct Connect Gateway, terminate new VIF on the same Direct Connect Gateway.
Next use the following traffic engineering techniques to keep the new connection in standby. You can use BGP attributes to make sure production traffic is not sent to the new Direct Connect connection (represented in dashed black line in figure 2).
-
Traffic from your on-premises network to Amazon Web Services
The route with the higherLocal Preference value is preferred. Therefore, set the Local Preference for the routes received from Amazon Web Services to a value that is lower (100) than the other two connections. -
Traffic from Amazon Web Services to your on-premises network
To keep the new Direct Connect connection in standby mode, apply a local preference community tag with a lower preference (7224:7100) to all on-premises routes you are advertising to Amazon Web Services. This ensure that any traffic originating from Amazon Web Services continues to prefer existing Direct Connect connections.
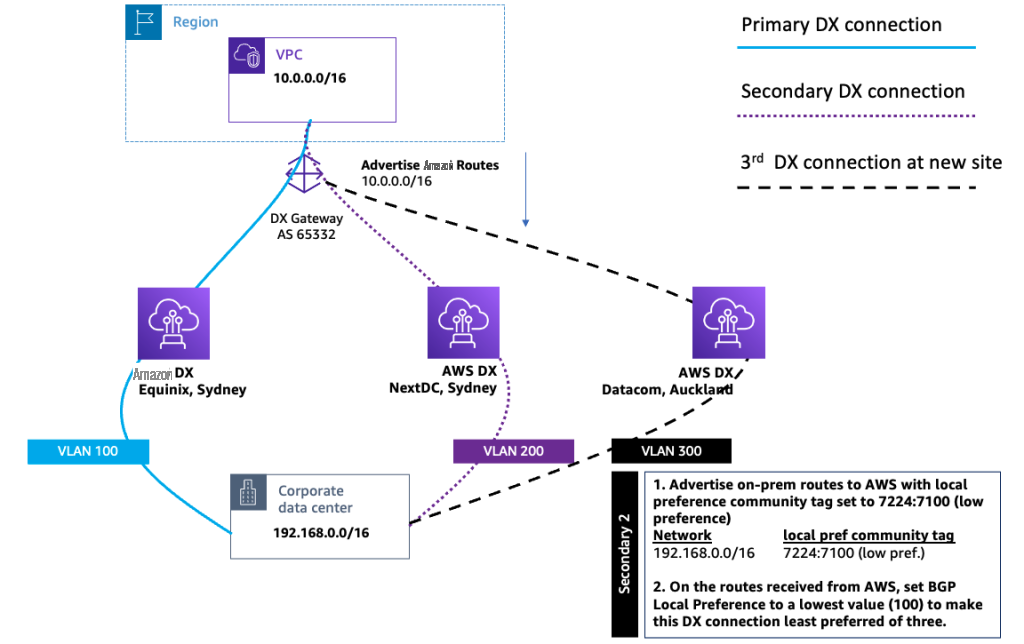
Figure 2: Create a third Direct Connect connection at a new Direct Connect location
At this stage, your Direct Connect setup should look as described in figure 2.
Step 3: Failover testing to test traffic over new VIFs
Follow the instructions on
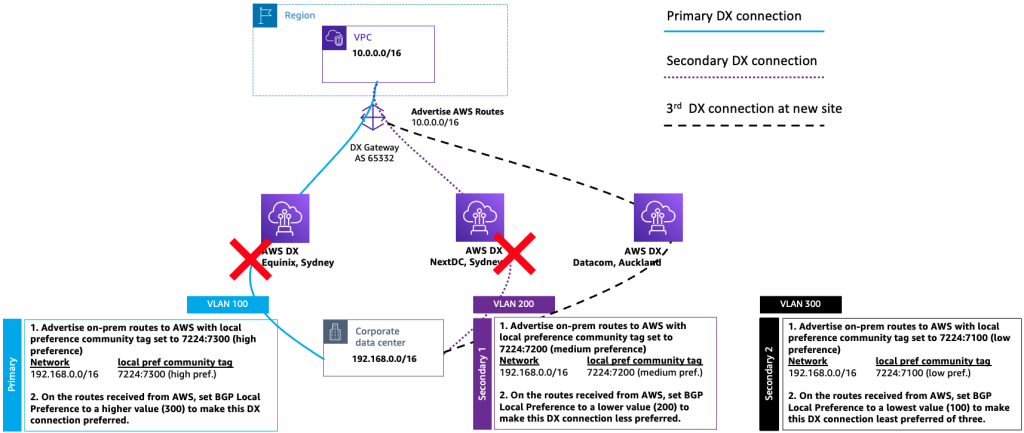
Figure 3: Direct Connect failover test to force traffic over new connection
Test your workloads on the new Direct Connect connection to make sure they’re working as intended and meeting your performance requirements. If you encounter a problem, you can stop the test immediately to bring up BGP peering sessions on the VIFs associated with primary and secondary Direct Connect connections and reinstate the flow of traffic in its original state.
Step 4: Decommission your old Direct Connect connection
Once you are confident the new Direct Connect connection meets your requirements, you can decommission one of the two old Direct Connect connections. In the following example, we have decommissioned the secondary Direct Connect connection (highlighted in figure 3 above in dotted purple color). After decommissioning of secondary Direct Connect connection, setup will look like as described in figure 4.
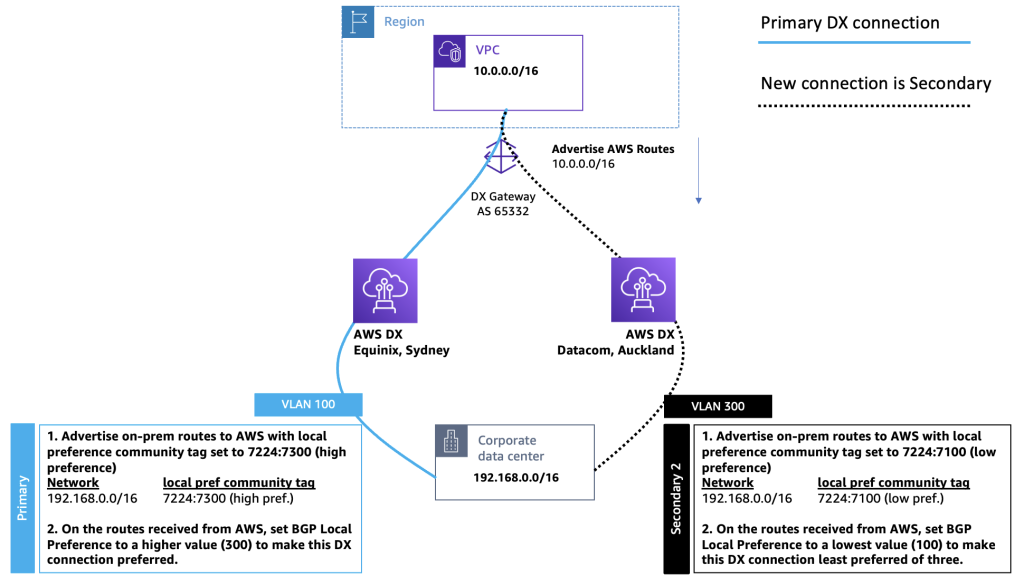
Figure 4: Direct Connect setup after decommissioning of secondary connection
To decommission Direct Connect connection, first delete the VIFs and then delete the Direct Connect connection from your Amazon Web Services Management Console. Work with your Direct Connect partner for the removal of physical circuits and the associated hardware.
Step 5: Swap primary and secondary connection
You may wish to use the new Direct Connect connection as the primary connection. To swap the primary and secondary connection, you can use the traffic engineering approach described in Step 2 using local preference community tags and local preference attribute to engineer the traffic flow as per your requirements. This is shown in the following diagram (figure 5).
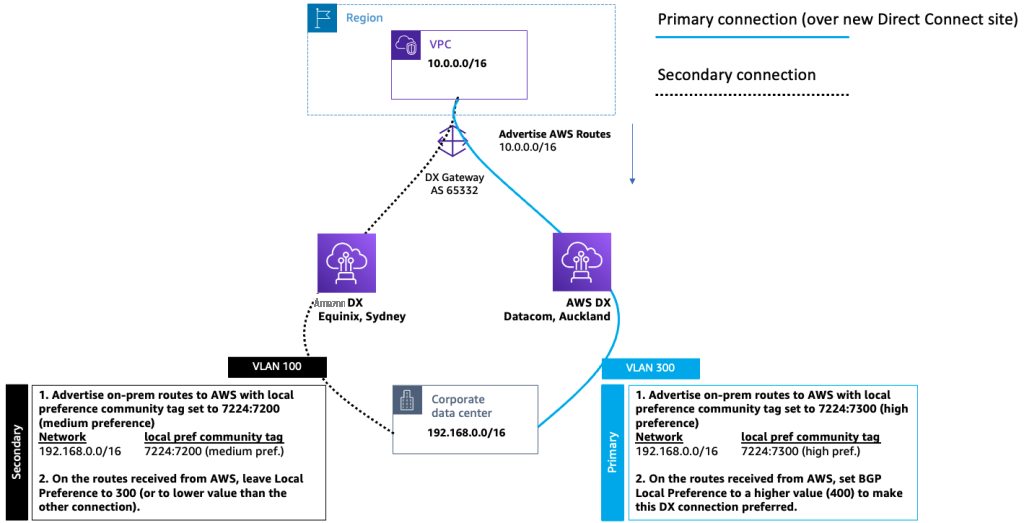
Figure 5: Final setup after interchanging primary and secondary Direct Connect connections
Conclusion
As new
About the author

Ratan Kumar
Ratan Kumar is a Principal Solutions Architect at Amazon Web Services. A trusted technology advisor with over 20 years of experience working across a range of industry domains, Ratan’s passion lies in empowering enterprise customers innovate and transform their business by unlocking the potential of Amazon Web Services cloud.
The mentioned AWS GenAI Services service names relating to generative AI are only available or previewed in the Global Regions. Amazon Web Services China promotes AWS GenAI Services relating to generative AI solely for China-to-global business purposes and/or advanced technology introduction.