Introduction
In November 2021, Amazon Web Services introduced
Karpenter
, an open-source high-performance Kubernetes Cluster Autoscaler licensed under the
Apache License 2.0
. Karpenter helps improve your application availability and cluster efficiency by rapidly launching right-sized compute resources in response to changing application load. Since its release, we’ve been seeing an increase in customers migrating from
Kubernetes Cluster Autoscaler
to Karpenter. However, for customers running a heterogeneous Amazon Elastic Kubernetes Service (
Amazon EKS
) cluster with Windows workloads, it became a showstopper as Karpenter didn’t support Windows nodes, until now.
The OSS
community
did a great job starting development on Windows workloads in Karpenter. The Amazon Web Services team took it a step further to review the proposed design, add enhancements to improve the customer experience, and integrate it with our internal continuous integration (CI) process.
When Karpenter is installed in your cluster, it observes the aggregate resource requests of unscheduled pods and decides to launch new nodes when additional capacity is needed, while deciding to deprovision nodes when that capacity is no longer needed. By doing this, Karpenter reduces the scheduling latencies and infrastructure costs of your cluster.
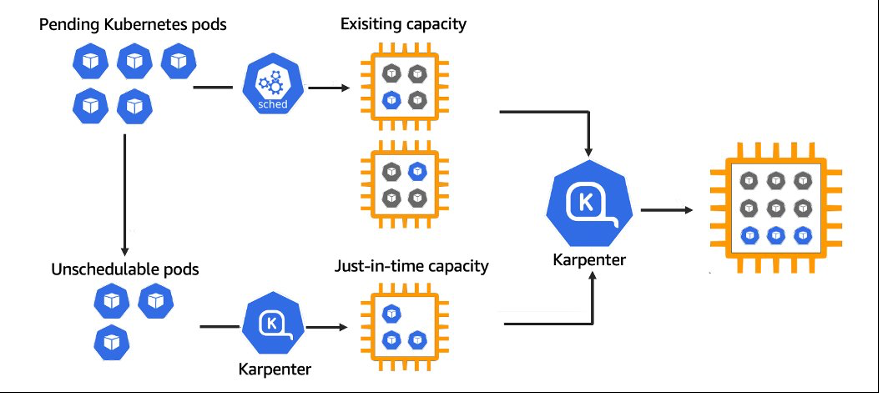
Figure 1: Karpenter high-level scheduling
In this post, we focus on scaling out/in Windows Server 2019 and Windows Server 2022 using Karpenter for Amazon EKS. To learn more about Karpenter architecture and components, access the Karpenter website.
Prerequisites
-
Ensure you are running eksctl commands with an Amazon Web Services Identify and Access Management (
Amazon Web Services IAM)
profile that has permissions to create and manage
Amazon EKS
. This Amazon Web Services IAM security principal is used in the Getting Started section below for the Amazon Web Services Command Line Interface (
Amazon Web Services CLI
) configuration.
-
Ensure you are using
eksctl v0.124.0
or higher to operate Karpenter.
-
Follow the
Getting Started section in the Amazon EKS documentation
to install
aws cli
,
kubectl
, and
eksctl
on your development machine.
-
Alternatively, you could leverage
Cloud9
or
Cloudshell
to handle deployment and maintenance tasks.
Solution overview
-
Create OS variables to be used throughout the post.
-
Deploy Karpenter service requirements.
-
Create an Amazon EKS cluster with the necessary iamIdentityMappings for Karpenter.
-
Enable Amazon EKS Windows support.
-
Install Karpenter with Helm.
-
Create Karpenter provisioner and NodeTemplate.
-
Test Karpenter for Windows – scale out.
-
Test Karpenter for Windows – scale in.
-
Cleanup test resources.
Walkthrough
1. Create OS variables to be used throughout the post
export KARPENTER_VERSION=v0-c990a2d9fb10c1bfeffd5c6af64bf8575536d67e
export AWS_PARTITION="aws"
export CLUSTER_NAME="windows-karpenter-demo"
export AWS_DEFAULT_REGION="us-west-2"
export AWS_ACCOUNT_ID="$(aws sts get-caller-identity --query Account --output text)"
export TEMPOUT=$(mktemp)
2. Create Karpenter service requirements
Karpenter directly integrates with the Amazon Elastic Compute Cloud (
Amazon EC2
) API endpoint to take specific actions based on events such as spot interruption or instance state changes. The following command automatically deploys the necessary Amazon Web Services services/components such as
Amazon EventBridge
rules applied to messages being sent over an Amazon SQS queue using
Amazon Web Services CloudFormation
.
curl -fsSL https://karpenter.sh/v0.29/getting-started/getting-started-with-karpenter/cloudformation.yaml  > $TEMPOUT \
&& aws cloudformation deploy \
  --stack-name "Karpenter-${CLUSTER_NAME}" \
  --template-file "${TEMPOUT}" \
  --capabilities CAPABILITY_NAMED_IAM \
  --parameter-overrides "ClusterName=${CLUSTER_NAME}"
Upon successful execution of the
Amazon Web Services CloudFormation template
, you’ll be presented with the following output:
Waiting for changeset to be created..
Waiting for stack create/update to complete
Successfully created/updated stack - Karpenter-windows-karpenter-demo
3. Create an Amazon EKS cluster with the necessary iamIdentityMappings for Karpenter
Next, we deploy a temporary Amazon EKS cluster using
eksctl
in order to test Karpenter integration with Windows. The necessary Amazon Web Services IAM and IdentityMapping are created as ServiceAccounts and added to the Kubernetes ConfigMap.
eksctl create cluster -f - <<EOF
---
apiVersion: eksctl.io/v1alpha5
kind: ClusterConfig
metadata:
  name: ${CLUSTER_NAME}
  region: ${AWS_DEFAULT_REGION}
  version: "1.27"
  tags:
    karpenter.sh/discovery: ${CLUSTER_NAME}

iam:
  withOIDC: true
  serviceAccounts:
  - metadata:
      name: karpenter
      namespace: karpenter
    roleName: ${CLUSTER_NAME}-karpenter
    attachPolicyARNs:
    - arn:${AWS_PARTITION}:iam::${AWS_ACCOUNT_ID}:policy/KarpenterControllerPolicy-${CLUSTER_NAME}
    roleOnly: true

iamIdentityMappings:
- arn: "arn:${AWS_PARTITION}:iam::${AWS_ACCOUNT_ID}:role/KarpenterNodeRole-${CLUSTER_NAME}"
  username: system:node:{{EC2PrivateDNSName}}
  groups:
  - system:bootstrappers
  - system:nodes

managedNodeGroups:
- instanceType: m5.large
  amiFamily: AmazonLinux2
  name: ${CLUSTER_NAME}-linux-ng
  desiredCapacity: 2
  minSize: 1
  maxSize: 10
EOF

export CLUSTER_ENDPOINT="$(aws eks describe-cluster --name ${CLUSTER_NAME} --query "cluster.endpoint" --output text)"
export KARPENTER_IAM_ROLE_ARN="arn:${AWS_PARTITION}:iam::${AWS_ACCOUNT_ID}:role/${CLUSTER_NAME}-karpenter"
echo $CLUSTER_ENDPOINT $KARPENTER_IAM_ROLE_ARN
eksctl uses Amazon Web Services CloudFormation to create all the necessary resources to build an Amazon EKS cluster. Upon successful creation of your cluster, you’ll be presented with a similar output. If the cluster creation fails, then the failure reason is provided in the Amazon Web Services CLI output (or Amazon Web Services CloudFormation console).
2023-06-14 06:20:19 [✔]  all EKS cluster resources for "windows-karpenter-demo" have been created
2023-06-14 06:20:19 [ℹ]  nodegroup "windows-karpenter-demo-linux-ng" has 2 node(s)
2023-06-14 06:20:19 [ℹ]  node "ip-192-168-12-160.ec2.internal" is ready
2023-06-14 06:20:19 [ℹ]  node "ip-192-168-53-156.ec2.internal" is ready
2023-06-14 06:20:19 [ℹ]  waiting for at least 1 node(s) to become ready in "windows-karpenter-demo-linux-ng"
2023-06-14 06:20:19 [ℹ]  nodegroup "windows-karpenter-demo-linux-ng" has 2 node(s)
2023-06-14 06:20:19 [ℹ]  node "ip-192-168-12-160.ec2.internal" is ready
2023-06-14 06:20:19 [ℹ]  node "ip-192-168-53-156.ec2.internal" is ready
2023-06-14 06:20:20 [ℹ]  kubectl command should work with "/Users/bpfeiff/.kube/config", try 'kubectl get nodes'
2023-06-14 06:20:20 [✔]  EKS cluster "windows-karpenter-demo" in "us-east-1" region is ready
4. Enable Amazon EKS Windows support
To deploy Windows nodes to our cluster, we need to enable
Amazon EKS Windows support
.
kubectl apply -f - <<EOF
---
apiVersion: v1
kind: ConfigMap
metadata:
  name: amazon-vpc-cni
  namespace: kube-system
data:
  enable-windows-ipam: "true"
EOF
5. Install Karpenter with Helm
Next, we will use
Helm
to install Karpenter.
# Logout of helm registry to perform an unauthenticated pull against the public ECR
helm registry logout public.ecr.aws

helm upgrade --install karpenter oci://public.ecr.aws/karpenter/karpenter --version ${KARPENTER_VERSION} --namespace karpenter --create-namespace \
  --set serviceAccount.annotations."eks\.amazonaws\.com/role-arn"=${KARPENTER_IAM_ROLE_ARN} \
  --set settings.aws.clusterName=${CLUSTER_NAME} \
  --set settings.aws.defaultInstanceProfile=KarpenterNodeInstanceProfile-${CLUSTER_NAME} \
  --set settings.aws.interruptionQueueName=${CLUSTER_NAME} \
  --set controller.resources.requests.cpu=1 \
  --set controller.resources.requests.memory=1Gi \
  --set controller.resources.limits.cpu=1 \
  --set controller.resources.limits.memory=1Gi \
  --wait
Upon successful installation, you‘ll see the following output.
Release "karpenter" does not exist. Installing it now.
Pulled: public.ecr.aws/karpenter/karpenter:v0-c990a2d9fb10c1bfeffd5c6af64bf8575536d67e
Digest: sha256:33e2597488e3359653515bb7bd43a4ed6c1e811cb95c261175f8808a9ea4fc97
NAME: karpenter
LAST DEPLOYED: Wed Jun 14 08:16:36 2023
NAMESPACE: karpenter
STATUS: deployed
REVISION: 1
TEST SUITE: None
6. Create provisioner as required
Now we create two Karpenter
provisioners
to support Windows Server 2019 and Windows Server 2022 in the same Amazon EKS cluster. The Karpenter provisioner sets constraints on the nodes that can be created by Karpenter and the pods that can run on those nodes.
cat <<EOF | kubectl apply -f -
apiVersion: karpenter.sh/v1alpha5
kind: Provisioner
metadata:
  name: windows2019
spec:
  requirements:
    - key: karpenter.sh/capacity-type
      operator: In
      values: ["on-demand"]
    - key: kubernetes.io/os
      operator: In
      values: ["windows"]
  limits:
    resources:
      cpu: 1000
  providerRef:
    name: windows2019
  ttlSecondsAfterEmpty: 30
---
apiVersion: karpenter.k8s.aws/v1alpha1
kind: AWSNodeTemplate
metadata:
  name: windows2019
spec:
  subnetSelector:
    karpenter.sh/discovery: ${CLUSTER_NAME}
  securityGroupSelector:
    karpenter.sh/discovery: ${CLUSTER_NAME}
  amiFamily: Windows2019
  metadataOptions:
    httpEndpoint: enabled
    httpProtocolIPv6: disabled
    httpPutResponseHopLimit: 2
    httpTokens: required
---
apiVersion: karpenter.sh/v1alpha5
kind: Provisioner
metadata:
  name: windows2022
spec:
  requirements:
    - key: karpenter.sh/capacity-type
      operator: In
      values: ["on-demand"]
    - key: kubernetes.io/os
      operator: In
      values: ["windows"]
  limits:
    resources:
      cpu: 1000
  providerRef:
    name: windows2022
  ttlSecondsAfterEmpty: 30
---
apiVersion: karpenter.k8s.aws/v1alpha1
kind: AWSNodeTemplate
metadata:
  name: windows2022
spec:
  subnetSelector:
    karpenter.sh/discovery: ${CLUSTER_NAME}
  securityGroupSelector:
    karpenter.sh/discovery: ${CLUSTER_NAME}
  amiFamily: Windows2022
  metadataOptions:
    httpEndpoint: enabled
    httpProtocolIPv6: disabled
    httpPutResponseHopLimit: 2
    httpTokens: required
EOF
7. Scale out the deployment
We now have our Amazon EKS cluster prepped for running Windows nodes and all the necessary components of Karpenter. We scale a sample application to see Karpenter automatically add nodes to the Amazon EKS cluster based on demand.
7.1 Run the following code to create your Windows Server 2022 sample application.
cat <<EOF | kubectl apply -f -
apiVersion: apps/v1
kind: Deployment
metadata:
  name: windows-server-iis-simple-2022
spec:
  selector:
    matchLabels:
      app: windows-server-iis-simple-2022
      tier: backend
      track: stable
  replicas: 0
  template:
    metadata:
      labels:
        app: windows-server-iis-simple-2022
        tier: backend
        track: stable
    spec:
      containers:
        - name: windows-server-iis-simple-2022
          image: mcr.microsoft.com/windows/servercore/iis:windowsservercore-ltsc2022
          imagePullPolicy: IfNotPresent
          command:
            - powershell.exe
            - -command
            - while(1){sleep 2; ping -t localhost;}
      nodeSelector:
        kubernetes.io/os: windows
        node.kubernetes.io/windows-build: 10.0.20348
EOF
The Windows Server version used by each pod must match that of the node. If you want to use multiple Windows Server versions in the same cluster, then you should set additional node labels and
nodeSelector
fields. Kubernetes automatically adds a label to the Windows node, named
node.kubernetes.io/windows-build
to simplify this.
This label reflects the Windows major, minor, and build number that need to match for compatibility. Here are values used for each Windows Server version:
|
|
|
Product Name
|
Version
|
|
1
|
Windows Server 2019
|
10.0.17763
|
|
2
|
Windows Server 2022
|
10.0.20348
|
Based on the build version specified in the Pod nodeSelector, Karpenter launches new Windows nodes with the operating system accordingly. For example, if the build version is specified as
10.0.17763
, then Karpenter uses the Windows 2019 provisioner to launch Windows nodes. For more information, please refer to the
Guide for Running Windows Containers in Kubernetes
.
7.2 Run the following command to scale your Windows Server 2022 sample application.
kubectl scale deployment windows-server-iis-simple-2022 --replicas 10
7.3 You can use the Karpenter logs to track the scaling progress.
kubectl logs -f -n karpenter -l app.kubernetes.io/name=karpenter -c controller
The following output shows the Windows Server 2022 Karpenter provisioner scaling from 0 nodes to 1 to support the 10 replicas we requested be run.
2023-06-14T12:19:01.581Z        INFO    controller.machine_lifecycle    launched machine
{"commit": "c990a2d", "machine": "windows2022-4hq46", "provisioner": "windows2022",
 "provider-id": "aws:///us-east-1f/i-039507775a01898e6", "instance-type": "c6a.xlarge",
  "zone": "us-east-1f", "capacity-type": "on-demand", "allocatable": {"cpu":"3920m",
  "ephemeral-storage":"44Gi","memory":"6012Mi","pods":"110","vpc.amazonaws.com/
  PrivateIPv4Address":"14"}}
7.4 Run the following command to track the deployment progress of your pods.
kubectl rollout status deploy/windows-server-iis-simple-2022
You’ll see the 10 replicas being created on our new Karpenter provisioned Windows worker nodes.
Waiting for deployment "windows-server-iis-simple-2022" rollout to finish: 0 of 10 updated replicas are available...
Waiting for deployment "windows-server-iis-simple-2022" rollout to finish: 1 of 10 updated replicas are available...
Waiting for deployment "windows-server-iis-simple-2022" rollout to finish: 2 of 10 updated replicas are available...
Waiting for deployment "windows-server-iis-simple-2022" rollout to finish: 3 of 10 updated replicas are available...
Waiting for deployment "windows-server-iis-simple-2022" rollout to finish: 4 of 10 updated replicas are available...
Waiting for deployment "windows-server-iis-simple-2022" rollout to finish: 5 of 10 updated replicas are available...
Waiting for deployment "windows-server-iis-simple-2022" rollout to finish: 6 of 10 updated replicas are available...
Waiting for deployment "windows-server-iis-simple-2022" rollout to finish: 7 of 10 updated replicas are available...
Waiting for deployment "windows-server-iis-simple-2022" rollout to finish: 8 of 10 updated replicas are available...
Waiting for deployment "windows-server-iis-simple-2022" rollout to finish: 9 of 10 updated replicas are available...
deployment "windows-server-iis-simple-2022" successfully rolled out
7.5 Run the following code to scale out your Windows Server 2019 deployment.
cat <<EOF | kubectl apply -f -
apiVersion: apps/v1
kind: Deployment
metadata:
  name: windows-server-iis-simple-2019
spec:
  selector:
    matchLabels:
      app: windows-server-iis-simple-2019
      tier: backend
      track: stable
  replicas: 0
  template:
    metadata:
      labels:
        app: windows-server-iis-simple-2019
        tier: backend
        track: stable
    spec:
      containers:
        - name: windows-server-iis-simple-2019
          image: mcr.microsoft.com/windows/servercore/iis:windowsservercore-ltsc2019
          imagePullPolicy: IfNotPresent
          command:
            - powershell.exe
            - -command
            - while(1){sleep 2; ping -t localhost;}
      nodeSelector:
        kubernetes.io/os: windows
        node.kubernetes.io/windows-build: 10.0.17763
EOF
7.6 Run the following command to scale your Windows Server 2019 sample application.
kubectl scale deployment windows-server-iis-simple-2019 --replicas 10
A new Windows Server 2019 worker is launched by Karpenter as more pods are requested to be scheduled. This process is identical to Windows Server 2022 and you can reuse the steps above to track the progress of launching Windows Server 2019 worker node.
8. Scale in the deployment
Karpenter handles scale out and scale in of Windows nodes based on demand. We’ll now tear down our sample applications and watch Karpenter terminate our Windows nodes.
8.1 Run the following commands to delete your sample application deployments.
kubectl delete deployment windows-server-iis-simple-2022
kubectl delete deployment windows-server-iis-simple-2019
The Windows instances launched earlier by Karpenter will now be terminated. You can use the Karpenter logs to track the scale down progress.
kubectl logs -f -n karpenter -l app.kubernetes.io/name=karpenter -c controller
Once all pods have been terminated, Karpenter deletes all idle instances.
2023-06-20T16:27:12.878Z        DEBUG   controller.node added TTL to empty node {"commit": "c990a2d", "node": "ip-192-168-99-4.ec2.internal", "provisioner": "windows2022"}
2023-06-20T16:27:15.140Z        DEBUG   controller.node added TTL to empty node {"commit": "c990a2d", "node": "ip-192-168-88-252.ec2.internal", "provisioner": "windows2019"}
2023-06-20T16:27:42.051Z        INFO    controller.deprovisioning       deprovisioning via emptiness delete, terminating 1 machines ip-192-168-99-4.ec2.internal/c6a.xlarge/on-demand       {"commit": "c990a2d"}
2023-06-20T16:27:42.138Z        INFO    controller.termination  cordoned node   {"commit": "c990a2d", "node": "ip-192-168-99-4.ec2.internal"}
2023-06-20T16:27:42.478Z        INFO    controller.termination  deleted node    {"commit": "c990a2d", "node": "ip-192-168-99-4.ec2.internal"}
2023-06-20T16:27:42.751Z        INFO    controller.machine_termination  deleted machine       {"commit": "c990a2d", "machine": "windows2022-4hq46", "node": "ip-192-168-99-4.ec2.internal", "provisioner": "windows2022", "provider-id": "aws:///us-east-1f/i-039507775a01898e6"}
2023-06-20T16:27:54.105Z        INFO    controller.deprovisioning       deprovisioning via emptiness delete, terminating 1 machines ip-192-168-88-252.ec2.internal/c6a.xlarge/on-demand     {"commit": "c990a2d"}
2023-06-20T16:27:54.177Z        INFO    controller.termination  cordoned node   {"commit": "c990a2d", "node": "ip-192-168-88-252.ec2.internal"}
2023-06-20T16:27:54.480Z        INFO    controller.termination  deleted node    {"commit": "c990a2d", "node": "ip-192-168-88-252.ec2.internal"}
2023-06-20T16:27:54.754Z        INFO    controller.machine_termination  deleted machine       {"commit": "c990a2d", "machine": "windows2019-khmc5", "node": "ip-192-168-88-252.ec2.internal", "provisioner": "windows2019", "provider-id": "aws:///us-east-1a/i-0978aeb1680f37d7c"}
2023-06-20T16:31:21.596Z        DEBUG   controller.awsnodetemplate      discovered subnets    {"commit": "c990a2d", "awsnodetemplate": "windows2019", "subnets": ["subnet-05d7fed709f082b75 (us-east-1a)", "subnet-0109ebad1a6808805 (us-east-1f)", "subnet-0ff0ebe5e1a8630f1 (us-east-1a)", "subnet-0d01b14a3e9c91d1f (us-east-1f)"]}
2023-06-20T16:33:19.192Z        DEBUG   controller.deprovisioning       discovered subnets    {"commit": "c990a2d", "subnets": ["subnet-05d7fed709f082b75 (us-east-1a)", "subnet-0109ebad1a6808805 (us-east-1f)", "subnet-0ff0ebe5e1a8630f1 (us-east-1a)", "subnet-0d01b14a3e9c91d1f (us-east-1f)"]}      discovered instance types     {"commit": "c990a2d", "count": 649}
Cleaning up
When you’ve finished, clean up the resources associated with the example cluster deployment to avoid incurring unwanted charges.
eksctl delete cluster --name ${CLUSTER_NAME} --region us-west-2
If this command times out, then you can run the command above again to show the cluster has been successfully removed.
Conclusion
In this post, we showed you can leverage Karpenter to seamlessly scale out/in your Windows worker nodes on Amazon EKS. Customers no longer need to maintain two auto-scaler solutions on a heterogeneous Amazon EKS cluster with Windows and Linux nodes.
A big shout-out to
topikachu
, who proactively started the development of the add-on.