We use machine learning technology to do auto-translation. Click "English" on top navigation bar to check Chinese version.
Calculating Overall Equipment Effectiveness (OEE) with Amazon Web Services IoT SiteWise
Introduction
This blog post represents the second entry in a series on using Overall Equipment Effectiveness (OEE) with
Additionally, we will show how you can automate OEE elements to streamline the implementation of this solution in many other use cases, like manufacturing production lines in pharmaceutical, food and beverage industries. To help you put into practice the concepts presented in this blog, we also provide a code repository that lets you stream synthetic data to Amazon Web Services IoT SiteWise to create an OEE dashboard using the calculations presented here.
Use case
Before diving deep into the OEE calculations, let’s define the example we will be using as a frame of reference. Our example is a BHS and the necessary data points for an OEE calculation are gathered from the installed hardware at the BHS in the carousel. The hardware consists of four sensors: two vibration sensors for motor monitoring, one speed sensor for conveyor surveillance, and one photo electric sensor counting the baggage throughput.
The architecture of the solution is as follows:
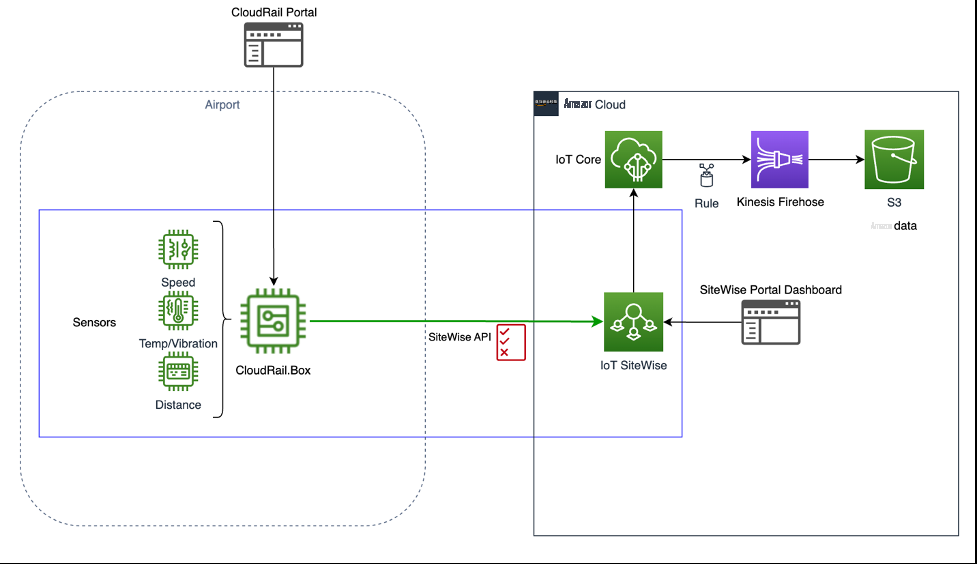
Sensor data is collected and formatted via
Amazon Web Services IoT SiteWise pre-requisites
Before sending data to Amazon Web Services IoT SiteWise, you must
Model:Carousel
Asset Name: CarouselAsset
Property {
Measurement: Photo.Distance
Measurement: Speed.PDV1
Measurement: VibrationL.Temperature
Measurement: VibrationR.Temperature
}
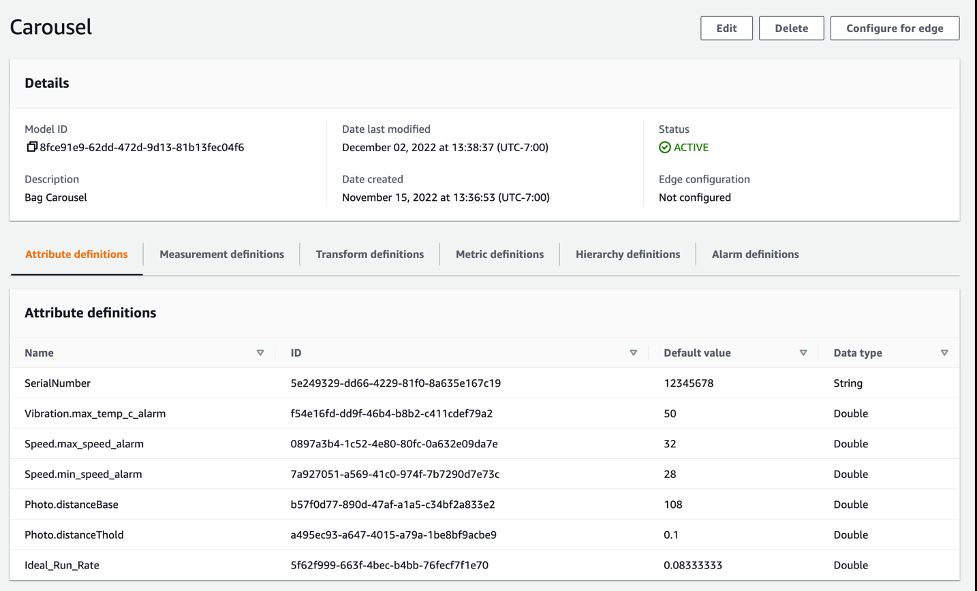
In addition to the measurements, we will add a few
Model:Carousel
Asset Name: CarouselAsset
Property {
Attribute: SerialNumber
Attribute: Photo.distanceBase
Attribute: Photo.distanceThold
Attribute: Speed.max_speed_alarm
Attribute: Speed.min_speed_alarm
Attribute: Vibration.max_temp_c_alarm
Attribute: Ideal_Run_Rate_5_min
}
Now, let’s go to the and create the Carousel model and asset that represent the airport BHS.
Open the navigation menu on the left, choose Build, Models , and then choose Create Model to define the attributes and measurements for this model:
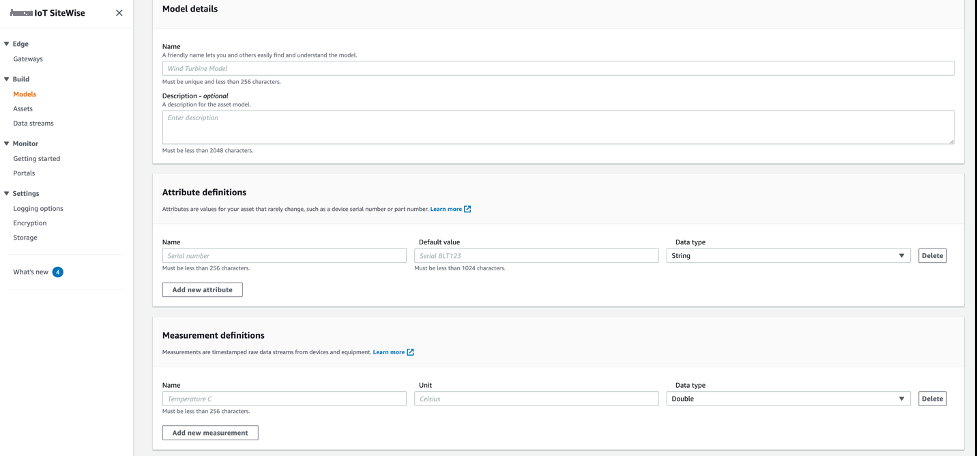
For more information on creating asset models visit the
Calculating OEE
Let’s take a look at the OEE definition and its components.
The standard OEE formula is:
| Component | Formula |
| Availability | Run_time/(Run_time + Down_time) |
| Quality | Successes / (Successes + Failures) |
| Performance | ((Successes + Failures) / Run_Time) / Ideal_Run_Rate |
| OEE | Availability * Quality * Performance |
Let’s look at the parameter definition for the BHS. For a full description of OEE parameters please visit the
- Ideal_Run_Rate: In our case, the ideal run rate is 300 bags/hour, which is equivalent to 0.83333 bags/second. This value depends on the system and should be obtained from the manufacturer or based on field observation performance.
Availability
Availability = Run_time/(Run_time + Down_time)
We have 4 sensors on the BHS and we need to define what
The acceptable values for correct operation are based on the following attributes of the Asset Model.
Vibration.max_temp_c_alarm = 50
Speed.min_speed_alarm = 28
Speed.max_speed_alarm = 32
Let’s define Equipment_State, a data
1024 – The machine is idle
1020 – A fault, like an abnormal operation of the system, high temperature or a speed value not within the normal range defined
1000 – A planned stop
1111 – A normal operation
The idle state of the BHS is not defined in this simplified use case, however, it is possible to integrate other data streams into Amazon Web Services IoT SiteWise and register information coming from Programmable Logic Controllers (PLCs) or other systems where a human operator dictates if the system is idle or not.
To add a transform, go to the model on the Amazon Web Services IoT SiteWise console and choose Edit . Scroll to the transform definitions and provide a Name, Data type (Double) and enter the following formula on the respective field:
Equipment_state =
if((Speed.PDV1>Speed.max_speed_alarm) or (Speed.PDV1<Speed.min_speed_alarm) or (VibrationL.Temperature>Vibration.max_temp_c_alarm) or (VibrationR.temperature>Vibration.max_temp_c_alarm),1020).elif(eq(Speed.PDV1,0),1000,1111)

The formula should look like this as you enter it in the console. The UI will bring suggestions for you to select attributes and measurements already defined in the model to build the formula.
![]()
Once Equipment_State is defined, create the following derived transforms to capture the different states of the BHS. Transforms can reference other transforms.
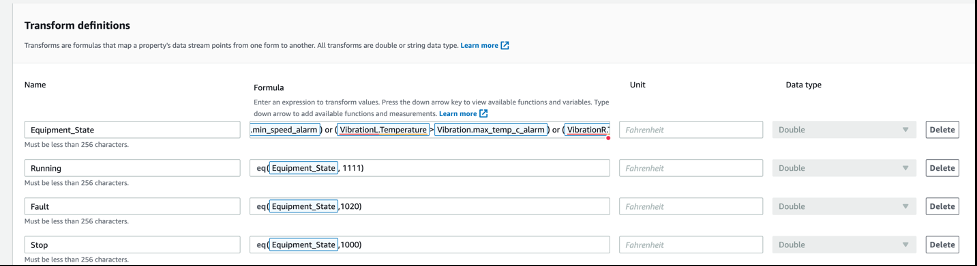
Proceed to define the following
Fault_Time = statetime(Fault) – The machine’s total fault time (in seconds)
Stop_Time = statetime(Stop) – The machine’s total planned stop time (in seconds)
Run_Time = statetime(Running) – The machine’s total time (in seconds) running without issue.
Down_Time = Idle_Time + Fault_Time + Stop_Time – The machine’s total downtime
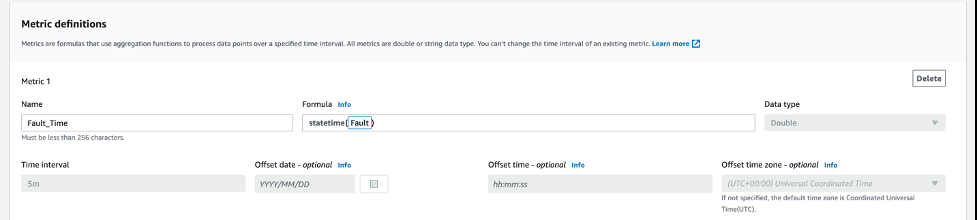
The metric definitions of the model should look like this:

Quality
Quality = Successes / (Successes + Failures)
Here, we need to define what constitutes a success and a failure. In this case our unit of production is a counted bag, so how do we define when a bag is counted successfully and when it is not? we use the measurements and data that are available from the BHS’s four sensors.
The bags are counted by looking at the distance the photo electric sensor is providing, therefore when there is an object passing the band, the sensor will report a distance that is less that the “base” distance. This is a simple way to calculate the bags passing, but at the same time it is prone to multiple conditions that can impact the accuracy of the measurement.
We use these model attributes on the quality calculation:
Photo.distanceBase = 108
Photo.distanceThold = 0.1
The Photo.distanceBase is the distance reported by the sensor, when there are no objects in front of it. This value might need to be calibrated on a regular basis and adjusted, factors like vibration and misalignment can lead to false positive counts.
Photo.distanceThold is used for defining a threshold for how sensitive is the sensor, in order to avoid counting debris or small objects (like bag attachments or belts) as a regular bag.
We then establish two transforms for bag count:
Bag_Count = if(Photo.Distance < Photo.distanceBase,1,0)
Dubious_Bag_Count = if((gt(Photo.Distance,Photo.distanceBase*(1-Photo.distanceThold)) and lt(Photo.Distance,Photo.distanceBase*0.95)) or (Speed.PDV1>Speed.max_speed_alarm) or (Photo.Distance>Photo.distanceBase),1,0)
![]()
Bag_count will account for all bags passing in front of the photo electric sensor, and Dubious_Bag_Count will count the objects detected as bags under two abnormal conditions:
- The distance detected is within the range of 95% and 90% of the base distance; accounting for small objects and very small variations in the measurements, indications of changes due to vibration or a sensor not properly attached.
- Bags counted when the speed of the carousel is above the limit defined; under this condition the sensor can miss counting bags that are too close together on the carousel.
NOTE: the above conditions are simple rules and the right values for distance base and thresholds need to be reviewed and analyzed with field data for better results.
Let’s define successes and failures as metrics:
Successes = sum(Bag_Count) – sum(Dubious_Bag_Count)
Failures = sum(Dubious_Bag_Count)
Finally we can define OEE Availability as a metric as well:
Quality = Successes / (Successes + Failures)
Remember to use the same metric interval as in all other metric definitions.
Performance
Performance = ((Successes + Failures) / Run_Time) / Ideal_Run_Rate
We have Successes and Failures from our Quality calculation, as well as Run_Time from Availability. Therefore, we just need to use the Ideal_Run_Rate_5_min, which in our system is 300 bags/hour = 0.0833333 bags/second.
OEE Value
Having Availability, Quality, and Performance we proceed to define our last metric for OEE.
OEE = Availability * Quality * Performance
Simplify transforms and metric definitions
As an alternative, the OEE components defined as transforms and metrics can be defined programmatically instead of using the Amazon Web Services Console. This is particularly useful when there are complex formulas that involve multiple variables, like the Equipment_State and Dubious_Bag_Count transforms; also, automated solutions are less error prone than manual ones and can be configured consistently across multiple environments. Let’s take a look at how we can do it using the
First, identify the measurements and attributes property IDs that you will be referencing on the transform/metric calculation, as well as the model ID.
Then define a JSON for the metric/transform. For instance, to create a new transform to calculate the Equipment_State of the BHS we need the following attributes:
Vibration.max_temp_c_alarm
Speed.max_speed_alarm
Speed.min_speed_alarm
And the following measurements:
VibrationL.Temperature
VibrationR.Temperature
Speed.PDV1
Create a file following this structure. Remember to replace the propertyIds and save it as equipment_state.json:
{
     "name": "Equipment_State",
     "dataType": "DOUBLE",
     "type": {
       "transform": {
         "expression": "if((var_speedpdv1>var_speedmax_speed_alarm) or (var_speedpdv1<var_speedmin_speed_alarm) or (var_vibrationltemperature>var_vibrationmax_temp_c_alarm) or (var_vibrationrtemperature>var_vibrationmax_temp_c_alarm),1020).elif(eq(var_speedpdv1,0),1000,1111)",
         "variables": [
           {
             "name": "var_vibrationrtemperature",
             "value": {
               "propertyId": "b9554855-b50f-4b56-a5f2-572fbd1a8967"
             }
           },
           {
             "name": "var_vibrationltemperature",
             "value": {
               "propertyId": "e3f1c4e0-a05c-4652-b640-7e3402e8d6a1"
             }
           },
           {
             "name": "var_vibrationmax_temp_c_alarm",
             "value": {
               "propertyId": "f54e16fd-dd9f-46b4-b8b2-c411cdef79a2"
             }
           },
           {
             "name": "var_speedpdv1",
             "value": {
               "propertyId": "d17d07c7-442d-4897-911b-4b267519ae3d"
             }
           },
           {
             "name": "var_speedmin_speed_alarm",
             "value": {
               "propertyId": "7a927051-a569-41c0-974f-7b7290d7e73c"
             }
           },
           {
             "name": "var_speedmax_speed_alarm",
             "value": {
               "propertyId": "0897a3b4-1c52-4e80-80fc-0a632e09da7e"
             }
           }
         ]
       }
     }
}
The main expression is as follows:
if((var_speedpdv1>var_speedmax_speed_alarm) or (var_speedpdv1<var_speedmin_speed_alarm) or (var_vibrationltemperature>var_vibrationmax_temp_c_alarm) or (var_vibrationrtemperature>var_vibrationmax_temp_c_alarm),1020).elif(eq(var_speedpdv1,0),1000,1111)
Obtain the script
update_asset_model_sitewise.py
and more details on how to stream data to Amazon Web Services IoT SiteWise by visiting
Then, run the following script passing the model ID and the name of the file previously defined.
#python3 update_asset_model_sitewise.py --assetModelId [Asset Model ID] --property_file [JSON File defining the new property] --region [AWS Region]
After the script returns a successful response, the new property ID created can be obtained directly from the Amazon Web Services Console as described before or by using the Amazon Web Services CLI to query the updated model definition and the
#aws iotsitewise describe-asset-model --asset-model-id [model ID] | jq .'assetModelProperties[] | select(.name=="Equipment_State_API")'.idYou can then repeat the process with the other transforms and metrics in order to create all the required components for the OEE calculation.
For more information on updating an Amazon Web Services IoT SiteWise asset model please visit the
Conclusion
In this blog post, we explored how we can use sensor data from a real-life scenario to calculate OEE and get insightful information from our physical system by using Amazon Web Services IoT SiteWise native capabilities. We walked through the process of identifying the available data and we defined the elements that constitute the main OEE elements, Availability, Quality and Performance, to finally take a deep dive into the calculations and how we can automate them.
As a call to action, we invite you to take the content presented here further, applying the OEE calculation process to your own use cases, as well as using the automation tools provided to simplify and streamline the creation of data that helps monitor your industrial systems with accuracy.
In the event you don’t have available data to use, we encourage you to follow the steps outlined in this
About the Authors

Juan Aristizabal
Juan Aristizabal is a Solutions Architect at Amazon Web Services. He supports Canada West greenfield customers on their journey to the cloud. He has more than 10 years of experience working with IT transformations for companies, ranging from Data Center technologies, virtualization and cloud. On his spare time, he enjoys traveling with his family and playing with synthesizers and modular systems.

Syed Rehan
The mentioned AWS GenAI Services service names relating to generative AI are only available or previewed in the Global Regions. Amazon Web Services China promotes AWS GenAI Services relating to generative AI solely for China-to-global business purposes and/or advanced technology introduction.