We use machine learning technology to do auto-translation. Click "English" on top navigation bar to check Chinese version.
Automatically convert satellite imagery to Cloud-Optimized GeoTIFFs for hosting in Amazon S3
The sheer size of satellite imagery has long levied a heavy burden on client software seeking to render these images dynamically. Typically, customers must duplicate imagery from a central repository to their local computers. Downloading large images can take several minutes. When images are downloaded, processing speeds are also slow. The introduction of
In this post, we demonstrate how to use serverless technologies to process and store satellite imagery. Specifically, the images are converted to efficient COGs and stored in
Cloud Optimized GeoTIFF (COG)
A COG is a regular GeoTIFF but with an internal organization that enables more efficient workflows on the cloud. Users can stream only the portions of the COG that they need, resulting in faster data transfer and processing speeds. Additionally, COGs reduce data duplication. Users can access COG data without needing to copy and cache the data locally. The serverless architecture described in the following sections allows organizations to automatically convert their data to COGs.
Solution overview
To accomplish this, we cover the following steps:
-
How to build a containerized
Amazon Web Services Lambda function with the Python library rio-cogeo preinstalled that handles the translation of imagery into a COG. Amazon Web Services Lambda will be able to translate imagery <10GB in size. - The creation of the cloud infrastructure that handles automatically processing new images, converting them, and storing the outputs. The S3 bucket triggers the translation Lambda function when the S3 bucket receives an upload of satellite imagery.
- An example of how to connect a client application to these newly created COG files in Amazon S3.
Prerequisites
The following prerequisites are required before continuing with the steps below:
- IAM permissions to create Amazon S3 buckets
- Amazon Web Services Lambda permissions to read and write to S3 buckets
- IAM permissions to create ECR repositories and push Docker images to it
-
Docker installed -
Amazon Web Services Command Line Interface installed -
QGIS software installed
Walkthrough
At a high level, you’ll perform the following steps:
- Create Amazon S3 input/output buckets.
- Create Amazon Web Services Lambda container image and push to ECR.
- Deploy Amazon Web Services Lambda function using the ECR image and setup S3 trigger.
- Use COGs with QGIS software.
1. Creating Amazon S3 buckets
Most GeoTIFFs are not COGs already. To conveniently convert these images to COGs, this post deploys two S3 buckets and a Lambda function. Ultimately, users can upload their imagery to an input S3 bucket which triggers the Lambda function to convert the image to a COG and upload the result to an output S3 bucket.
Start by creating the input S3 bucket using the
2. Creating the Lambda Container Image
Next, we describe how to build the Lambda function responsible for converting input imagery to COGs. Create the handler.py, Dockerfile, and requirements.txt as follows and store in a directory such as /lambda.
# handler.py
import json
import boto3
import os
import rio_cogeo
from rio_cogeo.cogeo import cog_translate
from rio_cogeo.profiles import cog_profiles

def noncog_to_cog_tiff(input_img, output_img):
    if rio_cogeo.cog_info(input_img).COG:
        print('The input img is already a COG!')
    else:
        print('The input img is not a COG, starting conversion of input img to COG!')
        cog_translate(input_img, output_img, cog_profiles.get("lzw"))
        if rio_cogeo.cog_info(output_img).COG:
            print(f'finished converting input img to COG! The output img is saved to {output_img}')

def handler(event, context):
    print('start')
    os.mkdir('/tmp/output')

    bucket_name = event['Records'][0]['s3']['bucket']['name']
    key = event['Records'][0]['s3']['object']['key']
    obj_name = key.split('/')[-1]
    full_path = f's3://{bucket_name}/{key}'

    s3 = boto3.resource('s3')
    s3.Bucket(bucket_name).download_file(key, f'/tmp/{obj_name}')
    print(obj_name)

    noncog_to_cog_tiff(f'/tmp/{obj_name}', f'/tmp/output/{obj_name}')

    s3 = boto3.client('s3')
    s3.upload_file(f'/tmp/output/{obj_name}', bucket_name+'-output', 'cog_'+key)

    return {
        'statusCode': 200,
        'body': json.dumps(f'conversion_to_cog_finished')
    }
# Dockerfile
FROM public.ecr.aws/lambda/python:3.9
COPY requirements.txt /tmp/requirements.txt
RUN pip install -r /tmp/requirements.txt
COPY handler.py ${LAMBDA_TASK_ROOT}
CMD ["handler.handler"]
# requirements.txt
awslambdaric
boto3
rio-cogeo
In a terminal, navigate to the directory and execute
docker build -t lambda-cog-blog:latest
. After the docker image has been built, you can test it locally using the command
docker run -p 9000:8080 lambda-cog-blog:latest
.
Next, the docker image is pushed to
-
docker tag blog-test:latest <Amazon Web Services_ACCOUNT_NUMBER>.dkr.ecr.us-east-1.amazonaws.com/lambda-cog-blog:latest
-
aws ecr get-login-password --region us-east-1 | docker login --username Amazon Web Services --password-stdin <Amazon Web Services_ACCOUNT_NUMBER>.dkr.ecr.us-east-1.amazonaws.com
-
aws ecr create-repository --repository-name lambda-cog-blog --image-scanning-configuration scanOnPush=true --image-tag-mutability MUTABLE
-
docker push <Amazon Web Services_ACCOUNT_NUMBER>.dkr.ecr.us-east-1.amazonaws.com/lambda-cog-blog:latest
3. Deploying Lambda from the Amazon ECR Image
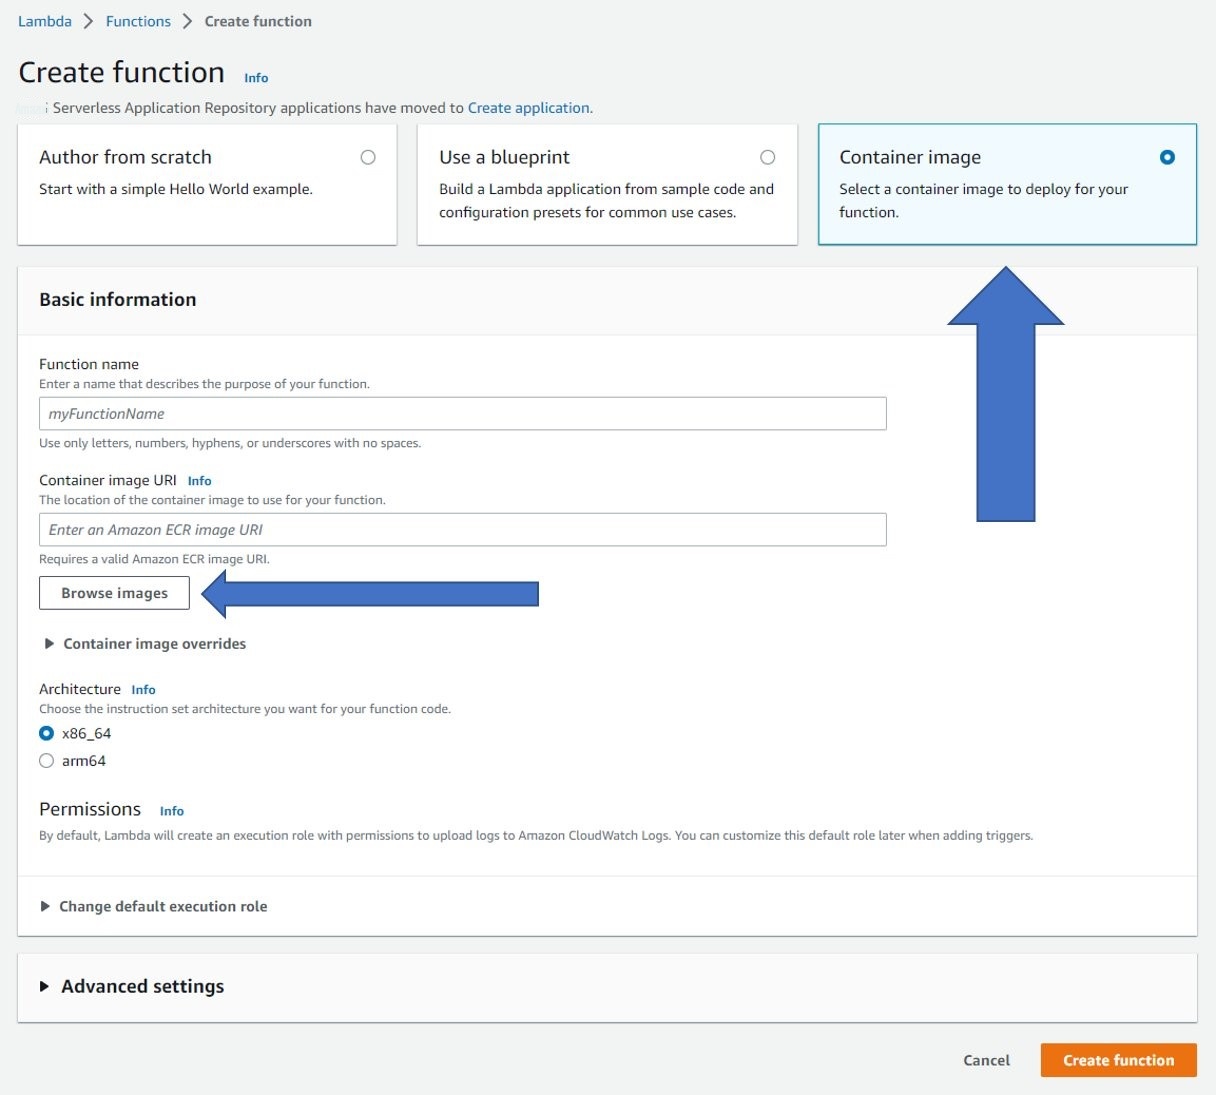
Finally, the Lambda function can be deployed using the image stored in Amazon ECR. Open Lambda within the Console. Select Create function and choose the Container image category. Select Browse images and select the Lambda image that was pushed to Amazon ECR. Give the Lambda function a name and select Create function .
After the function has been created, the Amazon S3 trigger must be setup. Start by selecting Add trigger and use Amazon S3 as the source. Choose your bucket as the event source and select Add at the bottom. Additionally, open the configuration tab and give Amazon S3 read and write permissions to the function’s role under Permissions . Depending on how large your input images are likely to be, you can also increase the RAM (10GB limit), disk (10GB limit), and timeout (15min limit) of the Lambda function under “General Configuration”.

This completes the necessary architecture. Users can input imagery to the input S3 bucket, here called the ‘geotiff-to-cog’ bucket. This triggers the Lambda function that downloads the image and converts it to a COG. The Lambda function inputs the COG output to the output S3 bucket, here called ‘geotiff-to-cog-output’. If users want a non-COG dataset of TIF images to test converting images to COGs using the architecture above, then a dataset is available
4. Access COGs with QGIS software
The images in the ‘geotiff-to-cog-output’ S3 bucket are ready to be accessed efficiently using geospatial analysis software. This post demonstrates how to access COG images with
In the bucket, copy the Amazon S3 URL of any of the COG images that you would like to analyze in QGIS.

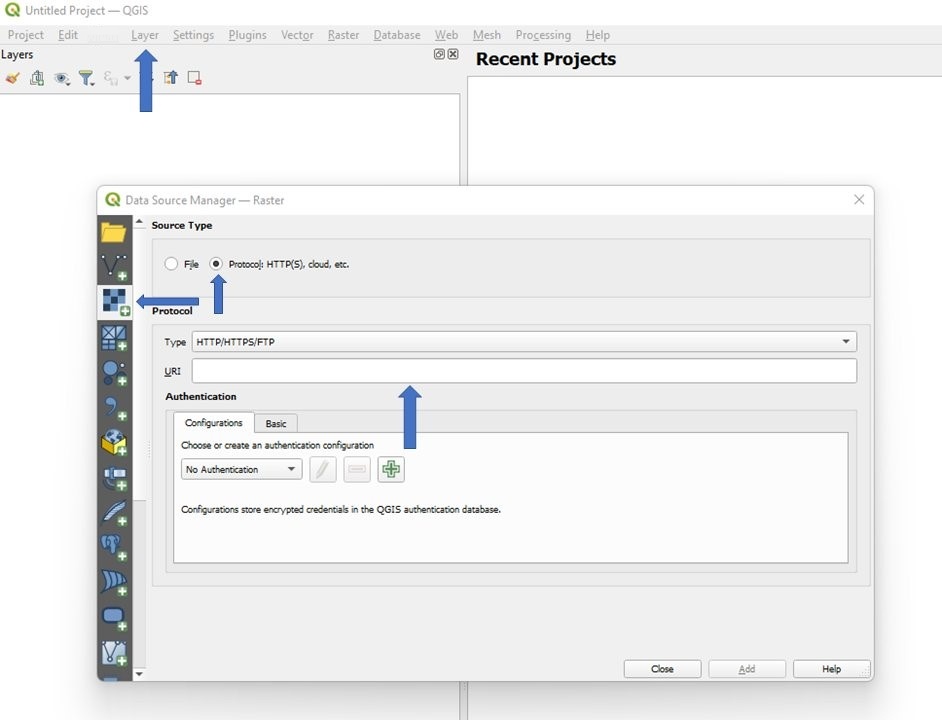
Open QGIS => Layer => Data Source Mapper . Inside Data Source Mapper , select the Add Raster Layer tab. Under Source type , select Protocol: HTTP(S), cloud, etc and paste the Amazon S3 URL in the URI input box under Protocol . Select Add and close the Data Source Mapper . The COG image from Amazon S3 has loaded within 5-10 seconds inside of QGIS and is ready for the user to analyze. If you prefer to use a nonpublic S3 bucket, then QGIS has options to input Amazon Web Services credentials to allow QGIS to access images inside of the nonpublic bucket.
Using COGs remotely has a tradeoff. When using a COG, scanning an image takes slightly longer to render than an image that has been fully downloaded and opened locally inside of QGIS. However, the ability of COGs to rapidly display in a user’s geospatial software using only a URL is a clear speed advantage over having to download entire non-COG images and then loading them inside of QGIS.
Cleaning up
The following instructions are for deleting the resources created in this post:
To delete the input/output S3 buckets
- Sign in to the Amazon Web Services Management Console and open the Amazon S3 console.
- In the Buckets list, select the option next to the name of the input bucket that you created, and then choose Delete at the top of the page. If the bucket is not empty, you must choose Empty and submit ‘ permanently delete ’ in the input field prior to deleting the bucket.
- On the Delete bucket page, confirm that you want to delete the bucket by entering the bucket name into the text field, and then choose Delete bucket .
- Repeat the instructions above for the output bucket.
To delete the Amazon Web Services Lambda function
- Sign in to the Amazon Web Services Management Console and open the Amazon Web Services Lambda console.
- Select Functions in the navigation sidebar.
- In the Functions list, select the option next to the name of the function that you created, and then choose Actions at the top of the page. Click Delete in the dropdown menu.
- Type ‘delete’ in the input box and click Delete at the bottom.
To delete the ECR repository
- Sign in to the Amazon Web Services Management Console and open the Amazon ECR console.
- Select Repositories in the navigation sidebar.
- In the Private repositories list, select the option next to the name of the repository that you created, and then choose Delete at the top of the page.
- Type ‘delete’ in the input box and click Delete at the bottom.
Conclusion
In this post, we demonstrated a solution that helps you
By using COGs users no longer have to duplicate data. Users can access large satellite imagery immediately instead of having to download it locally, which can take minutes. Users can also stream parts of the image they need instead of using the whole image, leading to faster processing speeds. The ability to access and process data faster can boost user efficiency and productivity.
Thanks for reading this post. If you have any comments or questions, please leave them in the comments section.
The mentioned AWS GenAI Services service names relating to generative AI are only available or previewed in the Global Regions. Amazon Web Services China promotes AWS GenAI Services relating to generative AI solely for China-to-global business purposes and/or advanced technology introduction.