We use machine learning technology to do auto-translation. Click "English" on top navigation bar to check Chinese version.
Authenticating to Amazon Web Services Transfer Family with Azure Active Directory and Amazon Web Services Lambda
Note (5/11/2023): The sample solution provided in this blog post does not support Multi-Factor Authentication (MFA) with Azure Active Directory.
Managing users at scale across multiple systems can become a time-intensive process, adding undue burden to system administrators. User management is increasingly complex when customers operate file transfer workloads that share data across different internal and external partners. Imagine a company with dozens of systems that transfer data between each other. If each system has their own user management, a unique user has to be created in every system for every user on a 1:1 basis. If one of the employees with access to the systems leaves the company, their user must be removed from every system.
To solve for this, companies look to federate user identities by integrating file transfer systems into their corporate Identity Provider (IdP). Using a corporate IdP allows administrators to manage the user centrally in their IdP, and then allow federated access to different systems. Removing the user from the IdP also removes their access to systems and applications within the company, improving and simplifying security.
In this blog, I provide an overview of Amazon Web Services Transfer Family authentication options and provide a sample architecture using Amazon Web Services Transfer Family’s custom Lambda Identity Provider option to integrate with Azure AD. At the end of this post, you will understand how Amazon Web Services Transfer Family can help you integrate with the IdP of your choice to remove undue administrative burden and improve your organization’s security posture as explained in the example above.
Amazon Web Services Transfer Family authentication overview
Amazon Web Services Transfer Family has a
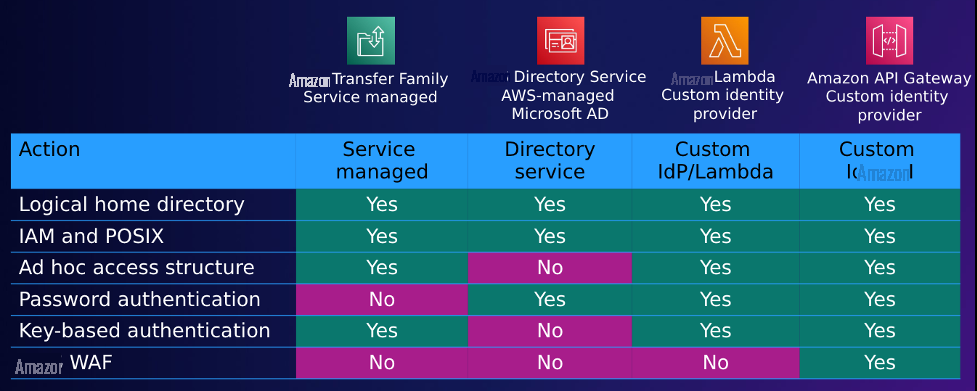
Figure 1: Table of Amazon Web Services Transfer Family’s authentication options and supported features
In this post, we provide a reference architecture for integrating your Amazon Web Services Transfer Family server(s) with Azure AD using Amazon Web Services Transfer Family’s Lambda custom IdP option. We provide an example Amazon Web Services Lambda function with code to authenticate an Azure AD user, and authorize the user for read and write access to the Amazon Web Services Transfer Family server’s S3 bucket. When you have completed this post, you will be able deploy Amazon Web Services Transfer Family with a Lambda custom IdP that integrates with Azure AD. In doing so, you will have sample to build from so that your organization can centralize user management for file transfer workloads to your corporate IdP.
Amazon Web Services Transfer Family Lambda custom IdP authentication and authorization
In this section, we describe Amazon Web Services Transfer Family’s authentication and authorization workflow when using the Lambda custom IdP option.
Amazon Web Services Transfer Family’s Lambda custom IdP option invokes custom code you provide for integration with your IdP. Amazon Web Services Transfer Family authorizes user sessions using
Figure 2 is a diagram which depicts Amazon Web Services Transfer Family’s authentication and authorization workflow when using the Lambda custom IdP option.
- Amazon Web Services Transfer Family user initiates a login or transfer request through their SFTP client.
- Amazon Web Services Transfer Family invokes the Lambda function with an event including the supplied credentials.
-
The Lambda function’s logic evaluates the credentials and responds with an HTTP 200 response including an
IAM role and optionally asession policy . - The IAM role and session policy authorize the user’s session.
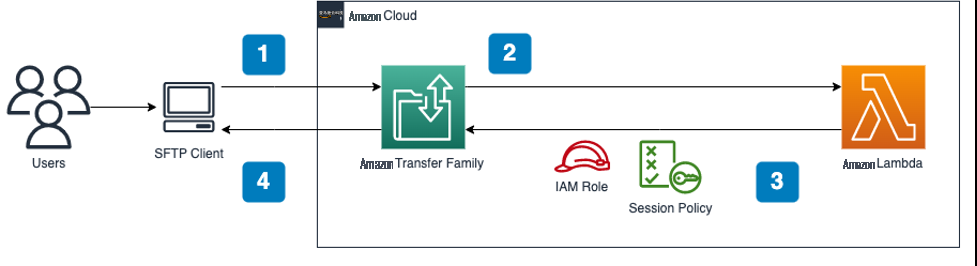
Figure 2: Diagram of Amazon Web Services Transfer Family Lambda custom IdP option
In the sample architecture provided in this post, there is one IAM role authorizing all authenticated users. With the Lambda custom IdP option, you can customize authorization logic to fit your use case. For example, your Lambda function can use Azure AD user claims such as group membership to logically determine session policies and IAM roles.
Sample architecture and walkthrough
In this section, we discuss the Amazon Web Services Transfer Family with Lambda custom IdP and Azure AD sample architecture, prerequisites, deploying the solution with a CloudFormation template, and steps to test your Amazon Web Services Transfer Family server. We include steps to clean up the sample resources later in this post.
Figure 3 shows the user authentication and authorization workflow for the Amazon Web Services Transfer Family’s Lambda custom IdP with Azure AD sample architecture provided in this post.
- Amazon Web Services Transfer Family user initiates a login or transfer request through their SFTP client using their Azure AD credentials (username and password).
- Amazon Web Services Transfer Family invokes the Lambda function with an event including the supplied credentials.
-
The Lambda function makes a request to Amazon Web Services Secrets Manager to retrieve the required
Azure AD client ID and Azure AD domain name. Secrets Manager is used to securely store the values for the Azure AD client ID and Azure AD domain name. - The Lambda function makes a request to Azure AD’s Graph API to check whether the credentials are valid, and connect to the specified Azure AD app by specifying the Client ID and Azure AD domain name in the request.
- If the credentials are valid, Azure AD returns a token with user claims to Lambda. If the token was retrieved successfully, it provides an IAM role and session policy.
- The Lambda function responds to the request initiated in step two with the IAM role and session policy from the previous step as a HTTP 200 response to Amazon Web Services Transfer Family.
- The user is authenticated to the Amazon Web Services Transfer Family server via SFTP protocol, authorized by the IAM role and session policy supplied by the Lambda function.
In step five, if the credentials passed to Azure AD are invalid, Amazon Web Services Transfer Family responds to the end user’s request with a login failed error when they attempt to connect. Behind the scenes, Azure AD returns a failed login response, and the Lambda function logs the error, exits, and returns an empty response to Amazon Web Services Transfer Family.
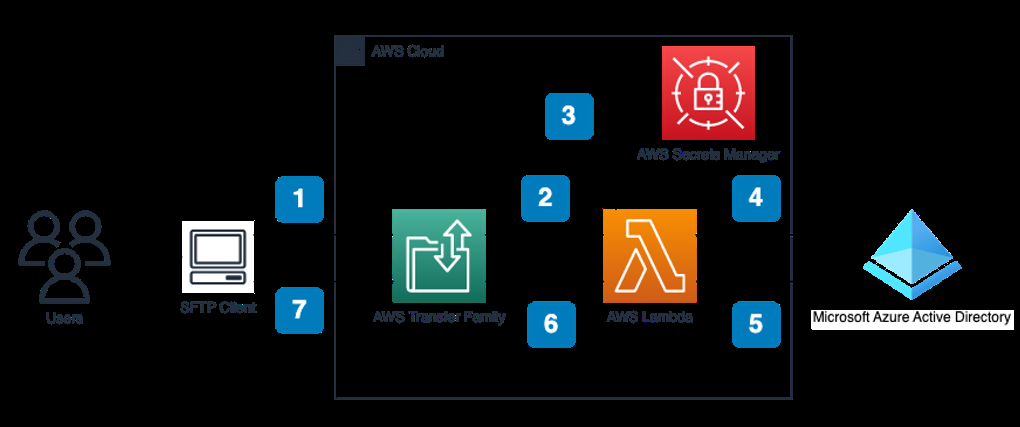
Figure 3: Diagram of sample architecture for Amazon Web Services Transfer Family Lambda custom IdP option using Azure AD
Prerequisites
-
An Amazon Web Services Account. For instructions, refer to
Creating an Amazon Web Services account . - Authorization to perform IAM actions for Amazon Web Services Transfer Family, Lambda, and S3.
-
An S3 bucket. For instructions, refer to
Creating a bucket . You will need the name of this bucket to deploy your CloudFormation stack. -
An Azure AD Enterprise application (Azure AD app). The Azure AD app must be configured with
Read
API Permissions granted for the directory using
Grant admin consent
.
Public client flows
must also be
enabled
in the
Advanced settings
of the Azure AD app. Take note of the following properties from your Azure AD app, as you will need them to deploy your CloudFormation stack. Note that Multi-Factor Authentication (MFA) is not supported by this example solution.
- Azure AD domain name (ex. @example.com)
- Azure AD client ID
- Azure AD user added to the Azure AD app, so you can test authentication with Amazon Web Services Transfer Family.
-
SFTP client of your choice. For more information, refer to
Transferring files using a client . -
(Optional) For least-privilege authorization to deploy the CloudFormation template, you can create an
Amazon Web Services CloudFormation service role with the following IAM policy. To do this, you must create anIAM policy and IAM role. You will attach the IAM policy to the IAM role, then choose this role later when configuring your CloudFormation stack options. You do not need to replace any values in the following IAM policy.
{
    "Version": "2012-10-17",
    "Statement": [
        {
            "Sid": "LambdaModify",
            "Effect": "Allow",
            "Action": [
                "lambda:AddPermission",
                "lambda:RemovePermission",
                "lambda:GetFunction",
                "lambda:ListTags"
            ],
            "Resource": "*",
            "Condition": {
                "StringEquals": {
                    "aws:ResourceTag/blogOrigin": "TransferFamilyAzureADIdP"
                }
            }
        },
        {
            "Sid": "LambdaCreate",
            "Effect": "Allow",
            "Action": [
                "lambda:CreateFunction",
                "lambda:TagResource"
            ],
            "Resource": "*",
            "Condition": {
                "StringEquals": {
                    "aws:RequestTag/blogOrigin": "TransferFamilyAzureADIdP"
                }
            }
        },
        {
            "Sid": "LambdaDelete",
            "Effect": "Allow",
            "Action": [
                "lambda:DeleteFunction"
            ],
            "Resource": "*",
            "Condition": {
                "StringEquals": {
                    "aws:ResourceTag/blogOrigin": "TransferFamilyAzureADIdP"
                }
            }
        },
        {
            "Sid": "IAMModify",
            "Effect": "Allow",
            "Action": [
                "iam:DeleteRole",
                "iam:PutRolePolicy",
                "iam:DeleteRolePolicy",
                "iam:GetRolePolicy",
                "iam:ListRoleTags",
                "iam:ListPolicyTags"
            ],
            "Resource": "*",
            "Condition": {
                "StringEquals": {
                    "aws:ResourceTag/blogOrigin": "TransferFamilyAzureADIdP"
                }
            }
        },
        {
            "Sid": "IAMCreate",
            "Effect": "Allow",
            "Action": [
                "iam:CreateRole",
                "iam:TagRole"
            ],
            "Resource": "*",
            "Condition": {
                "StringEquals": {
                    "aws:RequestTag/blogOrigin": "TransferFamilyAzureADIdP"
                }
            }
        },
        {
            "Sid": "IAMGetRole",
            "Effect": "Allow",
            "Action": [
                "iam:GetRole"
            ],
            "Resource": "*",
            "Condition": {
                "StringEquals": {
                    "aws:ResourceTag/blogOrigin": "TransferFamilyAzureADIdP"
                }
            }
        },
        {
            "Sid": "IAMPassRole",
            "Effect": "Allow",
            "Action": [
                "iam:PassRole"
            ],
            "Resource": "*",
            "Condition": {
                "StringEquals": {
                    "iam:PassedToService": [
                        "lambda.amazonaws.com",
                        "transfer.amazonaws.com"
                    ]
                }
            }
        },
        {
            "Sid": "SecretsCreateDelete",
            "Effect": "Allow",
            "Action": [
                "secretsmanager:DeleteSecret",
                "secretsmanager:TagResource"
            ],
            "Resource": "*",
            "Condition": {
                "StringEquals": {
                    "aws:ResourceTag/blogOrigin": "TransferFamilyAzureADIdP"
                }
            }
        },
        {
            "Sid": "SecretsCreate",
            "Effect": "Allow",
            "Action": [
                "secretsmanager:CreateSecret"
            ],
            "Resource": "*",
            "Condition": {
                "StringEquals": {
                    "aws:RequestTag/blogOrigin": "TransferFamilyAzureADIdP"
                }
            }
        },
        {
            "Sid": "TransferDescribeAndDeleteServer",
            "Effect": "Allow",
            "Action": [
                "transfer:DeleteServer",
                "transfer:DescribeServer",
                "transfer:ListTagsForResource"
            ],
            "Resource": "*",
            "Condition": {
                "StringEquals": {
                    "aws:ResourceTag/blogOrigin": "TransferFamilyAzureADIdP"
                }
            }
        },
        {
            "Sid": "TransferCreateServer",
            "Effect": "Allow",
            "Action": [
                "transfer:CreateServer",
                "transfer:TagResource"
            ],
            "Resource": "*",
            "Condition": {
                "StringEquals": {
                    "aws:RequestTag/blogOrigin": "TransferFamilyAzureADIdP"
                }
            }
        }
    ]
}
7. (optional; continued): For least-privilege authorization for the IAM principal running the CloudFormation template and following along, this post was tested with the following Amazon Web Services managed policies and the customer managed policy below. In the customer managed policy, you need to replace the values for
${AWS::AccountId}, ${my-bucket-name}, and ${my-cloudformation-service-role-name}
.
Amazon Web Services managed policies:
- Amazon Web ServicesTransferReadOnlyAccess
- Amazon Web ServicesCloudFormationFullAccess
Customer managed policy:
{
    "Version": "2012-10-17",
    "Statement": [
        {
            "Sid": "ViewS3BucketsWithoutErrors",
            "Effect": "Allow",
            "Action": [
                "s3:ListAllMyBuckets"
            ],
            "Resource": [
                "*"
            ]
        },
        {
            "Sid": "InteractWithMyBucketAndTransferBucket",
            "Effect": "Allow",
            "Action": [
                "s3:GetObject",
                "s3:GetBucketLocation",
                "s3:ListBucket"
            ],
            "Resource": [
                "arn:aws:s3:::${my-bucket-name}*"
            ]
        },
        {
            "Sid": "UploadCloudFormationTemplate",
            "Effect": "Allow",
            "Action": [
                "s3:PutObject",
                "s3:CreateBucket",
                "s3:PutBucket*",
                "s3:GetObject"
            ],
            "Resource": "arn:aws:s3:::cf-template*"
        },
        {
            "Sid": "CleanUpResults",
            "Effect": "Allow",
            "Action": [
                "s3:DeleteObject"
            ],
            "Resource": [
                "arn:aws:s3:::${my-bucket-name}/home*"
            ]
        },
        {
            "Sid": "ListRolesForCloudFormationDeployment",
            "Effect": "Allow",
            "Action": [
                "iam:ListRoles"
            ],
            "Resource": [
                "*"
            ]
        },
        {
            "Sid": "IAMRoleForCloudFormationDeployment",
            "Effect": "Allow",
            "Action": [
                "iam:PassRole"
            ],
            "Resource": [
                "arn:aws:iam::${AWS::AccountId}:role/${my-cloudformation-service-role-name}"
            ],
            "Condition": {
                "StringEquals": {
                    "iam:PassedToService": "cloudformation.amazonaws.com"
                }
            }
        }
    ]
}
Deploy the CloudFormation stack
In this section, you will deploy a
- Secrets Manager secret for the Azure AD client ID
- Secrets Manager secret for the Azure AD domain name
- IAM role for all authenticated Amazon Web Services Transfer Family users
- IAM role with an IAM policy allowing the Lambda Function access to Secrets Manager and CloudWatch logs
- IAM role allowing Amazon Web Services Transfer Family access to CloudWatch logs
- Lambda function which authenticates users against Azure AD
- Amazon Web Services Transfer Family server which references the Lambda function as its custom IdP
- Lambda resource policy allowing Amazon Web Services Transfer Family permission to invoke the custom identity provider Lambda function
Note that this CloudFormation template was tested in Amazon Web Services Region us-east-1 and us-west-2 . Note that deploying this into your Amazon Web Services account will incur cost. Steps for cleaning up the resources are included later in this post so you do not incur cost beyond the time you are using this sample solution.
To deploy the CloudFormation, follow these steps:
1. Download this post’s CloudFormation template
2. On the
3. Select Upload a template file and choose Choose file . Upload transfer-family-azure-active-directory.yaml , then choose Next .
4. On the Specify stack details page, enter the stack name AzureADSFTP . On the same page, there are three parameters:
a. For azureClientId , enter the Azure AD client ID from the prerequisite section.
b. For azureDomain , enter the Azure AD domain name from the prerequisite section.
c. For s3BucketName , enter the S3 bucket name in your Amazon Web Services account and in the same Amazon Web Services Region as where you’re running your CloudFormation stack. (For this post, we use the bucket name value, like my-bucket-name ). Choose Next .
5. On the Configure stack options page, choose Next .
a. (Optional) If you are using the least privilege CloudFormation service role, select the name of the role under the Permissions section of the Configure stack options page.
6. On the Review page , select I acknowledge that Amazon Web Services CloudFormation might create IAM resources , and choose Create stack .
The script takes less than 5 minutes to run and change to a CREATE_COMPLETE state. If you deploy the stack twice in the same Amazon Web Services account and Region, some resources will already exist, and the process fails with a message indicating the resource already exists.
Test authentication and use your Amazon Web Services Transfer Family server
In this section, you will authenticate to your Amazon Web Services Transfer Family server using your Azure AD user credentials. For my SFTP client, I will use the SFTP command line client that comes standard with Mac OS. Note that this is one of many clients you can use with your Amazon Web Services Transfer Family server, and for more information on clients supported by Amazon Web Services Transfer Family, refer to
-
Navigate to
Amazon Web Services Transfer Family console by using the link or searching for Amazon Web Services Transfer Family in the search bar of the Amazon Web Services management console as shown in Figure 4
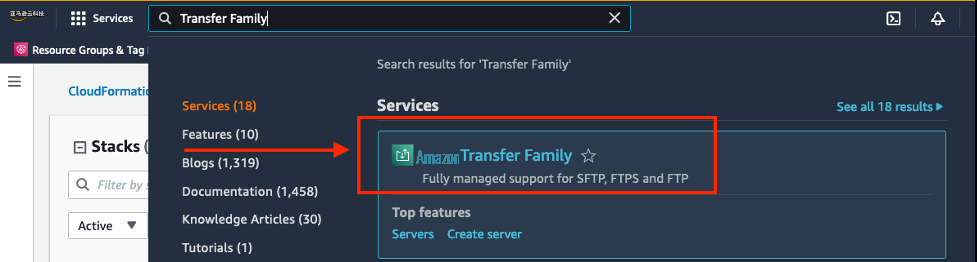
Figure 4: Search result for Amazon Web Services Transfer Family in Amazon Web Services management console
- Choose the Server ID of the Amazon Web Services Transfer Family server your CloudFormation stack created, as shown in Figure 5
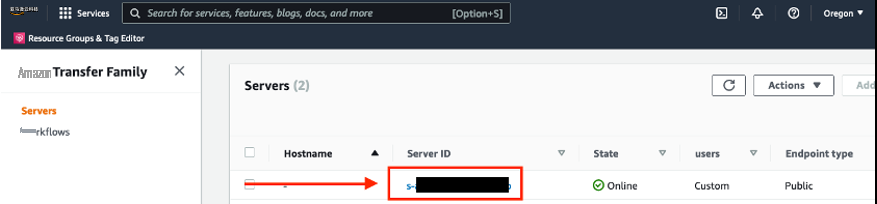
Figure 5: Amazon Web Services Transfer Family Servers table
- Take note of the Endpoint under the Endpoint details section as shown in Figure 6 You will use this in the next step to connect to Amazon Web Services Transfer Family.
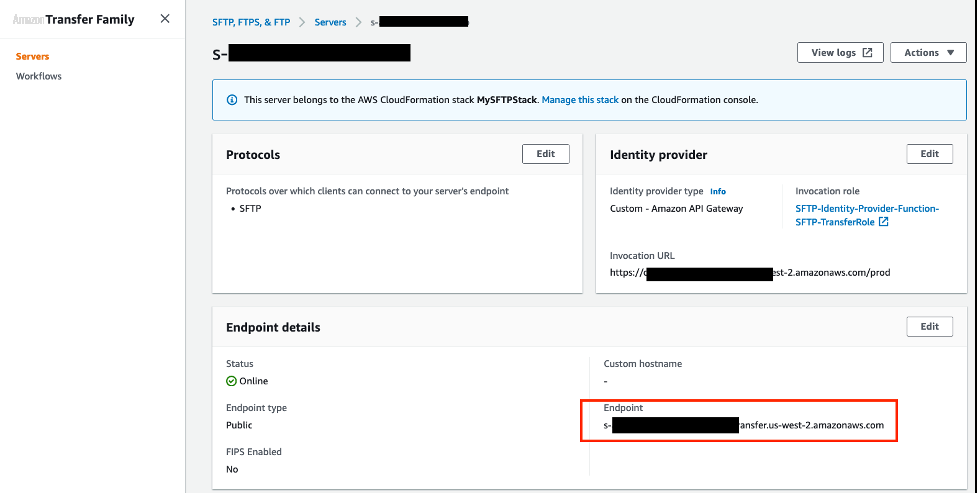
Figure 6: Amazon Web Services Transfer Family Endpoint
- Open the terminal and run the sftp client. You can run the commands below, and I also provide the output in a screenshot, Figure 7 .
Open your terminal and connect using the following command with your username and Amazon Web Services Transfer Family server endpoint, and enter your password when it prompts you. Note that you must replace your username with your Azure AD username (like my-user ), and the Amazon Web Services Transfer Family server endpoint with your server endpoint (like s-123456789012.server.transfer.us-west-2.amazonaws.com ).
sftp <username>@<endpoint>
Put a file onto your Amazon Web Services Transfer Family server with the following SFTP command. Note that you must replace the file name with a local file on your computer (like test.txt ).
put <path-to-local-file>
You can list what is in the Amazon Web Services Transfer Family directory to ensure your file was uploaded.
ls
You can close your SFTP session with the following command.
exit

Figure 7: Screenshot of example SFTP client interaction
-
Browse to the
S3 console and choose your S3 bucket. By default, the sample architecture’s Lambda function gives users a home directory based on their username (like my-bucket-name/home/username/ ). Figure 8 is a screenshot of browsing to the S3 prefix associated with this home directory, and the file you uploaded in step 4 is an object under the prefix.
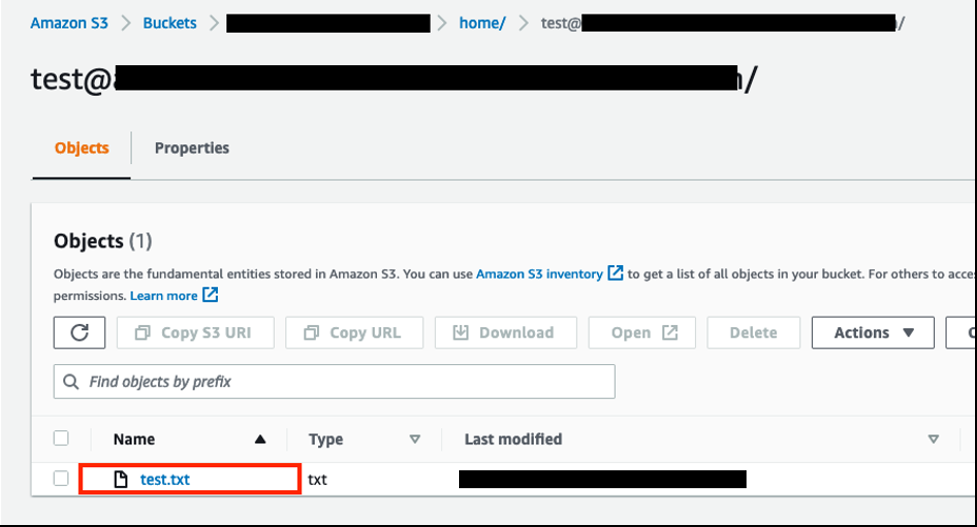
Figure 8: Amazon S3 home directory prefix with test.txt object
Cleaning up
In this post, you created several components which generate cost. To avoid incurring future charges, remove the resources with the following steps:
-
Navigate to the S3 bucket you used for testing and remove any uploaded files created after you tested your Amazon Web Services Transfer Family server. Refer to
Deleting folders for a guide on how to delete your test user’s home directory created when you uploaded any files. With the default template, the S3 prefix will be my-bucket-name/home/username/ . Please use caution in this step. Unless you areusing versioning on your S3 bucket , deleting S3 objects cannot be undone. -
In the
CloudFormation console , select the stack named AzureADSFTP , choose Delete , and confirm.
Summary
In this post, I covered how you can use Amazon Web Services Transfer Family’s Lambda custom IdP option to authenticate your users with an Azure AD app. The sample architecture includes code which authenticates users with Azure AD and authorized them with an IAM role, allowing you to federate users from your Azure AD IdP to Amazon Web Services Transfer Family and centralize user management for your file transfer workloads. Centralizing user management offers many benefits, including improved security and eliminating undue administrative effort on your file transfer workloads. You can extend this code to fit your specific use case, such as authorizing users with custom policies based on Azure AD group membership or other claims. You can get started with Amazon Web Services Transfer Family using the
Thanks for reading this blog post! If you have questions about Amazon Web Services Transfer Family authentication options don’t hesitate to leave a comment in the comments section. Happy building!
The mentioned AWS GenAI Services service names relating to generative AI are only available or previewed in the Global Regions. Amazon Web Services China promotes AWS GenAI Services relating to generative AI solely for China-to-global business purposes and/or advanced technology introduction.