发布于: Nov 30, 2022
【概要】本文将用一个实例来介绍如何借助无服务器架构来实现 Amazon Neptune 图数据库的数据可视化和数据分析。
本文将用一个实例来介绍如何借助无服务器架构来实现 Amazon Neptune 图数据库的数据可视化和数据分析。
- 参考文档在 VPC 内创建一个 Neptune 集群
https://docs.aws.amazon.com/neptune/latest/userguide/get-started.html
- 参考文档完成数据加载初始设置(创建 S3 桶、S3 终端节点、IAM Role)
https://docs.aws.amazon.com/neptune/latest/userguide/bulk-load.html
- 在 Amazon Web Services 俄勒冈区域使用社区 AMI(ami-0b4ab2ba75e2ef70c)创建 t3 实例
此 AMI 已经打包好所有测试的资源,默认用户是 ec2-user,请自行设置 Amazon Web Services 中国区域与 Global 区域的 Amazon CLI 配置。
$ aws configure –profile bjs ### Amazon Web Services 北京区域
AWS Access Key ID [None]: AKI***************
AWS Secret Access Key [None]: tr7*********************
Default region name [None]: cn-north-1
Default output format [None]: json
$ aws configure –profile pdx ### Amazon Web Services 俄勒冈区域
AWS Access Key ID [None]: AKI***************
AWS Secret Access Key [None]: 14U*********************
Default region name [None]: us-west-2
Default output format [None]: json
- 加载 S3 数据到 Neptune
- 同步测试数据到你的 S3 桶
$ aws s3 sync /home/ec2-user/sampledata s3://你的 S3 桶 –profile pdx
- 修改数据加载脚本
$ cat /home/ec2-user/load-twitter.sh
curl -X POST \
-H ‘Content-Type: application/json’ \
https://你的 Neptune 集群终端节点:8182/loader -d ‘
{
“source” : “s3://你的 S3 桶/neptune/csv/twitter/”,
“format” : “csv”,
“iamRoleArn” : “你的 IAM Role ARN”,
“region” : “us-west-2”,
“failOnError” : “FALSE”
}’
- 加载数据到 Neptune
$ sh /home/ec2-user/load-twitter.sh
{
“status” : “200 OK”,
“payload” : {
“loadId” : “63afaf9e-76aa-4a7a-8485-5a27cef0e97f”
}
- 查询数据加载状态
$ curl -G ‘https://你的 Neptune 集群终端节点:8182/loader/63afaf9e-76aa-4a7a-8485-5a27cef0e97f’
{
“status” : “200 OK”,
“payload” : {
“feedCount” : [
{
“LOAD_COMPLETED” : 7
}
],
“overallStatus” : {
“fullUri” : “s3://你的 S3 桶/neptune/csv/twitter/”,
“runNumber” : 1,
“retryNumber” : 0,
“status” : “LOAD_COMPLETED”,
“totalTimeSpent” : 18,
“startTime” : 1566271487,
“totalRecords” : 47400,
“totalDuplicates” : 914,
“parsingErrors” : 0,
“datatypeMismatchErrors” : 0,
“insertErrors” : 0
}
}
- 创建 Amazon Lambda 函数执行所需要的 Role
$ aws iam create-role –path /service-role/ –role-name lambda-vpc-access-role –assume-role-policy-document ‘{
“Version”: “2012-10-17”,
“Statement”: [
{
“Effect”: “Allow”,
“Principal”: {
“Service”: “lambda.amazonaws.com”
},
“Action”: “sts:AssumeRole”
}
]
}’ –description “VPC Access role for lambda function” –profile pdx
- 为 Role 增加权限
$ aws iam attach-role-policy –role-name lambda-vpc-access-role –policy-arn arn:aws:iam::aws:policy/service-role/AWSLambdaENIManagementAccess –profile pdx
- 创建 Amazon Lambda 函数,把红色字体更换成自己的内容,有关子网组、安全组、环境变量可以在控制台上调整,建议阅读 Lambda 源码,了解 Gremlin 查询
$ aws lambda create-function –function-name mygremlin01 \
–role “arn:aws:iam::你的 12 位数字帐号:role/service-role/lambda-vpc-access-role” \
–runtime nodejs8.10 –handler indexLambda.handler \
–description “Lambda function to make gremlin calls to Amazon Neptune” \
–timeout 120 –memory-size 256 –publish \
–vpc-config SubnetIds=subnet-8afde9ec,subnet-ac487fe4,subnet-9a1adcc0,SecurityGroupIds=sg-4bc9e337 \
–zip-file fileb:///home/ec2-user/amazon-neptune-samples/gremlin/visjs-neptune/lambdapackage.zip \
-environment Variables=”{NEPTUNE_CLUSTER_ENDPOINT=mygdbcluster01.cluster-crqg2j5cykhg.us-west-2.neptune.amazonaws.com,NEPTUNE_PORT=8182}” –profile pdx
- 使用 Amazon CLI 中的以下命令创建 Restful API
$ aws apigateway create-rest-api –name lambda-neptune-proxy-api –description “API Proxy for Amazon Lambda function in VPC accessing Amazon Neptune” –profile pdx
{
“apiKeySource”: “HEADER”,
“description”: “API Proxy for Amazon Lambda function in VPC accessing Amazon Neptune”,
“createdDate”: 1566278703,
“endpointConfiguration”: {
“types”: [
“EDGE”
]
},
“id”: “m68yv27u24“,
“name”: “lambda-neptune-proxy-api”
}
- 请注意前面输出中“id”字段的值,并将其用作下面<rest-api-id>的值
$ aws apigateway get-resources –rest-api-id m68yv27u24 –profile pdx
{
“items”: [
{
“path”: “/”,
“id”: “hpbz6o3ytf”
}
]
}
- 请注意前面输出中“id”字段的值,并将其用作下面的值,下面的命令将在 API 的根结构下创建一个资源
$ aws apigateway create-resource –rest-api-id m68yv27u24 –parent-id hpbz6o3ytf –path-part {proxy+} –profile pdx
{
“path”: “/{proxy+}”,
“pathPart”: “{proxy+}”,
“id”: “s3iu93“,
“parentId”: “hpbz6o3ytf”
}
- 请注意输出中“id”字段的值,并在下面的命令中将其用作<resource-id>
$ aws apigateway put-method –rest-api-id m68yv27u24 –resource-id s3iu93 –http-method ANY \
–authorization-type NONE –profile pdx
{
“apiKeyRequired”: false,
“httpMethod”: “ANY”,
“authorizationType”: “NONE”
}
- 使用从之前命令获得的相应值,创建 API 方法的集成
$ aws apigateway put-integration –rest-api-id m68yv27u24 \
–resource-id s3iu93 –http-method ANY –type AWS_PROXY \
–integration-http-method POST \
–uri arn:aws:apigateway:us-west-2:lambda:path/2015-03-31/functions/arn:aws:lambda:us-west-2:你的 12 位数字帐号:function:mygremlin01/invocations –profile pdx
{
“passthroughBehavior”: “WHEN_NO_MATCH”,
“timeoutInMillis”: 29000,
“uri”: “arn:aws:apigateway:us-west-2:lambda:path/2015-03-31/functions/arn:aws:lambda:us-west-2:你的 12 位数字帐号:function:mygremlin01/invocations”,
“httpMethod”: “POST”,
“cacheNamespace”: “s3iu93”,
“type”: “AWS_PROXY”,
“cacheKeyParameters”: []
}
- 使用下面的命令部署 API
$ aws apigateway create-deployment –rest-api-id m68yv27u24 –stage-name test –profile pdx
{
“id”: “n0ro9h”,
“createdDate”: 1566279566
}
- 执行以下命令以向 Amazon Lambda 函数添加 API 网关订阅/权限
$ aws lambda add-permission –function-name mygremlin01 \
–statement-id myapigw01 –action lambda:* \
–principal apigateway.amazonaws.com \
–source-arn arn:aws:execute-api:us-west-2:你的 12 位数字帐号:m68yv27u24/*/*/* –profile pdx
{
“Statement”: “{\”Sid\”:\”myapigw01\”,\”Effect\”:\”Allow\”,\”Principal\”:{\”Service\”:\”apigateway.amazonaws.com\”},\”Action\”:\”lambda:*\”,\”Resource\”:\”arn:aws:lambda:us-west-2:你的12位数字帐号:function:mygremlin01\”,\”Condition\”:{\”ArnLike\”:{\”AWS:SourceArn\”:\”arn:aws:execute-api:us-west-2:你的 12 位数字帐号:m68yv27u24/*/*/*\”}}}”
}
- 我们现在已经为 Amazon Lambda 函数创建了一个 API 网关代理, 测试如下:
$ curl https://m68yv27u24.execute-api.us-west-2.amazonaws.com/test/neighbours?id=77

- 在 Amazon Web Services 北京区域创建 S3 存储桶
$ aws s3api create-bucket –bucket myneptune77 –region cn-north-1 –create-bucket-configuration LocationConstraint=cn-north-1 –profile bjs
- 配置 S3 存储桶静态网站托管功能
$ aws s3api put-bucket-website –bucket myneptune77 –website-configuration ‘{
“IndexDocument”: {
“Suffix”: “index.html”
},
“ErrorDocument”: {
“Key”: “error.html”
}
}’ –profile bjs
- 修改 html 文件第 57 行的终端节点
PROXY_API_URL 为你部署的 API Gateway 终端节点的 URL
$ vi /home/ec2-user/s3webhost/index.html
var PROXY_API_URL = “https://m68yv27u24.execute-api.us-west-2.amazonaws.com/test”;
- 上传所有静态文件到 S3 存储桶
$ aws s3 sync /home/ec2-user/s3webhost/ s3://myneptune77 –acl public-read –profile bjs
- 在浏览器中打开如下页面进行测试
https://myneptune77.s3.cn-north-1.amazonaws.com.cn/index.html
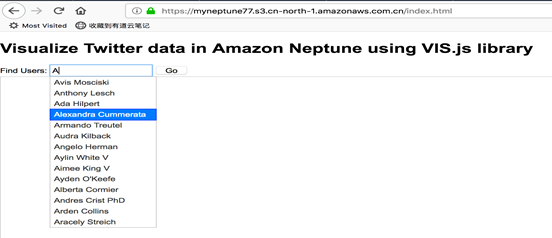
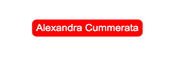
选中人名,点击 Go 按钮,出现选中的人名
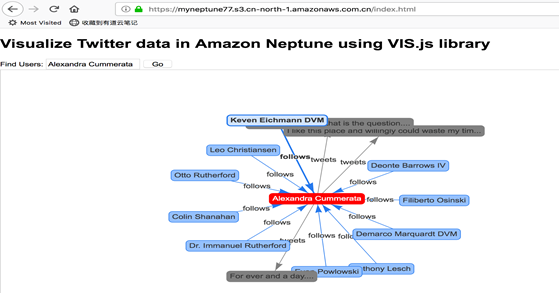
点击人名,将查询他的好友及所发的 Twitter 并进行可视化展现:
- 查询逻辑通过 js 封装在 Amazon Lambda 中,使用 Gremlim 语法直接查 Neptune 库
- 前端页面每次点击都会通过 API Gateway 终端节点去调 Lambda 函数来读库并返回 JSON 格式数据
- 前端解析 JSON 数据,并通过 js 进行数据可视化展现
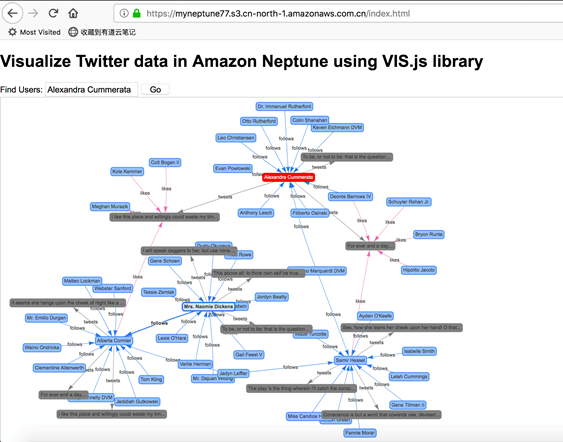
点击人名或 Twitter 信息,都将进行更深层次的数据可视化展现
综上所述,用户可以充分利用 Amazon Web Services 的云原生服务,Amazon API Gateway 与 Amazon Lambda,并结合 S3 存储桶的静态网站托管功能,即使 Amazon Web Services 中国区域还未提供 Neptune 图数据库的托管服务,用户也能在中国境内非常方便的去远程调用 Neptune 图数据库服务,并轻松实现对 Neptune 图数据库的数据分析可视化展现。