简介
亚马逊云科技
弹性负载均衡器
为部署在具有网络负载均衡器和应用程序负载均衡器 (ALB) 的 L4 和 L7 的
亚马逊弹性 Kubernetes 服务 (Amazon
EKS ) 集群上的工作负载提供原生入口解决方案。亚马逊云科技 负载均衡器控制器(以前称为 亚马逊云科技 ALB 入口控制器)使用 ALB 和使用网络负载均衡器 (NLB) 进行服务类型负载平衡来满足 Kubernetes 入口需求。创建 Kubernetes 入口时,会配置一个 ALB,用于对集群中不同节点或 Pod 的 HTTP 或 HTTPS 流量进行负载平衡。默认情况下,负载均衡器控制器通过特定的 Kubernetes 注释为每个入口资源创建一个符合其要求的新 ALB。
当 亚马逊云科技 负载均衡器控制器检测到带有注释 kubernetes.io/ingress.class: alb 的入口资源时,它会根据入口资源中指定的配置创建各种 亚马逊云科技 资源作为注释,包括 ALB、TargetGroups、监听器和规则。
此处提供的 完整列表
中一些值得注意的注释 包括创建面向互联网或内部 ALB 的 alb.ingress.kubernetes.io/scheme、指定 ALB 目标子网列表的 alb.ingress.kubernetes.io/subnets 注解,以及用于指定 亚马逊云科技 证书管理器管理的一个或多个证书的 alb.ingress.kubernetes.io/certificate-arn 注解,在 ALB 上启用 HTTPS 流量。这种基于注释的配置提供了一种灵活而强大的机制来预置所需的 亚马逊云科技 资源。
挑战
许多组织都需要使用传输层安全 (TLS) 为数百个不同的域名提供服务,例如网络托管提供商。为每个应用程序配备专用的负载均衡器可能会变得昂贵且难以管理。
解决方案概述
亚马逊云科技 负载均衡器控制器通过使用 ALB 基于主机的路由与
服务器名称指示 (
SNI) 配合使用向不同域提供流量,从而解决了这一难题。 这篇文章利用基于注释的配置,展示了如何配置和配置单个 ALB,以安全地为三个旨在为兔子、花栗鼠和仓鼠的宠物爱好者提供服务的演示网站提供服务。
以下是如何使用单个应用程序负载均衡器将流量提供给不同应用程序的简要说明。
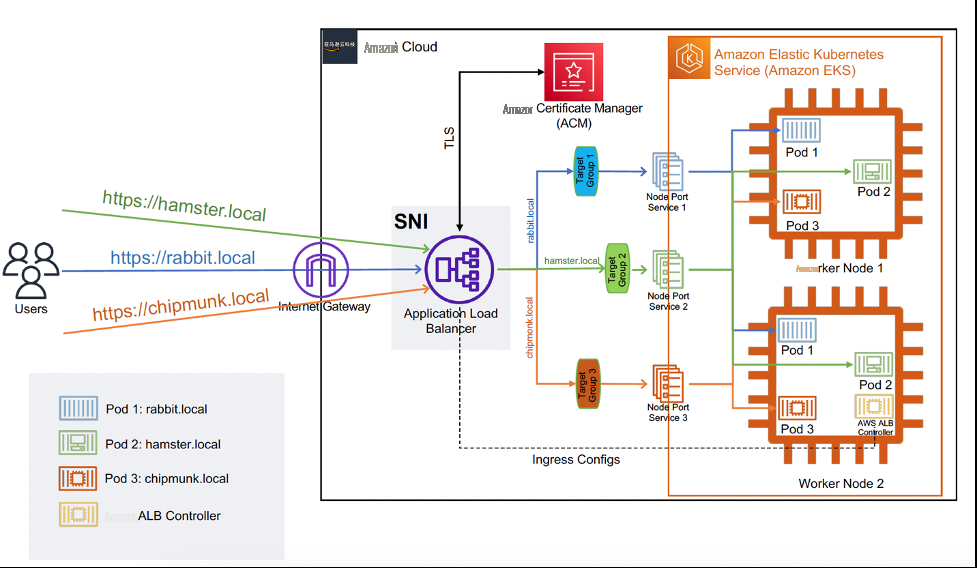
在上图中:
-
用户向
https://hamster.local/
发出 GET 请求
-
ALB 接收请求,终止 TLS,然后使用 SNI 提取主机标头
-
然后,使用基于主机名的路由,ALB 将请求映射到正确的目标组
-
目标组映射到您的服务的相应应用程序 Pod
概述解决方案的步骤:
-
部署 亚马逊云科技 负载平衡器控制器
-
设置 TLS 证书并将其导入 亚马逊云科技 Certificate Manager (ACM)
-
部署三个不同的应用程序
-
查看应用程序负载均衡器 SNI 规则
-
创建 Route 53 可用区域和记录
-
验证 Kubernetes 资源
-
验证解决方案
注意:目前,ALB 的默认配额为每个 ALB 最多 25 个证书。
先决条件
你需要这些工具来完成演练:
-
penssl
-
eksctl
-
kubectl
-
helm
-
awscli
最后,这篇文章假设你已经有一个 配置了 IA
M OIDC
提供商的现有 A
mazon EKS 集群
。
草率排练
步骤 A:部署 亚马逊云科技 负载均衡器控制器
在此步骤中,我们将创建和设置 亚马逊云科技 负载均衡器控制器。如需深入了解详尽的说明,请浏览此
链接
。
用你自己的
值 替换 示例
值。
获取 亚马逊云科技 IAM 政策:
curl -O https://raw.githubusercontent.com/kubernetes-sigs/aws-load-balancer-controller/v2.4.7/docs/install/iam_policy.json
使用上一步中下载的策略创建 亚马逊云科技 IAM 策略:
aws iam create-policy \
    --policy-name AWSLoadBalancerControllerIAMPolicy \
    --policy-document file://iam_policy.json
创建 亚马逊云科技 IAM 角色:
将 MY-EKS-CLUSTER-NAME 替换为您的亚马逊 EKS 集群的名称,将 111122223333 替换为您的账户 ID,然后运行该命令。
eksctl create iamserviceaccount \
  --cluster=<MY-EKS-CLUSTER-NAME> \
  --namespace=kube-system \
  --name=aws-load-balancer-controller \
  --role-name AmazonEKSLoadBalancerControllerRole \
  --attach-policy-arn=arn:aws:iam::<111122223333>:policy/AWSLoadBalancerControllerIAMPolicy \
  --approve
使用 Helm (v3) 安装亚马逊负载均衡器控制器:
helm repo add eks https://aws.github.io/eks-charts

helm repo update eks
将 MY-EKS-CLUSTER-NAME 替换为您的亚马逊 EKS 集群的名称:
helm install aws-load-balancer-controller eks/aws-load-balancer-controller \
  -n kube-system \
  --set clusterName==<MY-EKS-CLUSTER-NAME>\
  --set serviceAccount.create=false \
  --set serviceAccount.name=aws-load-balancer-controller
验证是否安装了 Amazon 负载平衡控制器:
kubectl get deployment -n kube-system aws-load-balancer-controller
输出示例:
NAME                           READY   UP-TO-DATE   AVAILABLE   AGE
aws-load-balancer-controller   2/2     2            2           92s
步骤 B:为 ACM 设置 TLS 证书
我们将为域名 rabbit.local、hamster.local 和 chipmunk.local 创建 TLS 证书,并将它们及其私钥上传到 亚马逊云科技 证书管理器中。
为 rabbit.local 创建 TLS 证书:
openssl req -new -x509 -sha256 -nodes -newkey rsa:4096 -keyout private_rabbit.key -out certificate_rabbit.crt -subj "/CN=rabbit.local"
注意:
为了
简单起见,传递了
openssl
命令中使用的 -nodes 标志,以防止对私钥进行加密。
将证书上传到 ACM
aws acm import-certificate --certificate fileb://certificate_rabbit.crt --private-key fileb://private_rabbit.key
分别对 hamster.local 和 chipmunk.local 域名重复相同的过程。
验证:
aws acm list-certificates --include keyTypes=RSA_4096
输出示例:
{
    "CertificateSummaryList": [
        {
            "CertificateArn": "arn:aws:acm:us-east-2:12345678:certificate/4zzzzzzzcxxxxzxzxzx",
            "DomainName": "hamster.local",
            "SubjectAlternativeNameSummaries": [
                "hamster.local"
            ],
            "HasAdditionalSubjectAlternativeNames": false,
            "Status": "ISSUED",
            "Type": "IMPORTED",
            "KeyAlgorithm": "RSA-4096",
            "KeyUsages": [
                "ANY"
            ],
            "ExtendedKeyUsages": [
                "NONE"
            ],
            "InUse": false,
            "RenewalEligibility": "INELIGIBLE",
            "NotBefore": "2023-03-17T14:58:17+00:00",
            "NotAfter": "2024-03-16T14:58:17+00:00",
            "CreatedAt": "2023-03-17T15:21:00.430000+00:00",
            "ImportedAt": "2023-03-17T15:21:00.439000+00:00"
        },……
步骤 C:将三个不同的应用程序部署到 Amazon EKS 集群中
现在边缘已经部署完毕,让我们部署整个 Kubernetes 应用程序后端及其资源。部署完成后,我们会将边缘连接到适当的应用程序。
为了提供必要的资源,以下清单创建了以下内容:
-
一个 nginx 服务器 Pod,用于托管登陆 HTML 页面
-
保存静态 HTML 内容的 nginx 配置的配置映射
-
Kubernetes
服务
对象,用于将 pod 作为 Kubernetes 服务公开
-
一个通过 ALB 提供对服务的 HTTPS 访问权限的
Ingre
ss 对象
默认情况下,满足入口要求会为每个入口创建一个 ALB。在我们的例子中,我们希望将多个入口资源整合到单个 ALB(即,每个入口代表不同的域名并指向相同的 ALB 和 SNI 证书)。
为了实现这一点,我们设置了入口注释:
alb.ingress.kubernetes.io/group.name: frontend
注意:IngressGroup 安全最佳实践规定,当所有 Kubernetes 用户都在可信边界内时,应使用 IngressGroup 功能。有关
更多详细信息 ,请参阅此
链接
。
创建基于模板的清单:
cat << 'EoF' >> manifest-template.yaml
apiVersion: networking.k8s.io/v1
kind: Ingress
metadata:
  name: ${CURRET_PET}-ingress
  namespace: myapplications-ns
  annotations:
    alb.ingress.kubernetes.io/scheme: internet-facing
    alb.ingress.kubernetes.io/target-type: ip
    alb.ingress.kubernetes.io/group.name: frontend
    alb.ingress.kubernetes.io/certificate-arn: ${ACM_ARN}
    alb.ingress.kubernetes.io/listen-ports: '[{"HTTPS": 443}]'
  labels:
    app: ${CURRET_PET}-ingress
spec:
  ingressClassName: alb
  rules:
    - host: ${CURRET_PET}.local
      http:
        paths:
        - path: /
          pathType: Prefix
          backend:
            service:
              name: ${CURRET_PET}-service
              port:
                number: 80

---
apiVersion: v1
kind: Pod
metadata:
  name: ${CURRET_PET}
  namespace: myapplications-ns
  labels:
    app.kubernetes.io/name: ${CURRET_PET}-proxy
spec:
  containers:
  - name: nginx
    image: nginx:stable
    ports:
      - containerPort: 80
        name: ${CURRET_PET}podsvc
    volumeMounts:
    - name: index-nginx
      mountPath: /usr/share/nginx/html/
  volumes:
  - name: index-nginx
    configMap:
      name: configmap-${CURRET_PET}
---
apiVersion: v1
kind: Service
metadata:
  name: ${CURRET_PET}-service
  namespace: myapplications-ns
spec:
  selector:
    app.kubernetes.io/name: ${CURRET_PET}-proxy
  ports:
  - name: name-of-service-port
    protocol: TCP
    port: 80
    targetPort: ${CURRET_PET}podsvc

---
apiVersion: v1
kind: ConfigMap
metadata:
  name: configmap-${CURRET_PET}
  namespace: myapplications-ns
data:
  index.html: |
    <html>
      <body>
        <h1>Welcome to ${CURRET_PET}.local! </h1>
      </body>
    </html>
EoF
创建 rabbit.yaml:
export CURRET_PET=rabbit
export ACM_ARN=$(aws acm list-certificates --query "CertificateSummaryList[?DomainName=='rabbit.local'].CertificateArn" --include keyTypes=RSA_4096 --output text)
envsubst < "manifest-template.yaml" > "rabbit.yaml"
创建 chipmunk.yaml:
export CURRET_PET=chipmunk
export ACM_ARN=$(aws acm list-certificates --query "CertificateSummaryList[?DomainName=='chipmunk.local'].CertificateArn" --include keyTypes=RSA_4096 --output text)
envsubst < "manifest-template.yaml" > "chipmunk.yaml"
创建 hamster.yaml:
export CURRET_PET=hamster
export ACM_ARN=$(aws acm list-certificates --query "CertificateSummaryList[?DomainName=='hamster.local'].CertificateArn" --include keyTypes=RSA_4096 --output text)
envsubst < "manifest-template.yaml" > "hamster.yaml"
应用清单:
kubectl apply -f ./hamster.yaml -f ./chipmunk.yaml ./rabbit.yaml
验证仓鼠、花栗鼠、兔子变量是否被正确替换:
kubectl get pods -n myapplications-ns -o=jsonpath='{range.items[*]}{.metadata.name}{"\n"}'
输出示例:
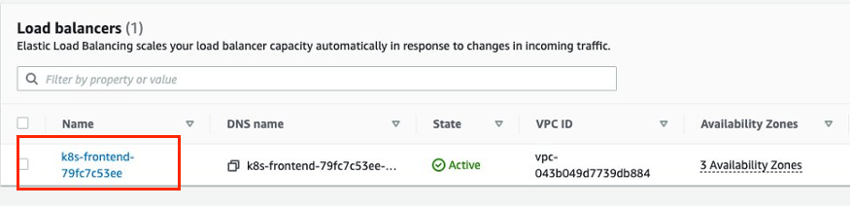
步骤 D:查看应用程序负载均衡器 SNI 规则
前往
亚马逊云科技 管理控制台
并选择负载均衡器的
名称
。
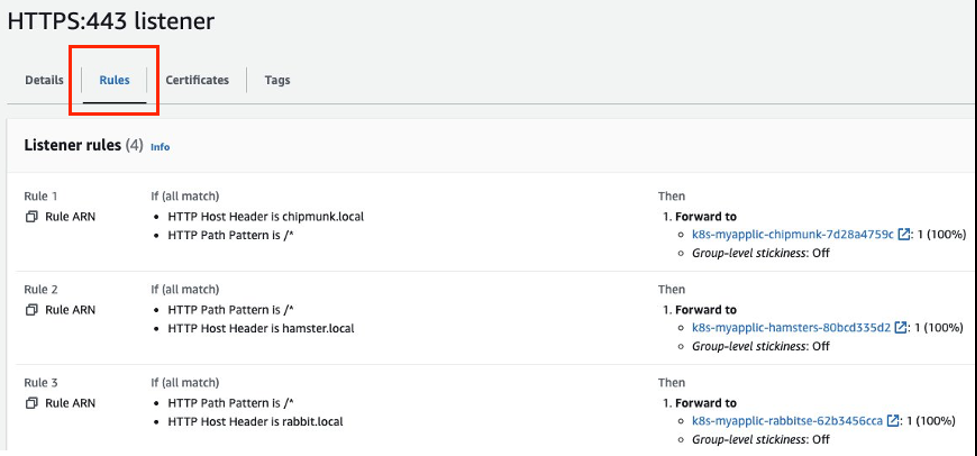
导航到
规则
以查看监听器规则。我们可以看到为应用程序创建的三条规则指向其关联的目标组,如下图所示。
步骤 E:创建 Route53 区域和记录
出于演示目的,我们将在 Route53 中创建三个私有托管区域,以私有设置为流量提供服务。在现实世界中,您极有可能创建公共托管区域,这些区域指向面向公众的应用程序负载均衡器。
使用 亚马逊云科技 CLI 在 Route53 上创建三个私有托管区域:
输入 VPC-ID(部署 Amazon EKS 集群的那个)。
aws route53 create-hosted-zone --name rabbit.local \
--caller-reference my-private-zone\
--hosted-zone-config Comment=”my private zone”,PrivateZone=true \
--vpc VPCRegion=us-east-1,VPCId=<VPC-ID>
重复上面的命令,为 chipmunk.local 和 hamster.local 域名创建私有区域
。
验证所有三个区域是否均已创建:
aws route53 list-hosted-zones
输出示例:
{    "HostedZones": [
        {
            "Id": "/hostedzone/Z082794337ILOZR8XXXX",
            "Name": "rabbit.local.",
            "CallerReference": "07faae71-ba67-4d1b-a3b4-e1e5e527XXXX",
            "Config": {
                "Comment": "my private zone",
                "PrivateZone": true
            },
            "ResourceRecordSetCount": 3
        },
……………..
将域指向应用程序负载均衡器:
将私有托管区域 ID 替换为您的区域 ID,将 DNS-of-alb 替换为在步骤 C 中创建的应用程序负载均衡器
aws route53 change-resource-record-sets --hosted-zone-id <Private-hosted-zone-id> --change-batch \ '{"Changes": [ { "Action": "CREATE", "ResourceRecordSet": { "Name": "rabbit.local", "Type": "A", "AliasTarget":{ "HostedZoneId": "<zone-id-of-ALB>","DNSName": "<DNS-of-ALB>",","EvaluateTargetHealth": false} } } ]}'
对 hamster.loca
l 和
chipmunk.local 域名重复前面的步骤
。
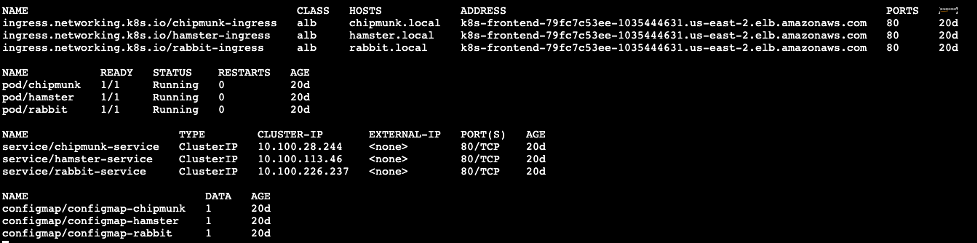
步骤 F:验证 Kubernetes 资源
验证 Kubernetes 资源:
kubectl get ingress,pod,service,configmap -n myapplications-ns
输出示例:
步骤 G:验证解决方案
部署应用程序并启动并运行所有相关资源后,让我们测试我们的应用程序。
-
使用系统管理器 连接到
您的一个 Amazon EKS Worker 节点
-
执行以下命令:
curl -k https://hamster.local
curl -k https://rabbit.local
curl -k https://chipmunk.local
正在清理
为避免将来产生费用,请删除应用程序资源:
kubectl delete -f ./rabbit.yaml ./hamster.yaml ./chipmunk.yaml
卸载 亚马逊云科技 负载均衡器控制器:
helms uninstall aws-load-balancer-controller -n kube-system
删除 亚马逊云科技 负载均衡器控制器的服务账户。将
MY-EKS-CLUSTER-NAME 替换为集群 的名称:
eksctl delete iamserviceaccount \
    --cluster my-cluster \
    --name aws-load-balancer-controller \
    --namespace kube-system \
    --wait
删除 亚马逊云科技 负载均衡器控制器的 亚马逊云科技 IAM 政策。将
111122223333
替换为您的账户 ID。
aws iam delete-policy \
    --policy-arn arn:aws:iam:: 111122223333:policy/AWSLoadBalancerControllerIAMPolicy
结论
在这篇文章中,我们向您展示了如何使用具有 SNI 的基于主机的路由,使用 亚马逊云科技 应用程序负载均衡器的单个实例为多个域提供服务。我们创建了一个带有 IngressG
roup 注释 、TLS(通过 ACM)和流量侦听器的 Ingres
s 资源,通过单个 ALB 向不同的域提供 HTTPS 流量。该解决方案减少了管理开销,是一个经济实惠的选择,因为它不需要为每个域创建专用 ALB。