我们使用机器学习技术将英文博客翻译为简体中文。您可以点击导航栏中的“中文(简体)”切换到英文版本。
使用备份和 bacpac 文件以及亚马逊 S3 将 Azure 中的 SQL Server 数据库迁移到 SQL Server 的亚马逊 RDS 自定义
在这篇文章中,我们向您展示如何使用本机备份和还原方法从 Azure 迁移到
适用于 SQL Server 的 Amazon RDS 自定义是一项托管数据库服务,适用于需要访问底层操作系统和数据库环境的传统、自定义和打包应用程序。适用于 SQL Server 的 Amazon RDS Custom 可自动设置、操作和备份 亚马逊云科技 云中的数据库,同时授予您访问数据库和底层操作系统的权限。借助 Amazon RDS Custom,您可以获得
在撰写本文时,Azure 平台有三种产品:Azure SQL VM、Azure SQL 托管实例和 Azure SQL 数据库。将 SQL Server 数据库从 Azure 迁移到适用于 SQL Server 的亚马逊 RDS 定制版的常用方法是使用本机备份和还原方法(.bak 文件)。但是,这只有 Azure SQL 虚拟机和 Azure SQL 托管实例支持,它们还支持数据层应用程序备份包文件 (.bacpac)。Azure SQL 数据库仅支持.bacpac 文件。有关.bacpac 文件迁移限制的详细信息以及适用于 SQL Server 的亚马逊 RDS 的类似解决方案,请参阅
解决方案概述
下图说明了 SQL Server 数据库从微软 Azure 迁移到适用于 SQL Server 的亚马逊 RDS Custom 的典型步骤。
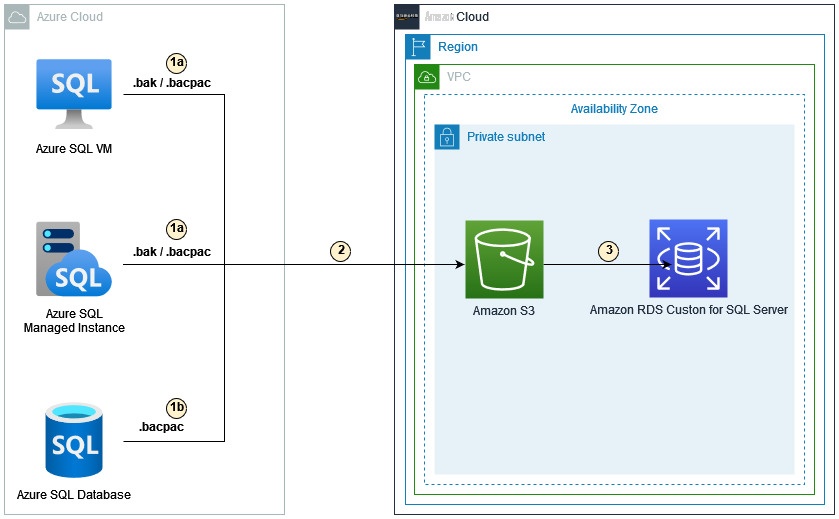
步骤如下:
-
备份数据库:
- Azure SQL 虚拟机和 Azure SQL 托管实例支持原生 SQL Server 备份和恢复以及.bacpac 文件。
- Azure SQL 数据库仅支持.bacpac 文件。
-
将原生备份文件或.bacpac 文件复制到
亚马逊 Simple Storage Servic e (Amazon S3)。 - 将文件从 Amazon S3 下载到 RDS 实例并进行恢复。
先决条件
我们假设您有以下先决条件:
-
亚马逊 EC2、亚马逊云科技
命令行接口 ( 亚马逊云科技 CLI) 和亚马逊 RDS 等 亚马逊云科技 服务的基础知识。 -
有关如何设置和启动适用于 SQL Server 实例和 Azure 平台的 RDS 自定义的基本知识。有关更多信息,请参阅为
自定义 SQL Server 的 Amazon RDS 创建和连接数据库实例 。 -
有关
数据层应用程序 和SQLPackage 的背景知识。 -
配置为存储必要的数据库备份文件的 S3 存储桶。有关说明,请参阅
创建存储桶 。
由于 亚马逊云科技 资源的设置和使用,此解决方案会给您的账户带来费用。有关更多信息,请参阅
使用.bak 文件在 Azure 平台上迁移 SQL 数据库
此过程包括对托管在 Azure 中的 SQL 数据库执行完整备份(仅支持 Azure SQL VM 和 Azure SQL 托管实例产品),然后进行差异备份和日志备份,然后将相同的备份恢复到目标 Amazon RDS Custom for SQL Server 实例。遵循此过程可以减少迁移过程中的应用程序切换时间。有关更多信息,请参阅
使用.bacpac 文件迁移 Azure SQL 数据库
Azure 平台中的所有三款产品(Azure SQL VM、Azure SQL 托管实例、Azure SQL 数据库)均支持 Bacpac。Bacpac 是一个压缩的压缩文件(扩展名为.bacpac),其中包含数据库的元数据和数据。为确保.bacpac 文件的事务一致性,请确保在导出期间不发生写入活动。一种常用的方法是停止对数据库的任何写入活动或对数据库的快照执行导出。成功导出.bacpac 文件后,可以删除快照。
以下是迁移.bacpac 文件所涉及的步骤:
-
从 Azure 中的 SQL 数据库中导出.bacpac 文件。你可以使用 Azure 门户、SqlPackage.exe、Azure 数据工作室或 PowerShell。有关更多信息,请参阅
导出到 BACPAC 文件——Azure SQL 数据库和 Azure SQL 托管实例 。 -
使用 亚马逊云科技 CLI 或亚马逊 S3 控制台将.bacpac 文件上传到亚马逊 S3。有关详细信息,请参阅
上传对象 。 -
使用 亚马逊云科技 CLI 将.bacpac 文件下载到托管亚马逊 RDS Custom for SQL Server 的 EC2 实例。建议使用 D 驱动器。有关如何下载文件的详细信息,请参阅
下载对象 。 - 使用数据层应用程序 SqlPackage.exe 将.bacpac 文件导入适用于 SQL Server 的亚马逊 RDS Custom。
在本文的其余部分中,我们假设步骤 1-3 已完成,.bacpac 文件已下载到
D:\Backup
中的 EC2 实例,您可以使用
使用 SSMS 导入数据层应用程序
在托管亚马逊 RDS Custom for SQL Server 的 EC2 实例上打开 SQL Server 管理工作室 (SSMS)。SSMS 具有使用数据层应用程序从.bacpac 导入数据的向导。
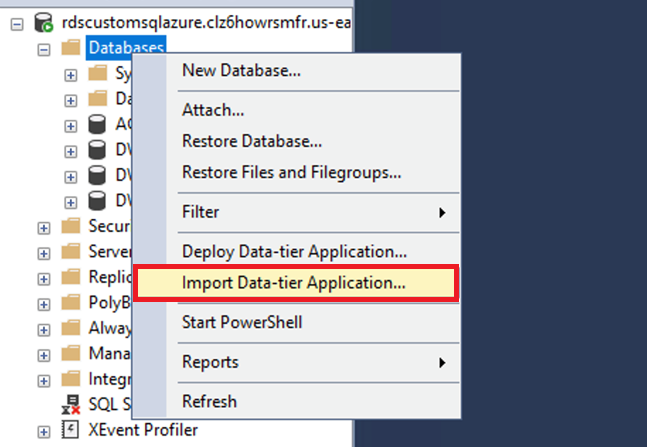
- 在 SSMS 中,选择(右键单击) 数据库 。
-
选择 “
导入数据层应用程序
”。
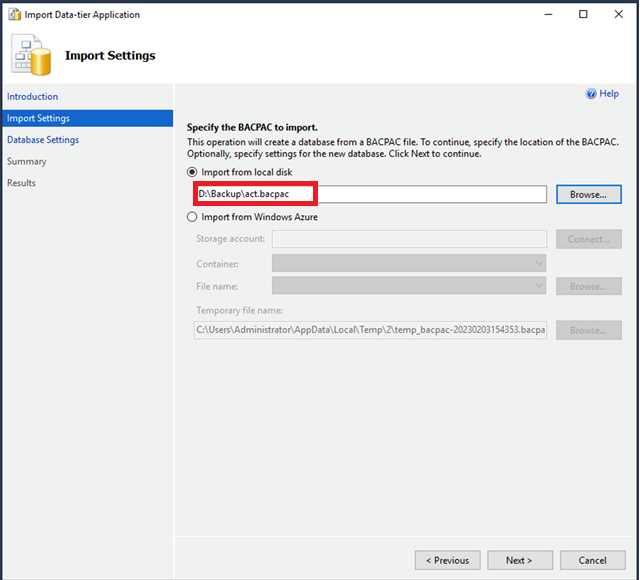
- 选择 “ 从本地磁盘 导 入”, 然后输入.bacpac 文件的源位置。
-
选择 “
下一步
” 。
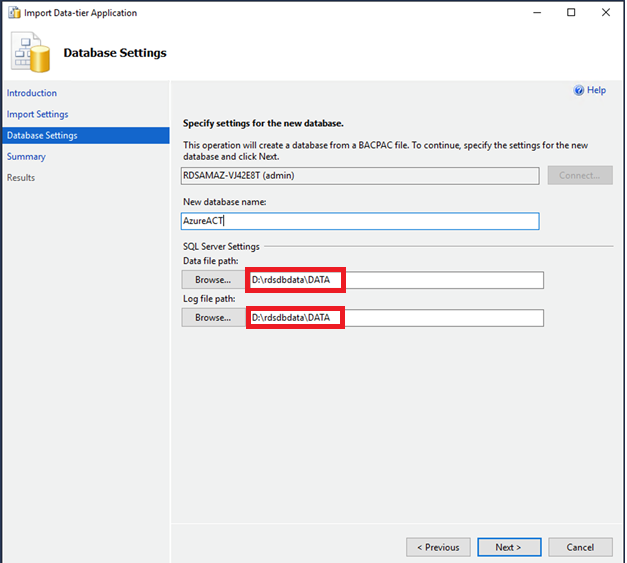
- 在 “ 新数据库名称 ” 中 ,输入数据库的名称。
所有 SQL Server 数据库文件都存储在
D:\rdsdbdata\Data
目录中。如果您将数据库文件位置创建或更改为 D: 驱动器以外的任何位置,则 Amazon RDS Custom 会将数据库实例置于支持范围之外。有关更多信息,请参阅
- 选择 “ 下一步 ” 。
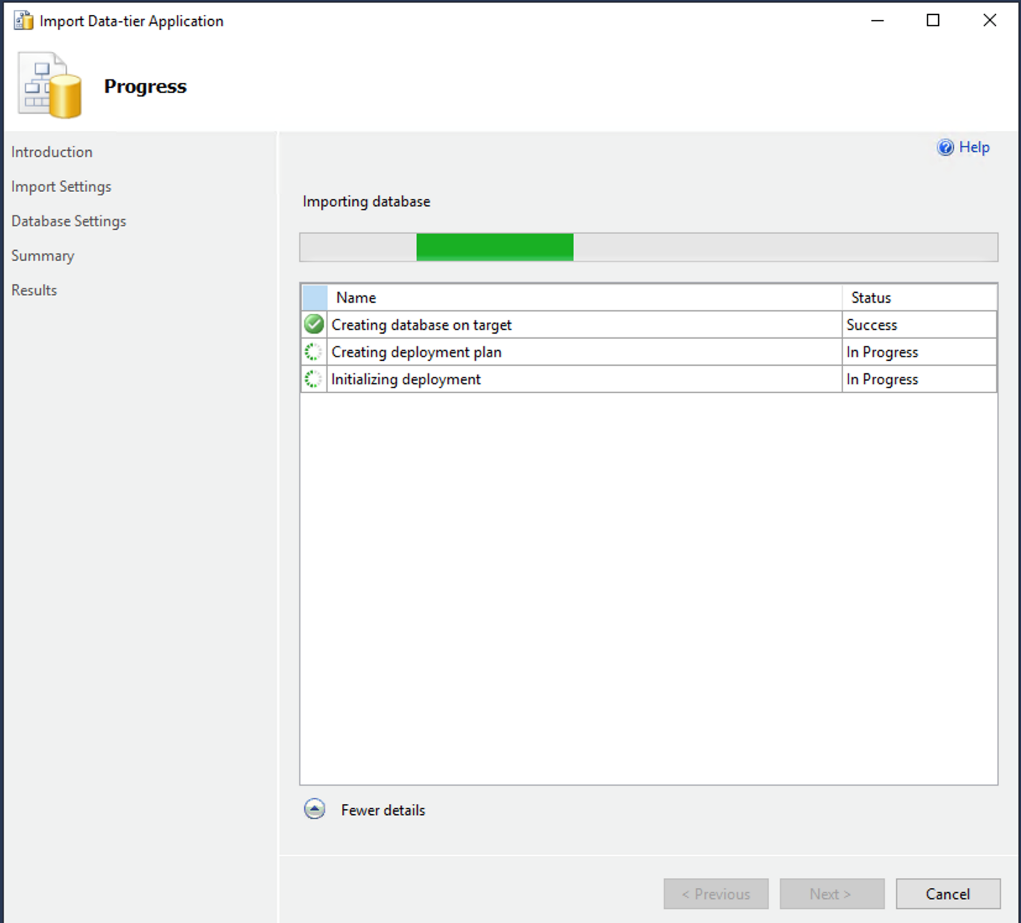
状态栏显示导入进度。
-
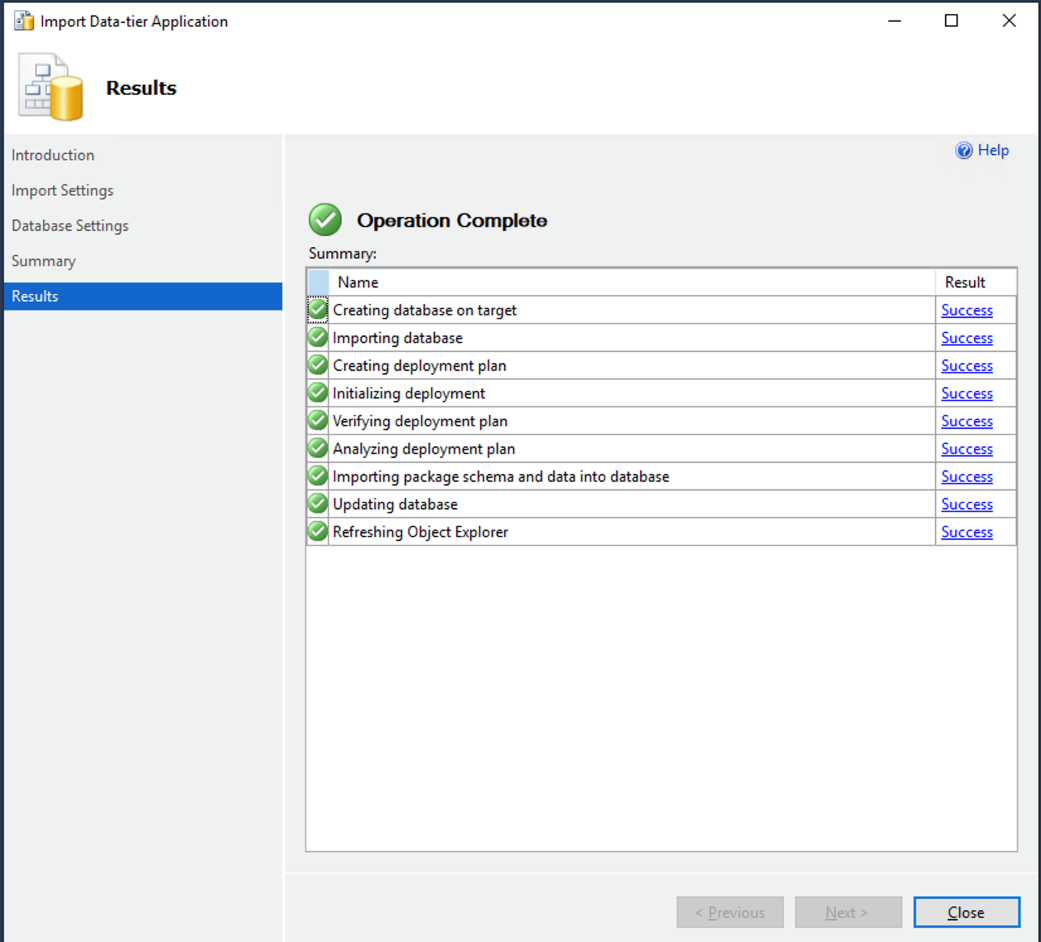
数据库创建完成后,选择
关闭
。
SQLPackage.exe
将.bacpac 文件导入 Amazon RDS Custom for SQL Server 的另一种方法是使用 SQLPackage.exe,它是一个命令行实用程序。您必须在适用于 SQL Server 的亚马逊 RDS 定制版上安装此实用程序。有关更多信息,请参阅
完成以下步骤:
-
在托管@@
适用 于 SQL 服务器的亚马逊 RDS Custom 的 EC2 实例上安装 SQLPackage.exe 。 - 在托管 Amazon RDS Custom for SQL Server 的 EC2 服务器上通过 CMD 外壳运行 SQLPackage.exe:
例如:

要了解有关 SqlPackage 导入参数的更多信息,请参阅
您可以将参数 t
argetenCryptConnection
设置 为在不加密的情况下进行连接或信任服务器证书。在前面的示例中,t
argetenCryptConnection
设置为
false
, 因为它 是在适用于 SQL Server 的 Amazon RDS Custom 上本地运行的。要了解更多信息,请参阅
你也可以使用 PowerShell 和 Azure Data Studio 来导入.bacpac 文件。有关更多信息,请参阅
清理
完成迁移后,您可以从 EC2 实例和 S3 存储桶中移除不再需要的文件。
摘要
在这篇文章中,我们介绍了如何使用 bacpac 方法将 SQL Server 数据库从 Azure 迁移到 Amazon RDS Custom for SQL Server。你学习了如何在 Azure SQL 虚拟机和 Azure SQL 托管实例支持中对数据库使用本机备份/恢复,以及如何将.bacpac 文件用于 Azure SQL 数据库。
如果您有任何问题或建议,请将其留在评论部分。
作者简介
 InduteJa Aligeti
是 亚马逊云科技 的首席数据库顾问。她在微软科技公司工作了16多年,专攻SQL Server。她专注于帮助客户构建高可用性、经济实惠的数据库解决方案,并将其大规模 SQL Server 数据库迁移到 亚马逊云科技。
 Priya Nair 是 亚马逊云科技
的数据库顾问。她在使用不同数据库技术方面拥有 18 多年的经验。她是数据库迁移专家,帮助亚马逊客户将其本地数据库环境迁移到 亚马逊云科技 云数据库解决方案。
 Jose Amado-Blanco
是一名数据库迁移高级顾问,在使用 亚马逊云科技 专业服务方面拥有超过 25 年的经验。他帮助客户将其数据库解决方案从本地迁移到 亚马逊云科技 并对其进行现代化改造。
*前述特定亚马逊云科技生成式人工智能相关的服务仅在亚马逊云科技海外区域可用,亚马逊云科技中国仅为帮助您发展海外业务和/或了解行业前沿技术选择推荐该服务。