Migrate Oracle Databases to Amazon Web Services using transportable tablespace

by Vishal Srivastava , Vineet Agarwal , and Manash Kalita | on

Administering databases in self-managed environments such as on premises or Amazon Elastic Compute Cloud (Amazon EC2) requires you to spend time and resources on database administration tasks such as provisioning, scaling, patching, backups, and configuring for high availability. Organizations are moving their self-managed Oracle databases to Amazon Web Services managed database services to offload undifferentiated heavy lifting of their applications and gain access to cloud services.

In this post, we describe the key factors you should consider for a migration and then dive into an example of performing a physical migration of a self-managed Oracle database to Amazon EC2 and Amazon Relational Database Service (Amazon RDS) Custom for Oracle using Oracle transportable tablespaces. Migration from self-managed Oracle database can be done via one of several options. Depending upon the environment and use case, you can choose the best migration path. Transportable tablespace provides a very fast and efficient mechanism to move large volumes of data from one database system to another. With transportable tablespace you can also move data across different platforms or operating systems.

Key factors to consider for migration

  • Make sure there is enough storage allocated on the target database server, so that the source datafiles can be copied.
  • The tablespaces being transported can be either dictionary managed or locally managed. Starting with Oracle 9i, the transported tablespaces are not required to be of the same block size as the destination database standard block size.
  • If you’re transporting a tablespace of a different block size than the standard block size of the database receiving the tablespace set, you must first have a DB_nK_CACHE_SIZE initialization parameter entry in the receiving database parameter file. For example, if you’re transporting a tablespace with an 8 K block size into a database with a 4 K standard block size, then you must include a DB_8K_CACHE_SIZE initialization parameter entry in the parameter file. If it’s not already included in the parameter file, you can set this parameter using the ALTER SYSTEM SET statement.
  • You can reduce the transportable tablespace downtime using cross-platform incremental backup. Refer to the Oracle Doc ID 2471245.1 .
  • Make sure there is network connectivity using public internet, VPN or Amazon Web Services Direct Connect and make sure there is enough bandwidth to support the data transfer between the source and target databases. The bandwidth should be “proportional” to the amount of data that needs to be transferred in order to meet the requirements.
  • The source and target Oracle Database version and DB instance OS types must be compatible. The following link provides compatibility considerations for Transporting data.

Based on these factors, you can choose offline or online migration using physical migration, logical migration, or a combination of both physical and logical migration approaches.

Solution overview

In this post, we focus on the steps to migrate an Oracle database on Amazon EC2 to Amazon RDS Custom for Oracle using transportable tablespaces. You can use any Oracle source and Oracle target .

After you determine whether you need to convert the data before migration and check character set compatibility, you can complete the migration steps.

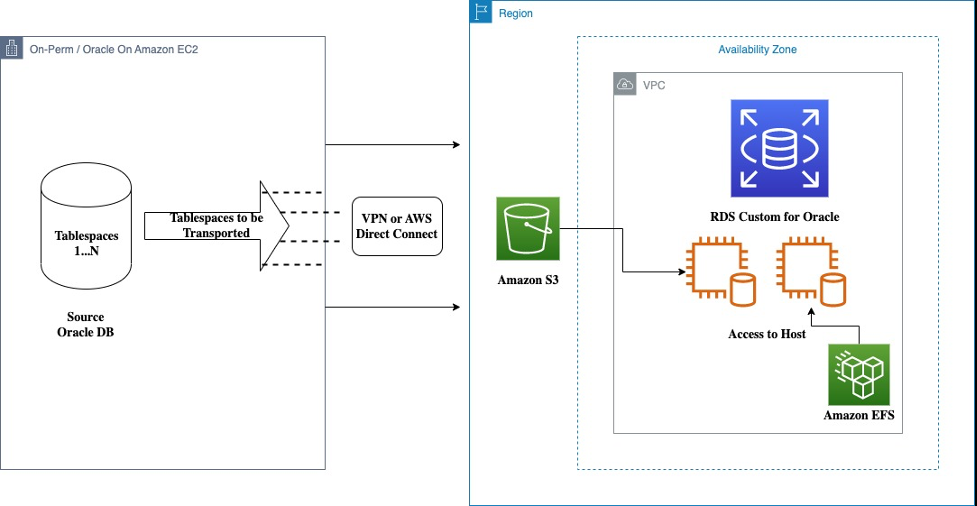
The following diagram illustrates our architecture for the transportable tablespace feature.

The Source can be on premises or Oracle on Amazon EC2. In the following architecture we use transportable tablespace feature to move tablespaces from on premises to RDS Custom for Oracle. You can use Amazon Elastic File System (Amazon EFS) or Amazon Simple Storage Service (Amazon S3) as the landing zone for storing the files.

architecture for the transportable tablespace feature.

Prerequisites

Make sure you meet the following prerequisites:

  • You should have operating system access on both the source and target database host
  • The source is an Oracle database running on premises or Oracle on Amazon EC2
  • If the source platform and target platform are different, then refer to the section Check Endian set compatibility
  • The target database is an RDS Custom for Oracle DB instance. We can also use the same steps for Oracle on Amazon EC2 as a target
  • The source and target databases have identical character sets, or the destination database character set must be a superset of the source database character set
  • Run the migration procedures as the OS user with owner as Oracle

Additionally, complete the following pre-migration checklist:

  • Create a new, empty RDS Custom for Oracle DB instance
  • Create the tablespaces in the target database, with the same name as source database for each tablespace that will be transported. The new target database consists initially of just SYSTEM, SYSAUX, UNDO, USERS, and Temporary tablespaces
  • If you want to import into different user schemas than the source then specify REMAP_SCHEMA in the data pump import command, so that all database objects (such as tables and indexes) are created in the appropriate schema on the target. By default, objects will be created in the same user schema as in the source database, and those users must already exist in the target database. If they don’t exist, then the import utility returns an error
  • Compare the sizes of the SYSTEM, SYSAUX, UNDO, and temporary tablespaces of the target database with that of the source database. To avoid any space issues the best practice is to have the target tablespaces the same size or larger than those tablespaces on the source database
  • The best practice is to have same number of target database log file groups and members as the source. Also, the sizes of log files for each log file group in the new target database should be the same as or larger than the source database
  • As a landing zone for data file copies, you can use Amazon Elastic Block Storage (Amazon EBS), Amazon Elastic File System (Amazon EFS), or Amazon Simple Storage Service (Amazon S3)
  • Make sure you have network connectivity between the source and Amazon RDS Custom for Oracle database servers, and the DB port where the database is listening (default port is 1521) is open for communication between the two
  • The database options and components used in the source database should be installed on the target database

Check Endian set compatibility

Many, but not all, platforms are supported for cross-platform data transport. You can query the V$TRANSPORTABLE_PLATFORM view to see the platforms that are supported, and to determine each platform’s endian format (byte ordering). The following query displays the platforms that support cross-platform data transport:

COLUMN PLATFORM_NAME FORMAT A40
COLUMN ENDIAN_FORMAT A14
 
SELECT PLATFORM_ID, PLATFORM_NAME, ENDIAN_FORMAT 
  FROM V$TRANSPORTABLE_PLATFORM
  ORDER BY PLATFORM_ID;

PLATFORM_ID PLATFORM_NAME                            ENDIAN_FORMAT
----------- ---------------------------------------- --------------
          1 Solaris[tm] OE (32-bit)                  Big
          2 Solaris[tm] OE (64-bit)                  Big
          3 HP-UX (64-bit)                           Big
          4 HP-UX IA (64-bit)                        Big
          5 HP Tru64 UNIX                            Little
          6 AIX-Based Systems (64-bit)               Big
          7 Microsoft Windows IA (32-bit)            Little
          8 Microsoft Windows IA (64-bit)            Little
          9 IBM zSeries Based Linux                  Big
         10 Linux IA (32-bit)                        Little
         11 Linux IA (64-bit)                        Little
         12 Microsoft Windows x86 64-bit             Little
         13 Linux x86 64-bit                         Little
         15 HP Open VMS                              Little
         16 Apple Mac OS                             Big
         17 Solaris Operating System (x86)           Little
         18 IBM Power Based Linux                    Big
         19 HP IA Open VMS                           Little
         20 Solaris Operating System (x86-64)        Little
         21 Apple Mac OS (x86-64)                    Little

If the source platform and the target platform are of the same endianness, then the data is transported from the source platform to the target platform without any data conversion.

Refer to the section Convert data if the endian formats are different .

Check character set compatibility

Run these commands on the source and destination databases to find character sets that are compatible:

On the source, use the following query:

SQL> select * from database_properties where PROPERTY_NAME in ('NLS_CHARACTERSET','NLS_NCHAR_CHARACTERSET');

PROPERTY_NAME PROPERTY_VALUE DESCRIPTION

----------------------- ------------ ------------------

NLS_NCHAR_CHARACTERSET AL16UTF16 NCHAR Character set

NLS_CHARACTERSET  US7ASCII Character set

On the target, use the following query:

SQL> select * from database_properties where PROPERTY_NAME in ('NLS_CHARACTERSET','NLS_NCHAR_CHARACTERSET');

PROPERTY_NAME PROPERTY_VALUE DESCRIPTION

----------------------- ------------ ------------------

NLS_NCHAR_CHARACTERSET AL16UTF16 NCHAR Character set

NLS_CHARACTERSET  US7ASCII Character setSQL> select * from database_properties where PROPERTY_NAME in ('NLS_CHARACTERSET','NLS_NCHAR_CHARACTERSET');

PROPERTY_NAME PROPERTY_VALUE DESCRIPTION

----------------------- ------------ ------------------

NLS_NCHAR_CHARACTERSET AL16UTF16 NCHAR Character set

NLS_CHARACTERSET  US7ASCII Character set

Pick a self-contained set of tablespaces from the source database

There may be logical or physical dependencies between the database objects in the transportable set and the database objects outside of the transportable set. You can only transport a tablespace set that is self-contained, that is, none of the database objects inside a tablespace set are dependent on any of the database objects outside of that tablespace set.

Some examples of self-contained tablespace violations are:

  • An index inside the set of tablespaces is for a table outside of the set of tablespaces. Note that it’s not a violation if a corresponding index for a table is outside of the set of tablespaces
  • A partitioned table is partially contained in the set of tablespaces
  • The tablespace set that you want to copy must contain either all partitions of a partitioned table, or none of the partitions of a partitioned table. To transport a subset of a partitioned table’s partitions , you must exchange the partitions into tables
  • A referential integrity constraint points to a table across a set boundary. When transporting a set of tablespaces, you can choose to include referential integrity constraints. However, doing so can affect whether a set of tablespaces is self-contained. If you decide not to transport constraints, then the constraints aren’t considered as pointers
  • A table inside the set of tablespaces contains a LOB column that points to LOB columns outside the set of tablespaces or vice versa
  • An XML DB schema (*.xsd) that was registered by user A imports a global schema that was registered by user B, and the following is true: the default tablespace for user A is tablespace A, the default tablespace for user B is tablespace B, and only tablespace A is included in the set of tablespaces

You can use the following statement to determine whether tablespace HR are self-contained, with referential integrity constraints taken into consideration (indicated by TRUE):

SQL> EXECUTE DBMS_TTS.TRANSPORT_SET_CHECK('HR', TRUE);

PL/SQL procedure successfully completed.

After running the DBMS_TTS.TRANSPORT_SET_CHECK procedure, you can see all the violations by selecting from the TRANSPORT_SET_VIOLATIONS view. If the set of tablespaces is self-contained, then this view is empty.

SQL> SELECT * FROM TRANSPORT_SET_VIOLATIONS;

no rows selected

You must resolve any violations before tablespaces are transportable. As noted in the next task, one choice for bypassing the integrity constraint violation is not to export the integrity constraints.

Generate a transportable tablespace set

After ensuring that you have a self-contained set of tablespaces that you want to transport, generate a transportable tablespace set with the following steps:

  1. Start SQL*Plus and connect to the database as an administrator or as a user who has either the ALTER TABLESPACE or MANAGE TABLESPACE system privilege.
  2. Make all tablespaces in the set read-only:
    SQL> ALTER TABLESPACE HR READ ONLY;
  3. Run the Data Pump export utility as a user with the DATAPUMP_EXP_FULL_DATABASE role and specify the tablespaces in the transportable set:
    $ expdp user_name dumpfile=expdat.dmp directory=data_pump_dir transport_tablespaces=HR logfile=tts_export.log

You must always specify TRANSPORT_TABLESPACES , which indicates that the transportable option is used. This example specifies the following additional Data Pump parameters:

  • DUMPFILE – Specifies the name of the structural information export dump file to be created, expdat.dmp
  • DIRECTORY – Specifies the directory object that points to the operating system or Oracle Automatic Storage Management location of the dump file
  • DATA_PUMP_DIR – In a non-CDB, the directory object is created automatically. However, the directory object DATA_PUMP_DIR is not created automatically in a PDB. Therefore, when exporting from or importing into a PDB, create a directory object in the PDB and specify the directory object when you run Data Pump
  • LOGFILE – Specifies the log file to create for the export utility. In this example, the log file is created in the same directory as the dump file, but you can specify any other directory for storing the log file

To perform a transport tablespace operation with a strict containment check, use the TRANSPORT_FULL_CHECK parameter, as shown in the following example:

expdp user_name dumpfile=expdat.dmp directory=data_pump_dir transport_tablespaces=HR transport_full_check=y logfile=tts_export.log

When using transport_full_check , the Data Pump export utility verifies that there are no dependencies and the tablespace set being transported is self-contained, otherwise the export fails. You must resolve any violations and then run this task again.

The expdp utility displays the names and paths of the dump file and the data files on the command line, as shown in the following example. These are the files that you need to transport to the target database. Also, check the log file for any errors.

*

Dump file set for SYSTEM.SYS_EXPORT_TRANSPORTABLE_01 is:

  /rdsdbdata/datapump/expdat.dmp

*

Datafiles required for transportable tablespace HR:

/rdsdbdata/oracle/dbs/hr.dbf

Transport the export dump file to the target database

To copy or move the dump files and the data file from source to target, you can use any of the following methods.

If both the source and destination are files systems, you can use:

  • Any facility for copying flat files (for example, an operating system copy utility or FTP)
  • DBMS_FILE_TRANSFER package
  • RMAN

If either the source or target is an automatic storage management (ASM) disk group, you can use:

  • FTP to or from the /sys/asm virtual folder in the XML DB repository
  • The dbms_file_transfer package
  • RMAN

Transport the dump file to the directory pointed to by the DATA_PUMP_DIR directory object, or to any other directory of your choosing. The new location must be accessible to the target database.

At the target database, run the following query to determine the location of DATA_PUMP_DIR :

SELECT * FROM DBA_DIRECTORIES WHERE DIRECTORY_NAME = 'DATA_PUMP_DIR';

OWNER DIRECTORY_NAME DIRECTORY_PATH

---------- ---------------- -----------------------------------

SYS DATA_PUMP_DIR /rdsdbdata/datapump

Move the datafiles of the transportable tablespace set

Transport the data files of the tablespaces (for this post, HR.dbf) from the source database to a directory on the target database. The directory should be part of the instance storage or Amazon EFS that is mounted on the instance.

If you’re transporting the HR tablespace to a different platform, you can run the following query on each platform:

SELECT d.PLATFORM_NAME, ENDIAN_FORMAT

FROM V$TRANSPORTABLE_PLATFORM tp, V$DATABASE d

WHERE tp.PLATFORM_NAME = d.PLATFORM_NAME;

If the query returns a row, the platform supports cross-platform tablespace transport.

The following is the query result from the source platform:

PLATFORM_NAME ENDIAN_FORMAT

---------------------------------- --------------

Linux x86 64-bit Little

The following is the result from the target platform:

PLATFORM_NAME ENDIAN_FORMAT

---------------------------------- --------------

Linux x86 64-bit  Little

In this example, you can see that the endian formats are the same. If no endianness conversion of the tablespaces is needed, then you can transfer the files using any file transfer method.

Convert data if the endian formats are different

There are two ways to convert data when the endian formats are different

  • Use either the GET_FILE or PUT_FILE procedure in the DBMS_FILE_TRANSFER package to transfer the data files. These procedures convert the data files to the target platform’s endian format automatically.
  • RMAN can transport databases, data files, and tablespaces across platforms using backup sets. Performing cross-platform data transport with backup sets enables you to use block compression to reduce the size of backups. This improves backup performance and reduces the time taken to transport backups over the network.

For the detailed steps on using RMAN backup sets for cross-platform data transfer to a different endian platform, follow Oracle Support Doc ID 2013271.1 .

Restore tablespaces to read/write mode (Optional)

Make the transported tablespaces read/write again at the source database:

ALTER TABLESPACE HR READ WRITE;

You can postpone this task to first ensure that the import process succeeds.

Import the tablespace set

To complete the transportable tablespaces operation, import the tablespace set.

Run the Data Pump import utility as a user with the DATAPUMP_IMP_FULL_DATABASE role to import the tablespace metadata:

impdp user_name dumpfile=expdat.dmp directory=data_pump_dir /

transport_datafiles='rdsdbdata/oracle/dbs/hr.dbf' /

remap_schema=HR:HR_Target remap_schema=sales2:crm2 logfile=tts_import.log

This example specifies the following Data Pump parameters:

  • DUMPFILE – Specifies the exported file containing the metadata for the tablespaces to be imported
  • DIRECTORY – Specifies the directory object that identifies the location of the export dump file. The directory must exist and must grant read and write privileges to the user running the import
  • TRANSPORT_DATAFILES – List all the data files containing the tablespaces to be imported. You can specify the TRANSPORT_DATAFILES parameter multiple times in a parameter file specified with the PARFILE parameter if there are many data files
  • REMAP_SCHEMA – Changes the ownership of database objects. If you don’t specify REMAP_SCHEMA , then all database objects (such as tables and indexes) are created in the same user schema as in the source database, and those users must already exist in the target database. If they don’t exist, then the import utility returns an error
  • LOGFILE – Specifies the file name of the log file to be written by the import utility. In this example, the log file is written to the directory from which the dump file is read, but it can be written to a different location

After this statement runs successfully, all tablespaces in the set being copied remain in read-only mode. Check the import log file to ensure that no error has occurred.

When dealing with a large number of data files, you can use an import parameter file to make the task definition easier. For example, you can run the Data Pump import utility as follows:

impdp user_name parfile='par.f'

The par.f parameter file contains the following:

DUMPFILE=expdat.dmp

DIRECTORY=data_pump_dir

TRANSPORT_DATAFILES='/rdsdbdata/oracle/dbs/hr.dbf’

remap_schema=HR:HR_Target

remap_schema=sales2:crm2

LOGFILE=tts_import.log

Postmigration tasks

Complete the following tasks to prepare the target Oracle database for use. Run the following queries on the source and target databases to check if data was exported and imported completely without any errors:

  1. View all users that exist in the database:
SQL> SELECT count(*) FROM dba_users; 

SQL> SELECT username, account_status FROM dba_users;
  1. View the total number of objects in the database:
SQL> SELECT count(*) FROM dba_objects; 

SQL> SELECT count(*), owner FROM dba_objects group by owner;
  1. View a list of all the tables owned by the database schema(s) that was migrated. Login to individual schemas in this example connect as HR user and execute the below commands.
SQL> SELECT count(*) FROM user_tables;

SQL> SELECT count(*), tablespace_name FROM user_tables group by tablespace_name;
  1. View the exact size in MBs occupied by the object at the tablespace:
SELECT owner, segment_name, segment_type, partition_name, ROUND(bytes/(1024*1024),2) SIZE_MB, tablespace_name FROM DBA_SEGMENTS WHERE SEGMENT_TYPE IN ('TABLE', 'TABLE PARTITION', 'TABLE SUBPARTITION', 'INDEX', 'INDEX PARTITION', 'INDEX SUBPARTITION', 'TEMPORARY', 'LOBINDEX', 'LOBSEGMENT', 'LOB PARTITION') AND TABLESPACE_NAME LIKE '<tablespace name>%' ORDER BY bytes DESC;
  1. View the total space occupied in MBs:
SELECT tablespace_name, owner, segment_type "Object Type", COUNT(owner) "Number of Objects", ROUND(SUM(bytes) / 1024 / 1024, 2) "Total Size in MB" FROM sys.dba_segments WHERE tablespace_name IN ('<tablespace name>') GROUP BY tablespace_name, owner, segment_type ORDER BY tablespace_name, owner, segment_type;
  1. View the size of the database:
SQL> SELECT a.data_size+b.temp_size+c.redo_size+d.controlfile_size "total_size in MB" FROM ( select sum(bytes)/1024/1024 data_size FROM dba_data_files ) a, (select nvl(sum(bytes),0)/1024/1024 temp_size FROM dba_temp_files) b, (select sum(bytes)/1024/1024 redo_size FROM sys.v_$log) c, (select sum(BLOCK_SIZE*FILE_SIZE_BLKS)/1024/1024 controlfile_size from v$controlfile) d;
  1. Switch transported tablespaces to READ WRITE mode at the destination:
SQL> ALTER TABLESPACE <tablespace name> READ WRITE;
  1. Revert tablespaces to READ WRITE mode at the source (Optional):

The source tablespace can be made read-write after the successful completion of export command or import command. If it was made read-write after export then this step can be ignored.

SQL> ALTER TABLESPACE <tablespace name> READ WRITE;
  1. Create and start appropriate database services or network connectivity on the new destination database.
  2. Redirect applications to destination database.
  3. Clean up the staging directories.
  4. Remove unneeded files from the source and destination hosts.

Limitations on transportable tablespaces

Be aware of the following limitations for transportable tablespaces:

  • You can’t include administrative tablespaces such as SYSTEM and SYSAUX in a transportable tablespace set
  • When transporting a tablespace set, objects with underlying objects (such as materialized views) or contained objects (such as partitioned tables) aren’t transportable unless all of the underlying or contained objects are in the tablespace set
  • Transportable tablespaces can’t transport tables with TIMESTAMP WITH TIMEZONE (TSTZ) data across platforms with different time zone file versions. The transportable tablespace operation skips these tables. You can export and import these tables conventionally
  • When you transport a tablespace containing tables with TIMESTAMP WITH LOCAL TIME ZONE (TSLTZ) data between databases with different time zones, the tables with the TSLTZ data aren’t transported. You can export and import these tables conventionally
  • The maximum size of a single file on RDS Custom for Oracle DB instances is 16 TiB (tebibytes)
  • Tablespaces that don’t use block encryption but contain tables with encrypted columns can’t be transported. You must use Oracle Data Pump to export and import the tablespace’s schema objects. You can take advantage of Oracle Data Pump that enables you to maintain encryption for the data while it is being exported and imported

The limitations described in General Limitations on Transporting Data apply to transportable tablespaces.

Summary

In this post, we highlighted how to use the transportable tablespace feature to migrate Oracle databases to Oracle on Amazon EC2 or Amazon RDS Custom for Oracle.

To learn more about transportable tablespace and Amazon RDS Custom refer to the following resources:

  • Amazon RDS Custom for Oracle
  • Transporting Databases

If you have questions or suggestions, leave a comment.


About the authors

Vineet Agarwal is a Senior Database Specialist Solutions Architect with Amazon Web Services (Amazon Web Services). Prior to Amazon Web Services, Vineet has worked for large enterprises in financial, retail and healthcare verticals helping them with database and solutions architecture. In his spare time, you’ll find him playing poker, trying a new activity or a DIY project.

Vishal Srivastava is a Senior Partner Solutions Architect specializing in databases at Amazon Web Services. In his role, Vishal works with ISV Partners to provide guidance and technical assistance on database projects, helping them improve the value of their solutions when using Amazon Web Services. He also works with Public Sector ISV Partners to help them design scalable, secure, performant, robust database architectures in the Amazon Web Services Cloud.

Manash Kalita is an Amazon Web Services Senior Database Specialist Solutions Architect for APJ, having extensive experience in Enterprise Cloud Architecture.


The mentioned AWS GenAI Services service names relating to generative AI are only available or previewed in the Global Regions. Amazon Web Services China promotes AWS GenAI Services relating to generative AI solely for China-to-global business purposes and/or advanced technology introduction.