我们使用机器学习技术将英文博客翻译为简体中文。您可以点击导航栏中的“中文(简体)”切换到英文版本。
将微软 SQL 服务器 SSIS 包迁移到适用于 SQL Server 的亚马逊 RD
如果您仍在
在这篇文章中,我们将向您展示如何在适用于 SQL Server 的 RDS 自定义数据库实例上配置和使用 SSIS。我们将讨论使用
解决方案概述
我们使用以下高级步骤实施部署 SSIS 包的解决方案:
- 为 SQL 服务器创建 RDS 自定义实例。
- 在适用于 SQL 服务器的亚马逊 RDS 自定义上配置 SSIS。
- 将.ispac 文件上传到亚马逊 S3。
- 将.ispac 文件导入 RDS Custom for SQL Server EC2 实例。
- 将文件部署到适用于 SQL Server 的亚马逊 RDS 定制版。
要部署多个包,可以重复步骤 3 和 4。
先决条件
要在适用于 SQL Server 的亚马逊 RDS Custom 上配置 SSIS,您必须满足以下要求:
- 适用于 SQL Server 的 RDS 自定义实例必须是 SQL Server 2019 标准版或企业版(15.00.4073.23.v1 或更高版本)。
-
该实例必须加入
亚马逊云科技 Directory Service 才能启用 Windows 身份验证。有关说明,请参阅为 SQL Server 数据库实例设置 Windows 身份验证 。 -
SSIS 项目 (.ispac) 文件必须上传到适用于 SQL Server 的亚马逊 RDS Custom 可以访问的 S3 存储桶。有关从项目生成.ispac 文件的说明,请参阅
部署集成服务 (SSIS) 项目 和包。 -
您必须
安装 亚马逊云科技 命令行接口 (亚马逊云科技 CLI),才能将部署的 SSIS 包复制到 EC2 实例的亚马逊弹性区块存储 (Amazon EBS) 卷。 - 由于 SSIS 需要 Windows 身份验证,因此可以考虑将 Amazon RDS Custom 加入到自行管理或 亚马逊云科技 托管的 Active这样,在更换主机的情况下,使用 Windows 身份验证可以无缝连接到 SSIS。否则,如果将本地管理员帐户添加为 SQL 登录,则每次更换主机时都需要使用该帐户。
-
扩展计算或主机更换后,EC2 实例将插入 AD,我们可以使用 SSM 自动加入域。有关更多详细信息,请参阅
自动加入 域名 。
为 SQL 服务器创建 RDS 自定义实例
要在您的账户上创建 RDS 自定义 SQL Server 实例,请参阅为 S
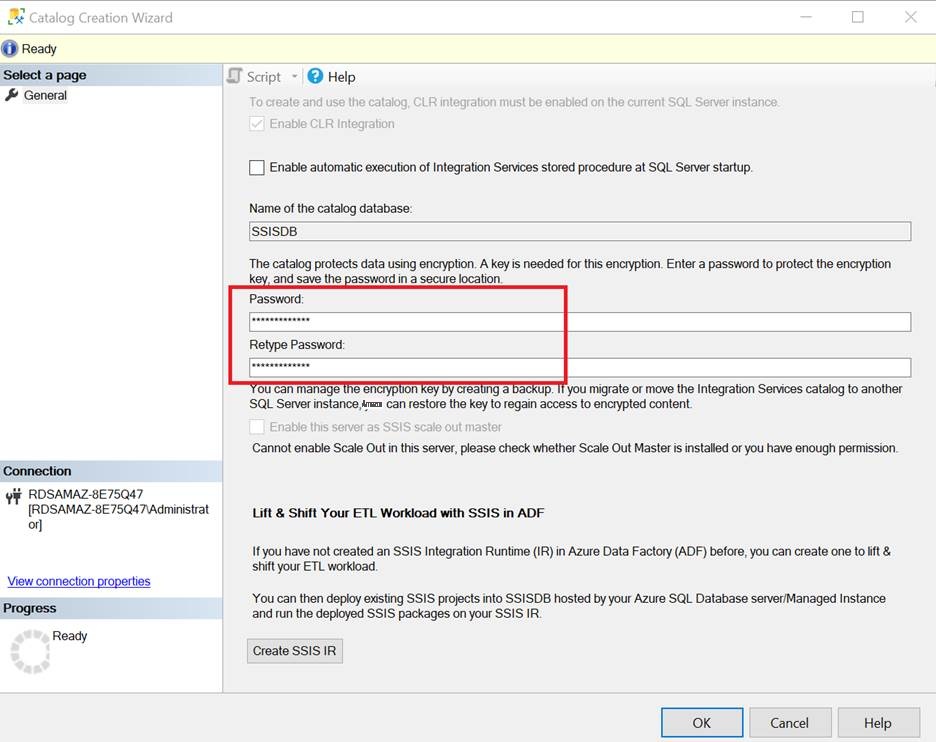
在 SQL Server 的亚马逊 RDS 自定义上配置 SSIS
必须为 SSIS 启用公共语言运行时 (CLR) 集成。检查是否已经为 SQL Server 启用了 CLR。如果未启用,请参阅
有关使用
将.ispac 文件上传到亚马逊 S3
使用
将.ispac 文件导入 EC2 实例
使用 亚马逊云科技 CLI 将.ispac 文件从 S3 存储桶复制到 EC2 实例。建议使用 D 驱动器。有关如何下载文件的详细信息,请参阅
将 SSIS 包部署到适用于 SQL Server 的亚马逊 RDS 定制版
完成以下步骤来部署 SSIS 包:
- 打开 SSMS。
- 使用在目录服务中创建的 Windows 帐户连接到本地主机。
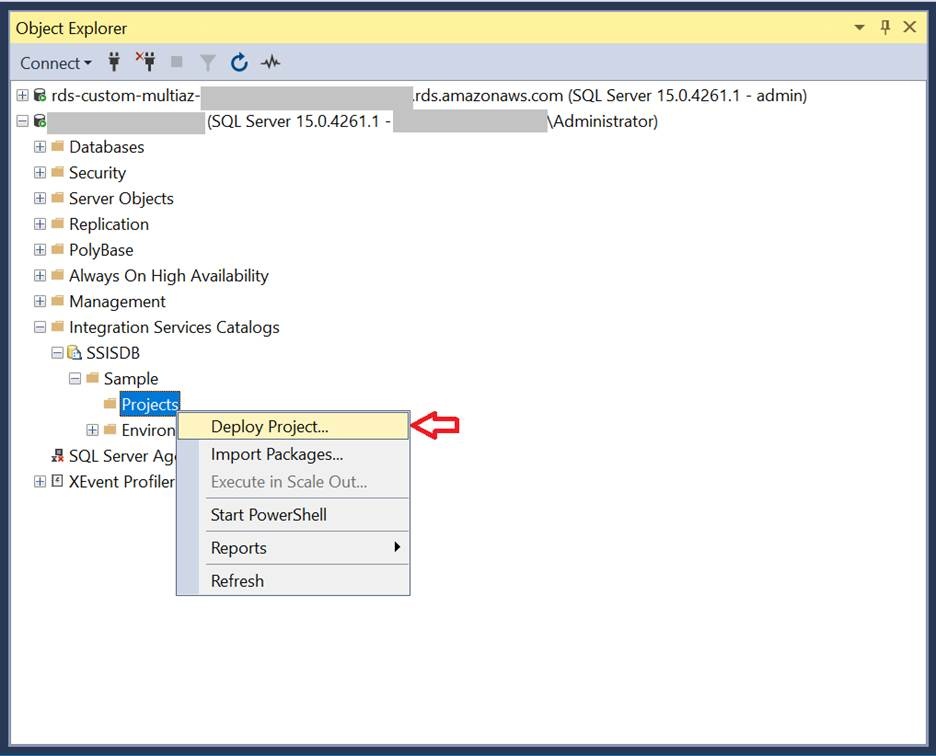
- 展开 “集成服务目录” 下的 SSISDB 文件夹。
- 创建存储项目的示例文件夹。
-
选择(右键单击)“项目” 文件夹,然后选择 “
部署项目
” 。
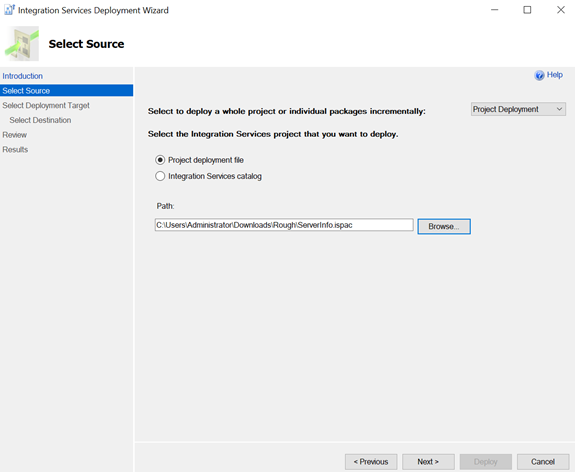
- 当出现集成服务部署时,选择 下一步 。
-
输入从 S3 存储桶下载.ispac 文件的本地路径。
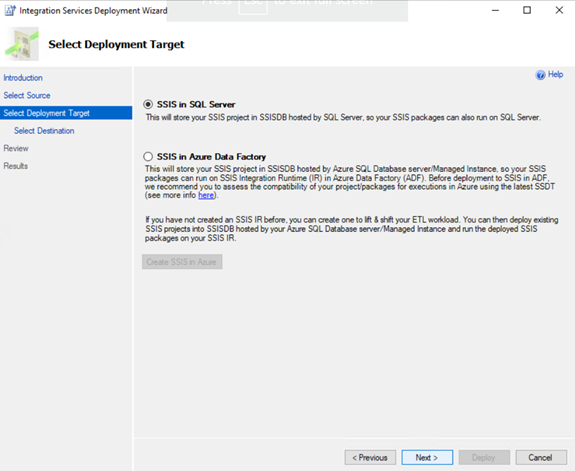
-
在
SQL 服务器中选择 SSIS
,然后选择
下一步
。
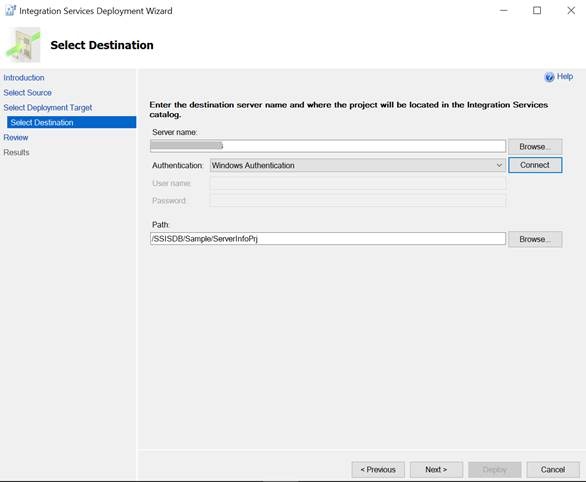
- 输入目标服务器名称并选择 “ 连接 ” 。
- 提供项目所在的路径。
-
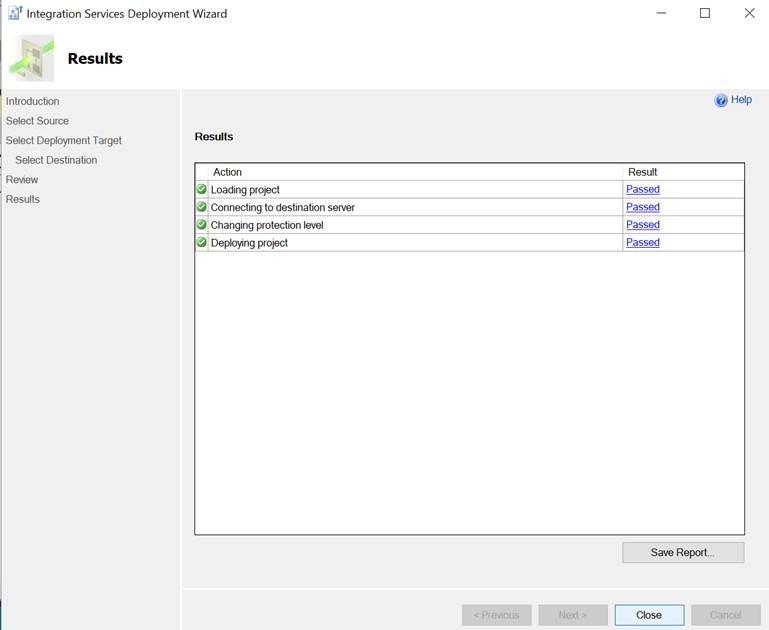
查看您输入的值,然后选择
Deploy
。
-
等待部署完成。
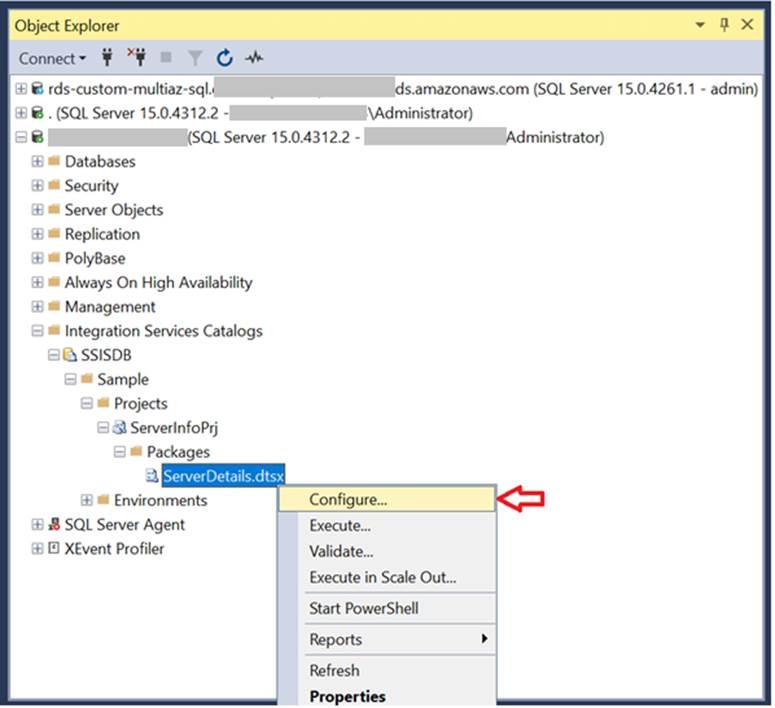
- 您可以在 SSMS 中查看已部署的软件包。
-
确保配置软件包以验证参数是否合适。
- 确保正确定义连接字符串和其他参数值。编辑值以提供输入文件的正确路径。
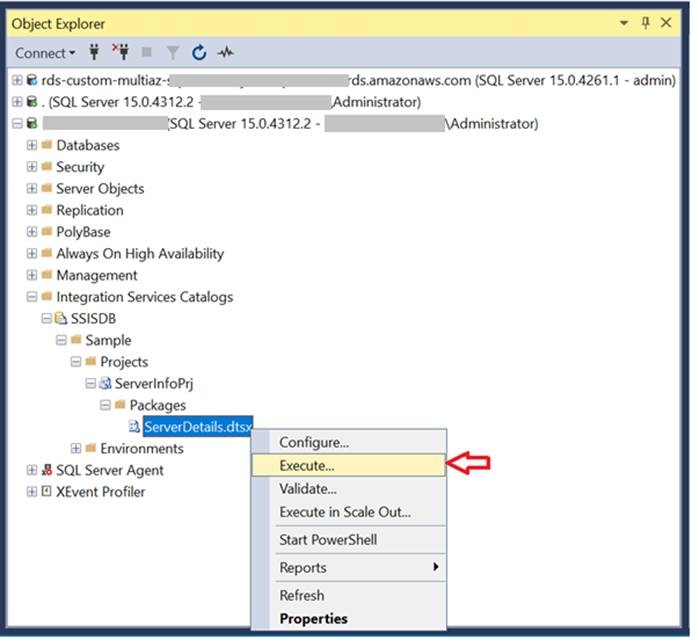
-
要运行该包,请选择(右键单击)它并选择 “
执行
” 。
现在,您可以查看包裹的报告。

清理
完成以下步骤以清理您在这篇文章中创建的资源:
在 Amazon RDS 控制台的导航窗格中,选择 数据库 。
- 选择您为本教程创建并想要删除的 RDS Custom for SQL Server 数据库实例。
- 在 “ 操作 ” 菜单上,选择 “ 删除 ” 。
- 要拍摄最终快照,请选择 创建最终快照 并提供快照的名称。
- 要保留自动备份,请选择 保留自动备份 。
- 在框中输入 “删除我”。
- 选择 “ 删除” 。
- 如果您为本教程创建了新的 EC2 实例和相应的安全组,请同时删除这些资源。
结论
在这篇文章中,你学习了如何将 SQL Server 集成服务迁移到适用于 SQL Server 的亚马逊 RDS 定制版。我们使用 SQL Server 管理工作室从 S3 存储桶安装了 SSIS 软件包。此解决方案允许您克服 Amazon RDS for SQL Server 的
请在评论部分告诉我们您的想法和问题。
作者简介
 InduteJa Aligeti
是 亚马逊云科技 的高级首席数据库顾问。她拥有超过 18 年的微软技术使用经验,专长于 SQL Server。她专注于帮助客户构建高度可用、经济实惠的数据库解决方案,并将其大规模 SQL Server 数据库迁移到 亚马逊云科技。
InduteJa Aligeti
是 亚马逊云科技 的高级首席数据库顾问。她拥有超过 18 年的微软技术使用经验,专长于 SQL Server。她专注于帮助客户构建高度可用、经济实惠的数据库解决方案,并将其大规模 SQL Server 数据库迁移到 亚马逊云科技。
 Kanwar Nain Singh
是亚马逊网络服务的专业解决方案架构师。他在设计和架构包括SQL Server在内的数据库堆栈迁移和现代化方面拥有超过12年的经验。
Kanwar Nain Singh
是亚马逊网络服务的专业解决方案架构师。他在设计和架构包括SQL Server在内的数据库堆栈迁移和现代化方面拥有超过12年的经验。
*前述特定亚马逊云科技生成式人工智能相关的服务仅在亚马逊云科技海外区域可用,亚马逊云科技中国仅为帮助您发展海外业务和/或了解行业前沿技术选择推荐该服务。