We use machine learning technology to do auto-translation. Click "English" on top navigation bar to check Chinese version.
Implement a CI/CD pipeline for Ethereum smart contract development on Amazon Web Services – Part 2
This post discusses the implementation details of an
Solution overview
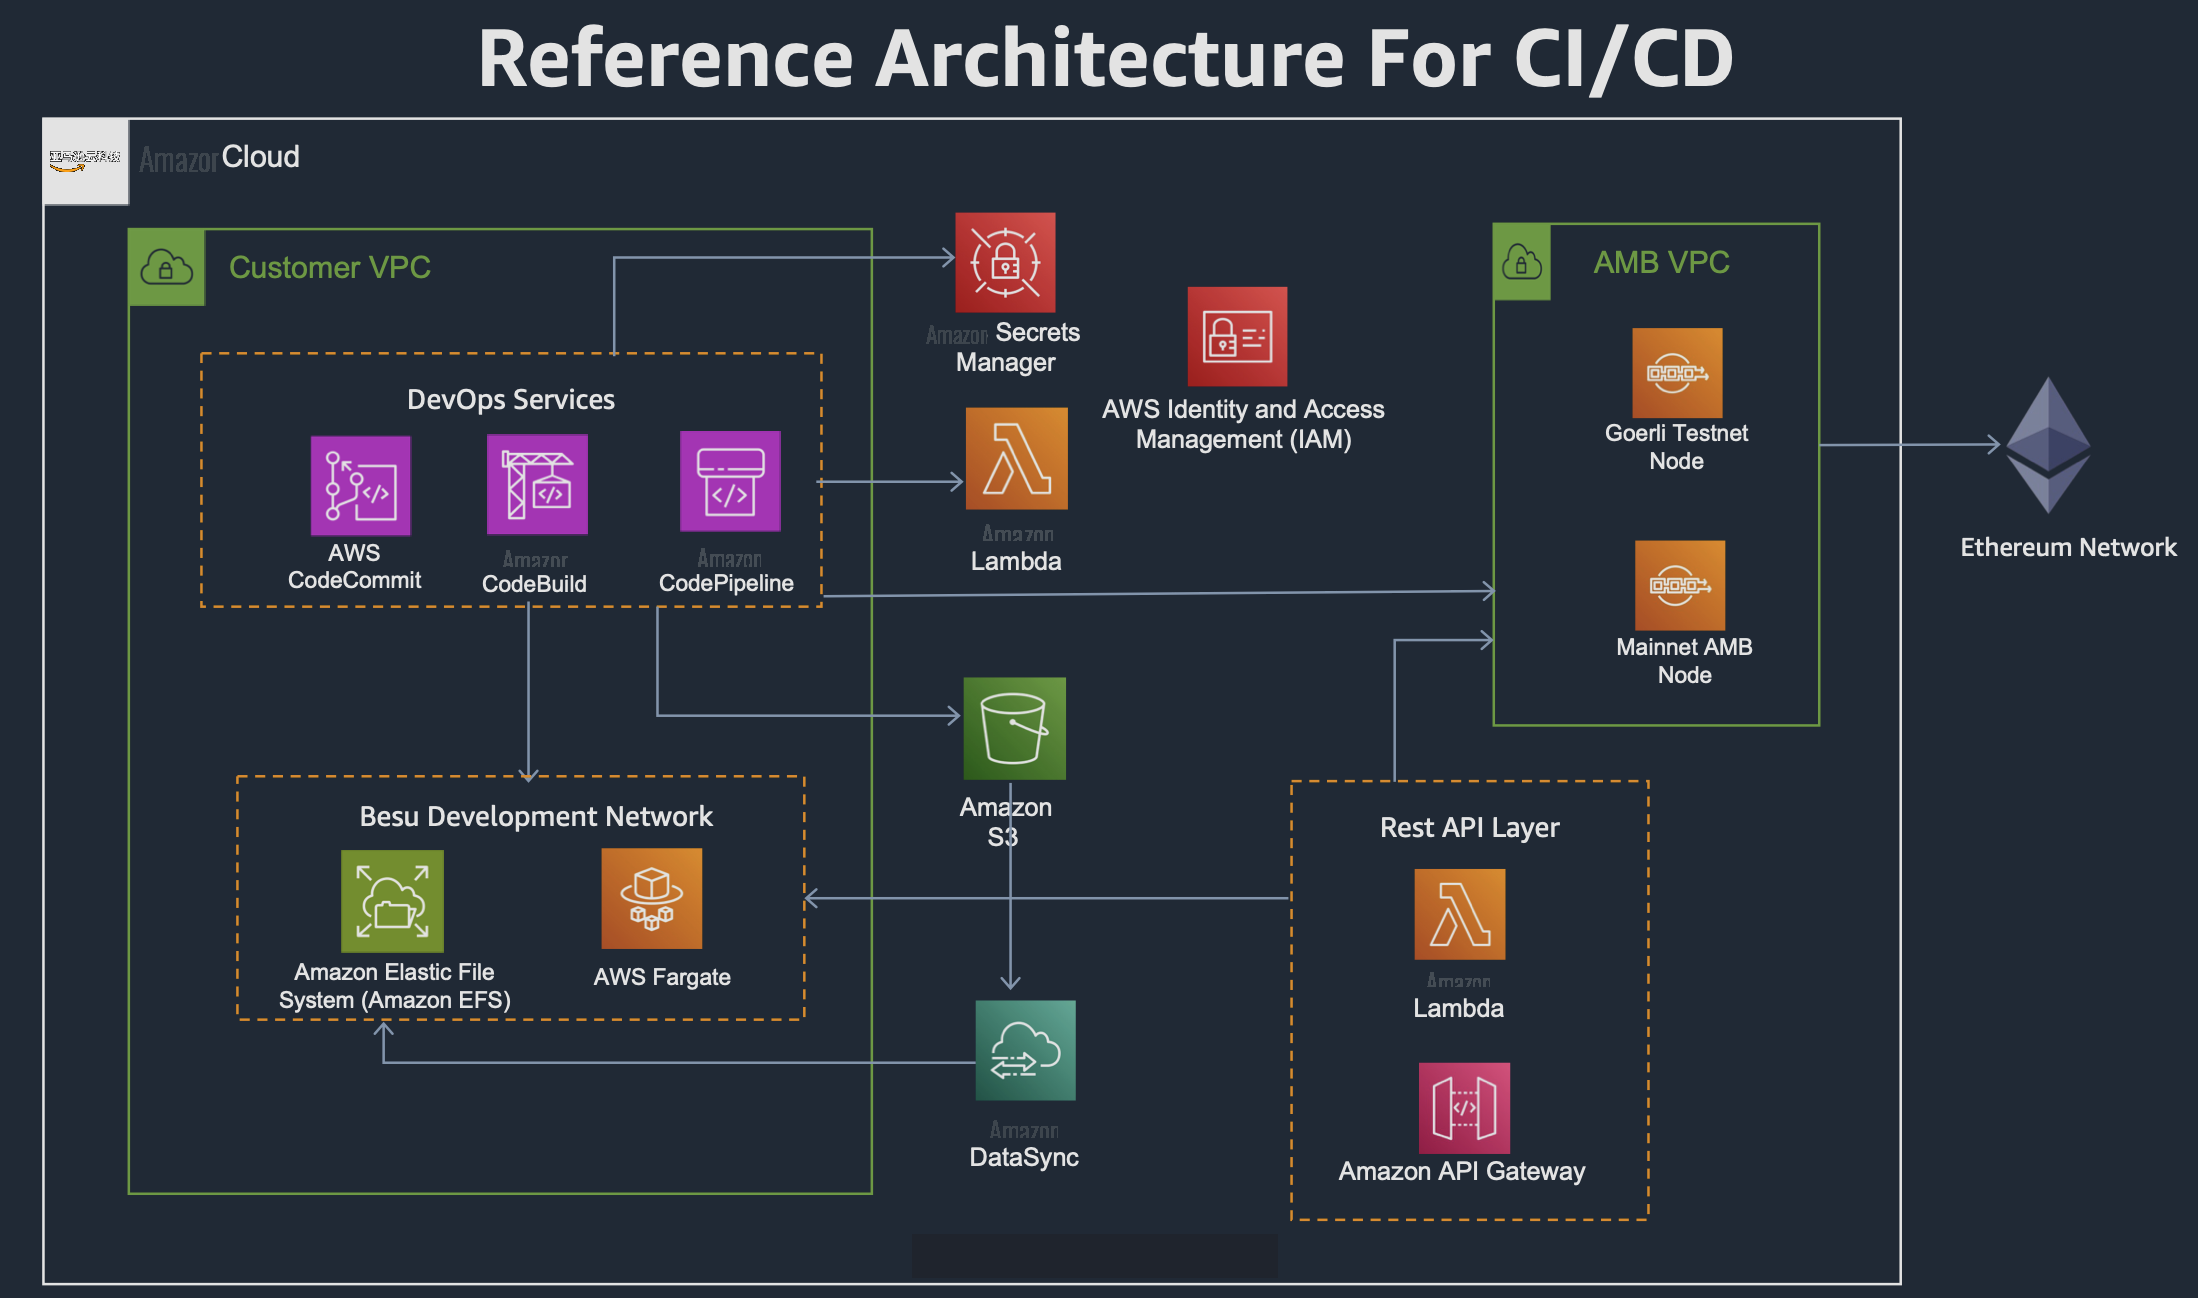
The Amazon Web Services CDK code in this post is built on the solution architecture from Part 1, which is depicted in the following diagram.
The Amazon Web Services CDK code is available in the
README
file in the GitHub repository has instructions on how to deploy the Amazon Web Services CDK stack so it creates all the resources shown in the architecture. When you deploy the stack in your Amazon Web Services account, after installing and configuring all the Amazon Web Services services, it will also run the CI/CD pipeline.
Amazon Web Services CDK project code organization
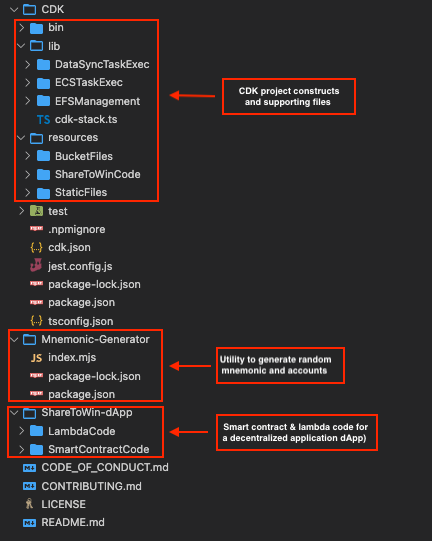
The following screenshot shows how the Amazon Web Services CDK project implementing our CI/CD pipeline is laid out.
All the Amazon Web Services CDK
cdk-stack.ts
file. The three folders, DataSyncTaskExec
, ECSTaskExec
, and EFSManagement
, contain
cdk-stack.ts
file. All the various configurations and .zip files needed in the stack are in the resources folder. ShareToWin-dApp
has the implementation of a sample decentralized application and is used as a base application for the CI/CD pipeline. We discuss some of these files in detail later in this post.
Ethereum development network: Hyperledger Besu
As discussed in the first part of this series, an Ethereum development network allows an unlimited supply of Ethers for testing and debugging purposes and therefore is widely used during the development phase. To support a multi-developer team, this development network needs to be run on an infrastructure that allows multiple developers to connect to it. The sample CI/CD infrastructure discussed in this post uses
There are two configuration files, dev.json
and config.toml
, that Besu reads at the time of starting the Besu node. Both files are copied from
The dev.json
file, which is provided as the genesis file, creates 10 test Ethereum addresses. Its public and private keys are provided in the dev.json
file. These addresses are based on a
Mnemonic-Generator
folder that randomly creates a new mnemonic phrase and 10 accounts with its public and private key pairs that you can use to create your own accounts. The README file of the GitHub repository has detailed steps of how to run this utility.
Note: Do not use the mnemonic provided in the Amazon Web Services CDK project or any public or private key derived from this mnemonic string in any production CI/CD pipeline you create using this solution. The mnemonics and addresses derived from them should solely be used for learning purposes in a development network where no real Ethers are associated with them.
Storing mnemonics and other secrets
The CI/CD pipeline requires certain security-related parameters, like an
Do not use the preceding mnemonic for any purpose other than testing on development networks.
In the preceding code, only the mnemonics associated with the development network are provided; the rest of the secrets are left to be entered by the user after the Amazon Web Services CDK stack is created. The Amazon Web Services CDK resource only provides the placeholders for these secrets.
S3 bucket
The Amazon Web Services CDK stack creates a S3 bucket called amb-cicd-blog-s3bucket
and copies all the files located in the resources/BucketFiles
folder of the Amazon Web Services CDK project on the GitHub repo. The files in the BucketFiles
folder are as follows:
- BlockchainDevLayer.zip – This .zip file is used to create Lambda layer for the dependencies of Lambda that are part of the deployed dApp.
- config.toml – This is the configuration file of the Besu node.
- deploy.js – This file is needed to deploy the smart contract to Ethereum networks.
- dev.json – This is the genesis file of the Besu network.
- hardhat.config.js – The CI/CD pipeline internally uses
Hardhat to compile and deploy the smart contract. The networks of both Besu andGoerli are defined in this file. - ShareToWinLambda.zip – This .zip file contains the source code for the Lambda function that is created to support the dApp.
Custom resource providers
To configure and run the Besu development network, the Amazon Web Services CDK defines three custom resource providers. These providers are configured with Lambda functions to run at the time of creation, update, and deletion of the
EFS folder creation
The Besu node requires a certain folder structure on the file system. After the EFS volume is created by the Amazon Web Services CDK stack, Lambda functions defined in lib/EFSManagement
folder are run that create the config
and data
folders on the EFS volume. The config
folder contains the files that are needed at the time of running the Besu node, and the data
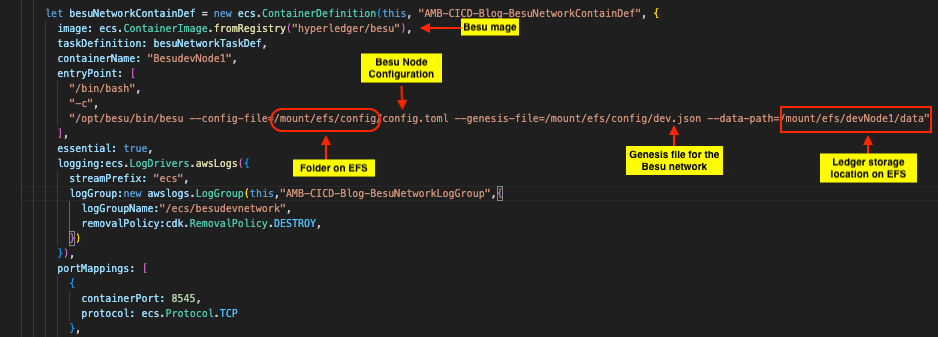
folder contains the ledger database, key, and other files needed by the Besu node. The locations of both of these folders are provided as commands when the Besu node is started.
Files copied from Amazon S3 to Amazon EFS
The custRsrcDataSyncTaskLambdaExec
custom resource is responsible for copying files from Amazon S3 to Amazon EFS via a DataSync task. The Amazon Web Services CDK stack defines a DataSync task that has Amazon S3 as the source location and Amazon EFS as the destination location. The Lambda functions associated with this custom resource, located in lib/DataSyncTaskExec
, run the DataSync task, which copies config.toml
and dev.json
files before the Besu node on the ECS cluster can be started.
ECS task to run Besu node
The Fargate task created by the Amazon Web Services CDK stack that launches Besu node is started by a custom resource called custRsrcEcsTaskLambdaExec
. Its associated Lambda functions are located in the lib/ECSTaskExec
folder. The ECS task is started with the public IP enabled. This public IP is an output parameter of the Amazon Web Services CDK stack and also is configured as an environment variable for other Amazon Web Services CDK constructs that we discuss later.
Code repository for the decentralized application
The GitHub repo of this post provides a sample dApp that is used as the basis for creating a CI/CD pipeline. This sample application consists of a smart contract AssetToken.sol
in the ShareToWin-dApp/SmartContractCode/contracts
folder and a Lambda function in the ShareToWin-dApp/LambdaCode/index.mjs
file that invokes functions in the smart contract. This sample dApp is the same as discussed in
Multiple developers working on the same or different smart contracts are only required to upload their smart contract file (*.sol) to the contract folder in this repository. This way, they are free to use any IDE tool and extension of their choice in their local development environment and only push the unit tested .sol file to the GitHub repository to be integrated in the CI/CD pipeline. Developers should also add any npm dependencies of their smart contract in the project.json
file of the smart contract code so the CI/CD can inject those dependencies at the time of building and deploying the smart contract.
A .zip file containing all the code of the dApp is created and is stored in the resources/ShareToWinCode
folder to make it available to the Amazon Web Services CDK stack. The stack creates an
CodeBuild projects
The Amazon Web Services CDK stack has two
resources/StaticFiles
folder. The buildspec file for the Besu CodeBuild project is called besubuildspec.yml
, and the buildspec file for the Goerli CodeBuild project is called goerlibuildspec.yml
. The following screenshot shows the code snippet of the besubuildspec.yml file, which we discuss in more detail.
CodeBuild uses Hardhat to compile and deploy the smart contract. The choice of Hardhat is a personal preference and it can be easily replaced by
hardhat.config.js
file. This file is part of this Amazon Web Services CDK project and is uploaded to Amazon S3 to be made available to CodeBuild. The following code in the buildspec file downloads these two files from Amazon S3 to be made available to the CodeBuild environment:
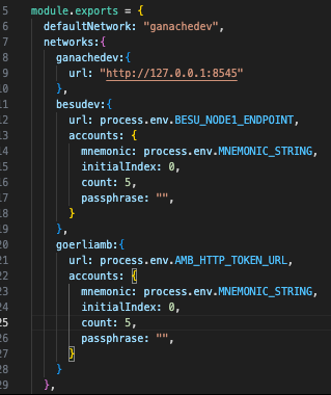
The following screenshot shows the various blockchain network configurations as defined in the hardhat.config.js
file.
The next step in the build process is to compile and deploy the smart contract to the Besu network, which is accomplished by running the following two commands:
After running these commands, the CodeBuild environment has access to both the newly deployed smart contract address as well as the smart contract’s
The next step in the build and deploy process is that CodeBuild runs test scripts that are provided in the smart contract code repository. If the test scripts fail, the entire build pipeline is rolled back and the pipeline is in a failed state.
When the test script is successful, it takes the smart contract’s ABI along with the Lambda code in the dApp Lambda repository and creates a new .zip file that is used to deploy a new version of the Lambda code. It also updates the dApp Lambda environment variable to point to the newly deployed smart contract address. The following code snippet shows how this is done in the buildspec file:
At this time, the CI/CD pipeline is in the manual approval stage. Before approving this stage, make sure the Managed Blockchain billing token URL and Goerli-related mnemonic string in Secrets Managers are updated; otherwise, the Goerli build project will fail because it can’t retrieve these secrets.
This sample code uses the Managed Blockchain billing token to access the Ethereum node on Managed Blockchain. There are two ways to access the Managed Blockchain node: via the billing token or via SigV4. For more information about these methods, refer to
Clean up
To terminate the resources that we created in this post, run the following:
Conclusion
In this post, we expanded on
Try out the
About the Authors
Rafia Tapia is a Blockchain Specialist Solution Architecture. Having more than 27 years of experience in software development and architecture, she has a keen interest in developing design patterns and best practices for smart contracts and blockchain technologies.
Kranthi Manchikanti is a Cloud Solutions Architect at Amazon Web Services with experience in designing and implementing scalable cloud solutions for enterprise customers. Kranthi is a trusted advisor to organizations looking to migrate and modernize their applications to the cloud. He has also made significant contributions to the open source community, including The Linux and Hyperledger Foundations.
The mentioned AWS GenAI Services service names relating to generative AI are only available or previewed in the Global Regions. Amazon Web Services China promotes AWS GenAI Services relating to generative AI solely for China-to-global business purposes and/or advanced technology introduction.