我们使用机器学习技术将英文博客翻译为简体中文。您可以点击导航栏中的“中文(简体)”切换到英文版本。
如何使用 亚马逊云科技 网络管理器对 亚马逊云科技 组织中多个账户的传输网关进行可视化
在 亚马逊云科技 中迁移或构建新应用程序时,必须将 分布在不同账户和您的本地系统的多个
如今,大多数企业的资源跨越多个地域,并在各个 亚马逊云科技 区域和账户中使用多个传输网关。因此,您需要能够可视化和监控 Transit Gateway 网络以了解现有库存。这种可见性可以帮助您做出与架构变化、故障排除相关的明智决策,并帮助新的团队成员改善现有 Transit Gateway 网络的设置方式。
在这篇文章中,您将学习如何使用 亚马逊云科技 Network Manager 来监控分布在
您将学习如何配置 亚马逊云科技 Network Manager、在不同账户中注册您的传输网关以及如何将其可视化。
解决方案概述
下图显示了分布在多个账户中的Transit Gateway网络的高级概述。您必须注册组织内的所有传输网关才能在 Network Manager 中对其进行可视化。
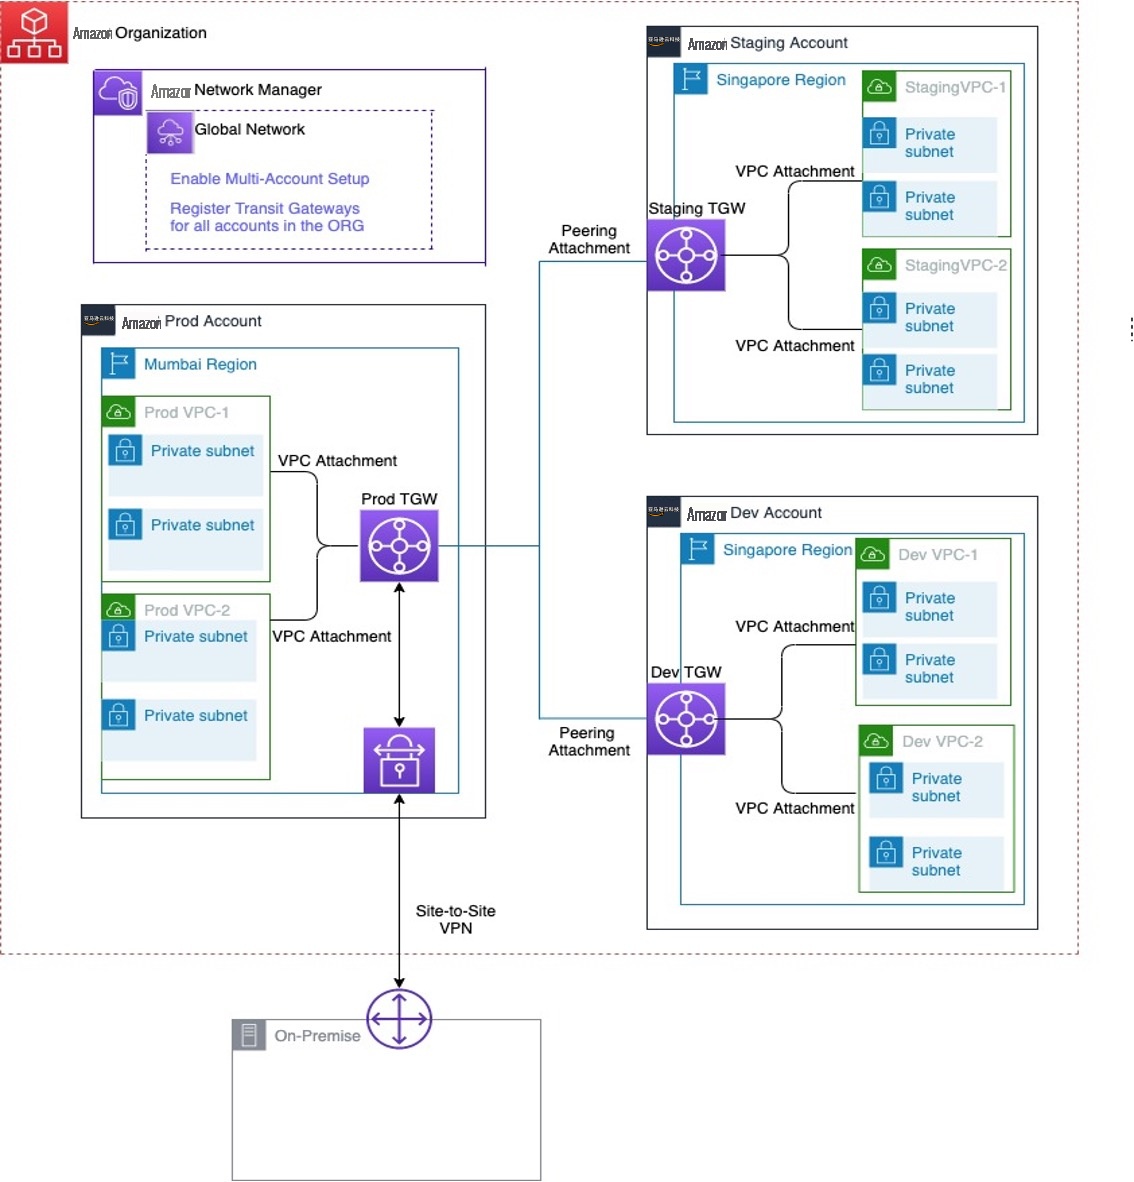
图 1 — 多账户传输网关拓扑
在此图中,我们有分布在多个区域(ap-south-south-1 和 ap-southeast-1)的 VPC。这是在组织中设置的多账户设置,其中暂存和开发账户位于 ap-sutheast-1 中,生产账户位于 ap-southe-1 中。这三个账户都有一个带有相应的 VPC 附件的传输网关。Transit Gateway还相互对等,以促进VPC之间的区域间连接。
必须先完成以下步骤才能将所有传输网关集成到 Network Manager 中,然后才能将其可视化:
- 创建全球网络
- 启用多账户访问
- 注册您的公交网关
- 查看和监控您的全球网络
先决条件
开始之前,请确保您的账户或组织内的任何账户中都有一个带有附件的 Transit Gateway。
A. 创建全球网络
创建全球网络作为您的传输网关的容器。
创建全球网络
-
在此 处打开网络管理器控制台 。 - 在左侧导航窗格中,选择 全球网络 。
- 选择 创建全球网络 。
- 输入全球网络的名称和可选描述,然后选择 下一步
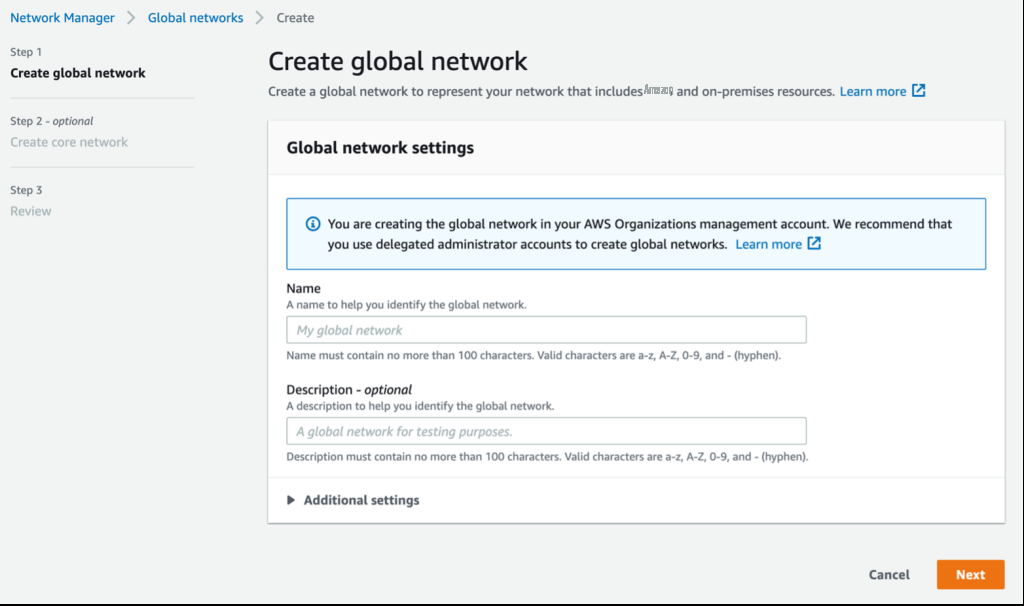
图 2 — 创建全球网络
- 在下一个屏幕中,取消选择 “在您的全球网络中添加核心网络”,然后选择下一步。
- 最后,查看并选择 “ 创建全球网络 ” 。
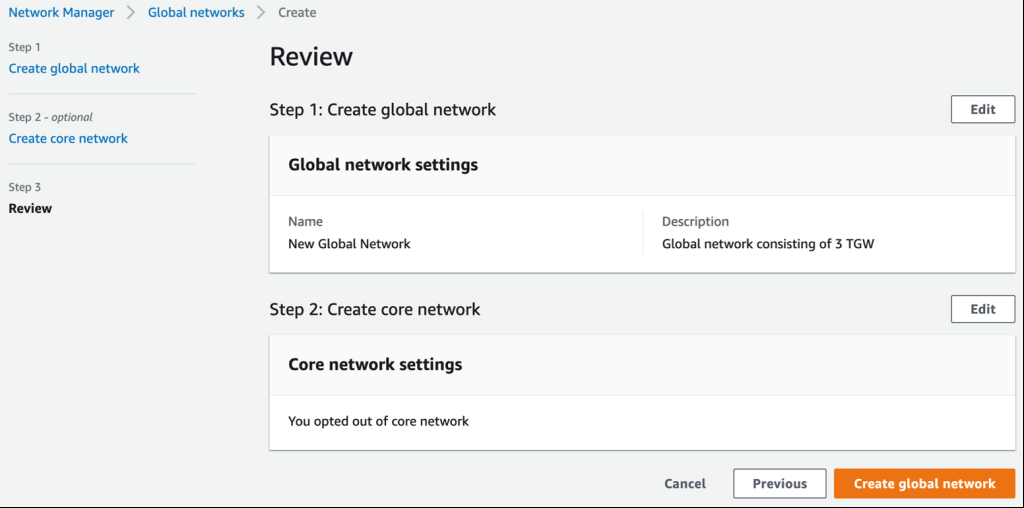
图 3 — 创建全球网络
B. 启用多账户访问
启用多账户访问权限,从多个账户注册公交网关。这使 您可以查看和管理来自全球网络中那些注册账户的 Tran s it Gateway 和相关资源。加入组织是启用 Network Manager 多账户访问权限的先决条件。您可以在网络管理器控制台上启用多帐户访问权限。
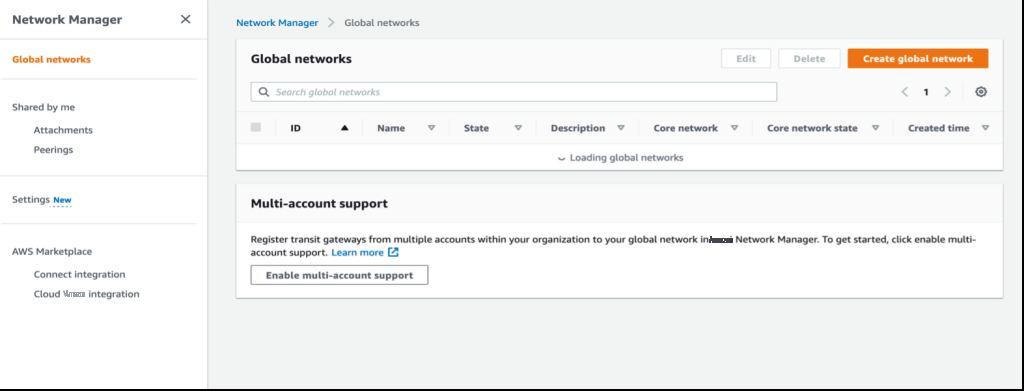
图 4 — 启用多账户支持
Network Manager 服务的委派管理员帐户可以利用启用可信访问时部署的成员帐户中的服务关联角色 (SLR)。此外,他们可以从其他成员帐户查看Transit Gateways,并可以将其注册到他们的全球网络。这允许 Transit Gateway 和相关资源出现在其全球网络拓扑结构中。
有关启用可信访问和注册委派管理员的更多信息,请参阅
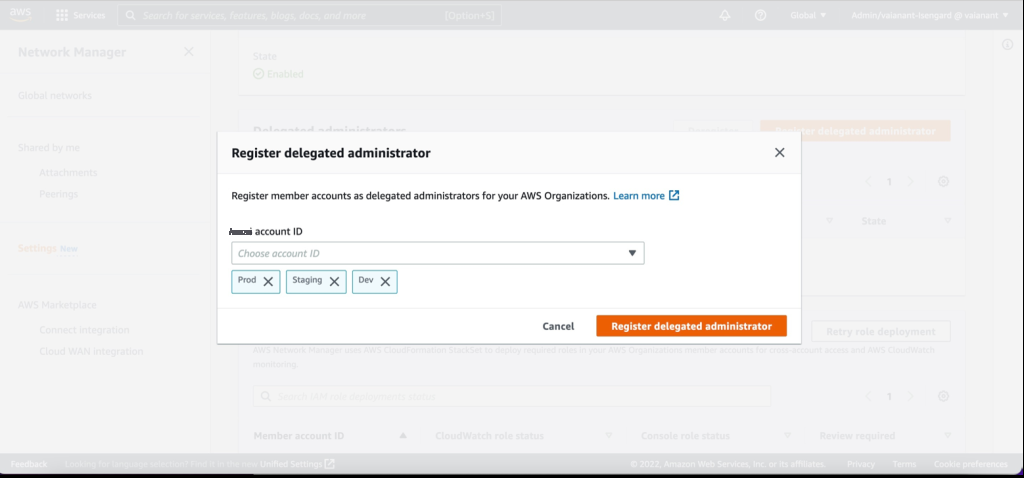
图 5 — 注册委派管理员
C. 注册您的交通网关
现在,我们将在您的全球网络中注册一个公交网关。启用多账户后,您可以将 Transit Gateways 从多个账户注册到您的全球网络。有关注册公交网关的更多信息,请参阅
注册公交网关
- 在 “ 全球网络 ” 页面上,选择全局网络 ID(这与您在步骤 1 中创建的实体相同)。
- 在左侧导航窗格中,选择 T ransit Gateway ,然后选择 注册传输网关 。
- 从 “选择账户” 下拉列表中,选择要从中注册 Transit Gateway 的账户(从列表中)。
- 从列表中选择一个或多个传输网关,然后选择 注册传输网关 。在我们的示例中,我们选择了图中所示的所有公交网关。
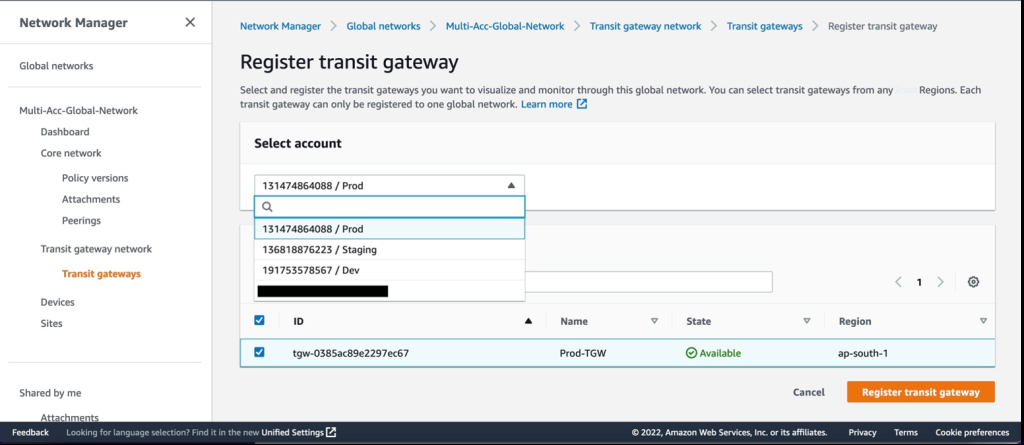
图 6 — 传输网关注册
D. 查看和监控您的全球网络
网络管理器控制台提供了一个控制面板,供您查看和监控全球网络中的两个 Transit Gateway 网络对象。
访问您的全球网络的控制面板
- 在 “ 全球网络 ” 页面上,选择全球网络 ID。
- 选择 “概览” 选项卡,在世界地图上可视化您的公交网关。
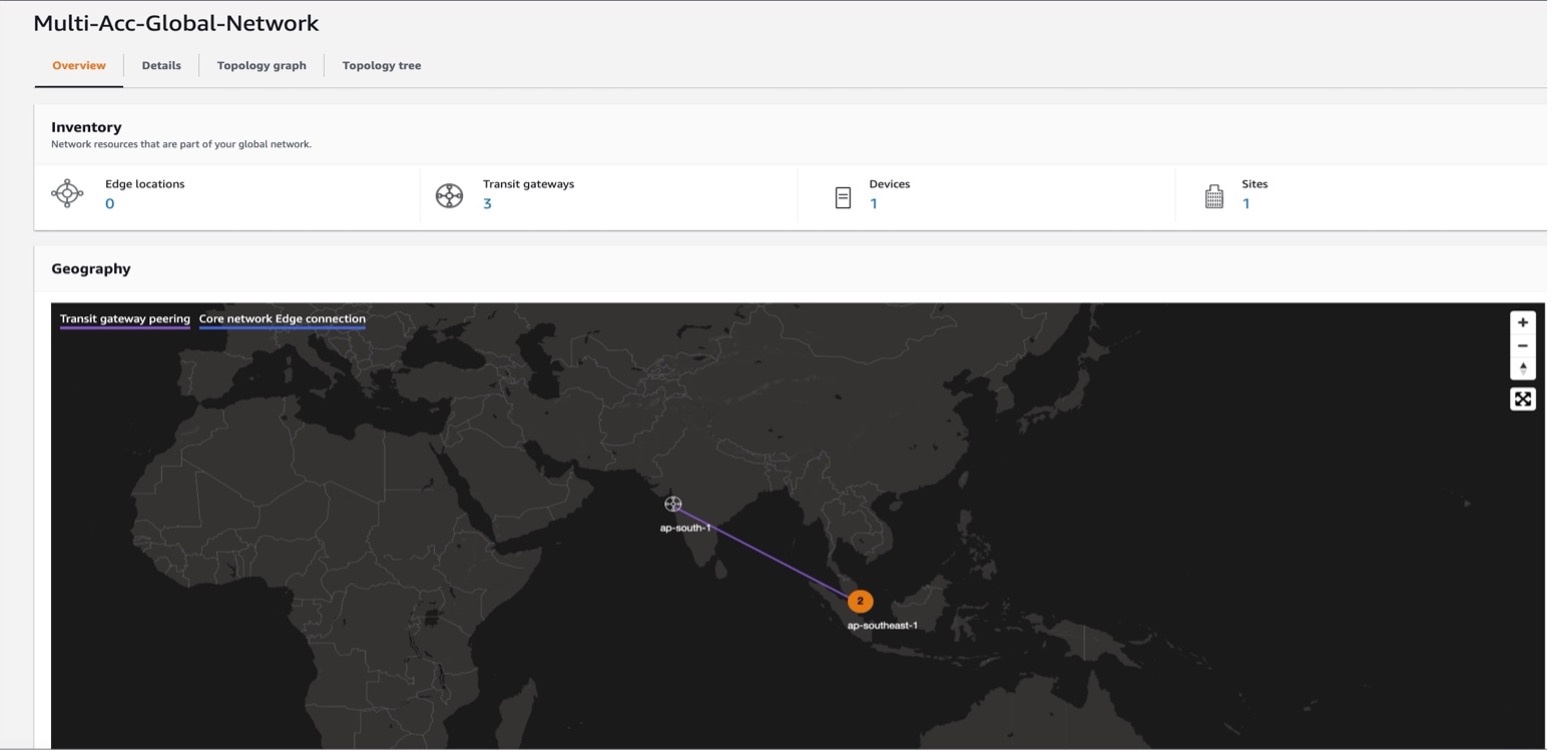
图 7 — 地理视图
- 选择拓扑图以可视化您的传输网关网络。
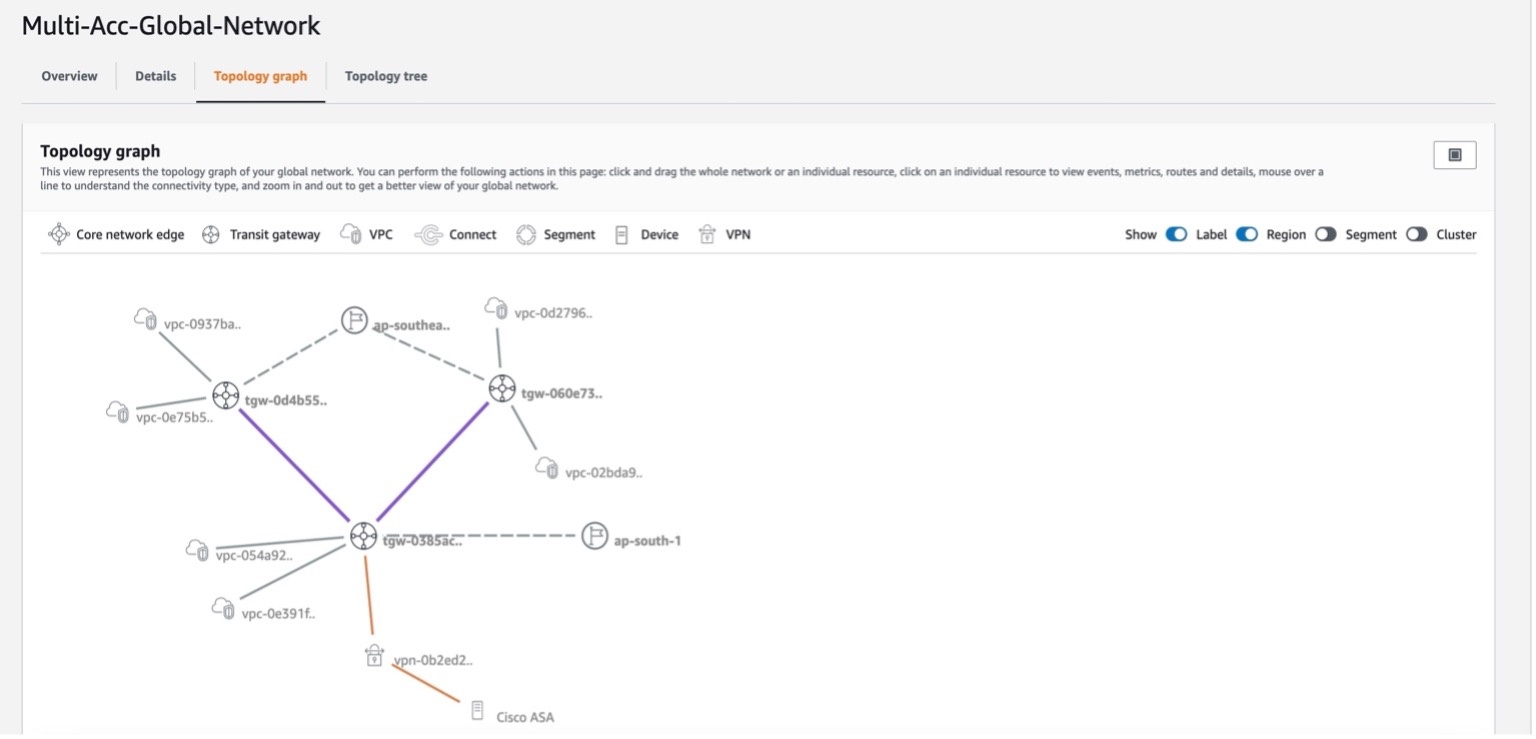
图 8 — 地形视图
-
选择拓扑树以可视化您的传输网关网络。有关仪表板中页面的更多信息,请参阅
可视化公交网关网络 。

图 9 — 拓扑树视图
结论
这篇文章向您展示了如何配置
其他读物
有关 亚马逊云科技 网络管理器的更多信息,请参阅以下内容:
-
使用网络管理器建立全球网络并集中监控 -
亚马逊云科技 网络管理器的工作原理

Anant Vaibhav
Anant 是 亚马逊云科技 的二级云支持工程师,专注于网络。他在TGW和VPN服务方面获得了中小型企业的认证。在加入 亚马逊云科技 之前,Anant 曾在数据和无线网络领域工作。他喜欢解决网络中的技术挑战。

Ashutosh Pateriya
Ashutosh Pateriya 是 亚马逊云科技 的高级解决方案架构师。他热衷于云网络、安全以及帮助客户利用 亚马逊云科技 云的力量。

Nishant Kumar
Nishant Kumar 是亚马逊 VPC 团队的高级产品经理。他对网络可观测性和网络管理领域感兴趣。工作之余,他喜欢一级方程式赛车、烹饪和探索野生动物。
*前述特定亚马逊云科技生成式人工智能相关的服务仅在亚马逊云科技海外区域可用,亚马逊云科技中国仅为帮助您发展海外业务和/或了解行业前沿技术选择推荐该服务。