我们使用机器学习技术将英文博客翻译为简体中文。您可以点击导航栏中的“中文(简体)”切换到英文版本。
开始使用开源亚马逊 SageMaker 发行版
数据科学家需要一个一致且可重复的环境来处理机器学习 (ML) 和数据科学工作负载,以支持管理依赖关系且安全。
在这篇文章中,我们将向您展示如何使用 SageMaker 开源发行版在本地环境中快速进行试验,并轻松地将其提升到 SageMaker 上的工作岗位。
解决方案概述
在我们的示例中,我们展示了使用 PyTorch 训练图像分类模型。我们使用在
先决条件
您需要满足以下先决条件:
-
安装了
Docker 。 - 具有管理员权限的有效 亚马逊云科技 账户。
-
安装了
亚马逊云科技 命令行接口 (亚马逊云科技 CLI) 和 Docker 的环境。 -
现有的 SageMaker 域名。要创建域名,请参阅
加入亚马逊 SageMa ker 域名。
设置您的本地环境
你可以直接在本地笔记本电脑上开始使用开源发行版。要启动 JupyterLab,请在终端上运行以下命令:
您可以将
ECR_IMAGE_ID
替换为
最新的 GPU
标签。
这个命令将启动 JupyterLab 并在终端上提供一个网址,比如 http://127.0.0.1:8888/lab?
设置工作室
Studio 是适用于 ML 的端到端集成开发环境 (IDE),允许开发人员和数据科学家大规模构建、训练、部署和监控机器学习模型。Studio 提供了大量的第一方镜像列表,其中包含常见的框架和软件包,例如数据科学、TensorFlow、PyTorch 和 Spark。这些图像使数据科学家只需选择他们选择的计算框架和实例类型即可轻松地开始使用机器学习。
现在,你可以使用 Studio 的
-
在终端上运行以下命令,将开源发行版添加到您账户的 亚马逊弹性容器注册表 (Amazon ECR) 存储库中: - 创建 SageMaker 映像并将图像附加到 Studio 域: ult-user-settings.json
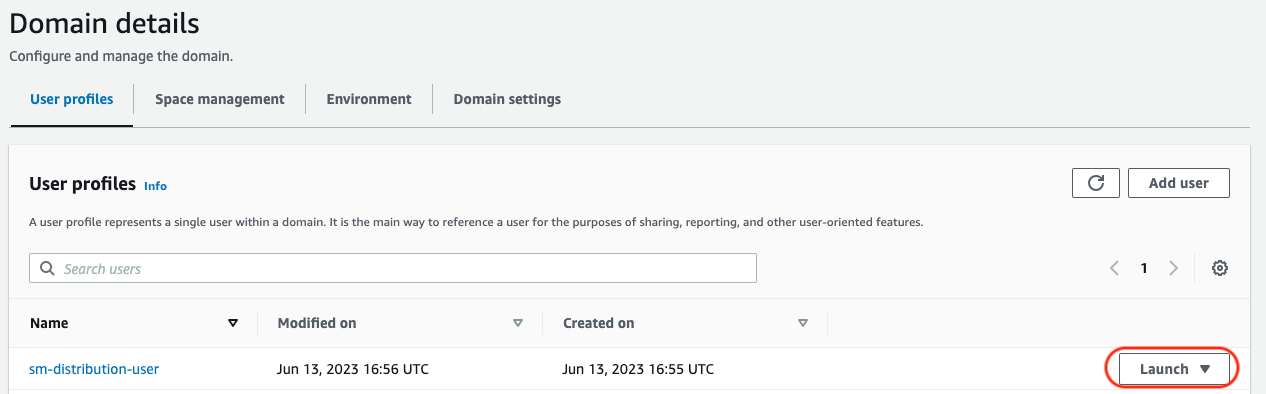
- 在 SageMaker 控制台上,选择您的域名和现有用户个人资料启动 Studio。
-
(可选)按照
关闭和更新 SageMaker Studio 中的步骤重启 Studio。
下载笔记本
从
在你选择的 IDE 中打开笔记本电脑,然后在笔记本的开头添加一个单元格来安装
torch
summary。t
orchsum
mary 包不是发行版的一部分,将其安装在笔记本电脑上将确保笔记本端到端运行。我们建议使用
conda
或
micromamba
来管理环境和依赖关系。将以下单元格添加到笔记本并保存笔记本:
在本地笔记本上进行实验
选择上传图标,将笔记本上传到您启动的 JupyterLab 用户界面,如以下屏幕截图所示。
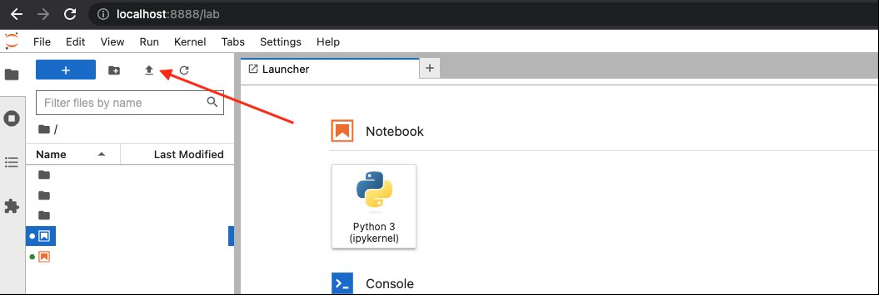
上传后,启动
cv-km
nist.ipynb 笔记本电脑。你可以立即开始运行单元,而不必安装任何依赖项,例如 torch、matplotlib 或 ipywidgets。
如果您执行了上述步骤,则可以看到可以在笔记本电脑上本地使用该发行版。在下一步中,我们将在 Studio 上使用相同的发行版来利用 Studio 的功能。
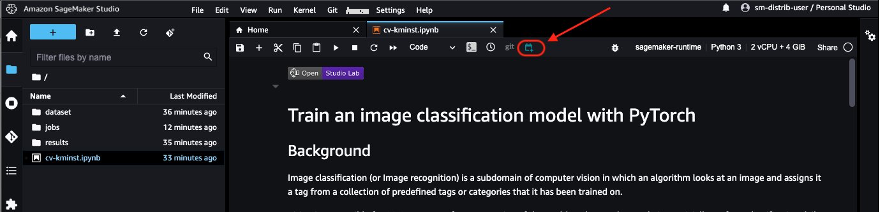
将实验移至 Studio(可选)
或者,让我们把实验推广到 Studio。Studio 的优势之一是底层计算资源具有完全的弹性,因此您可以轻松地向上或向下调动可用资源,并且更改会在后台自动进行,而不会中断您的工作。如果您想在更大的数据集和计算实例上运行之前的相同笔记本,则可以迁移到 Studio。
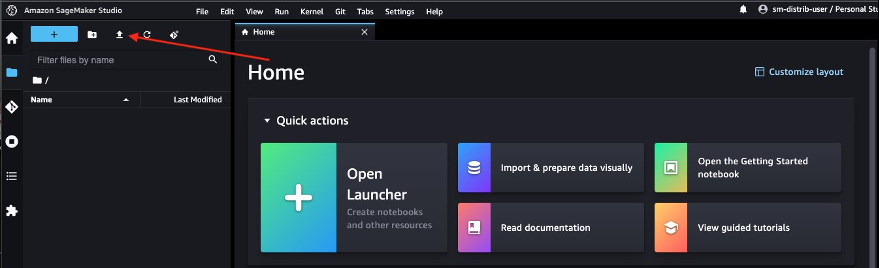
导航到您之前启动的 Studio 用户界面,然后选择上传图标来上传笔记本。
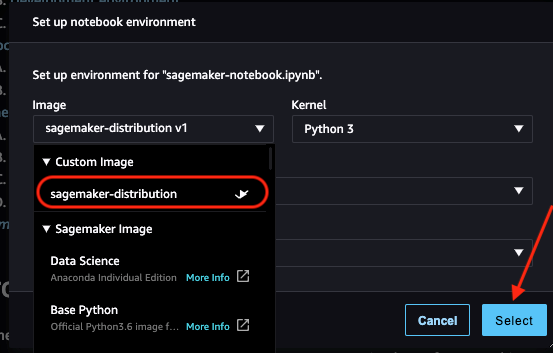
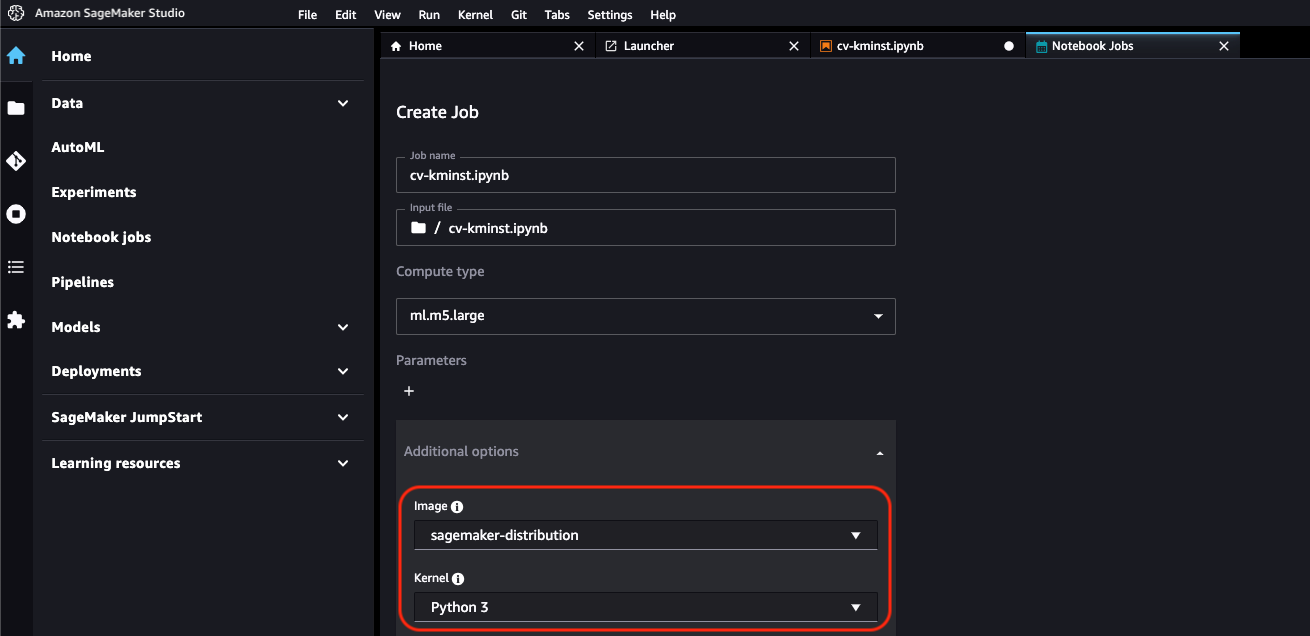
启动笔记本后,系统将提示您选择映像和实例类型。
在内核启动器上,选择
sagemaker-distribut
ion 作为图像和
ml.t3.m
edium 实例,然后选择选择。
现在,您可以端到端运行笔记本电脑,而无需在笔记本上进行任何更改,从本地开发环境到 Studio 笔记本电脑!
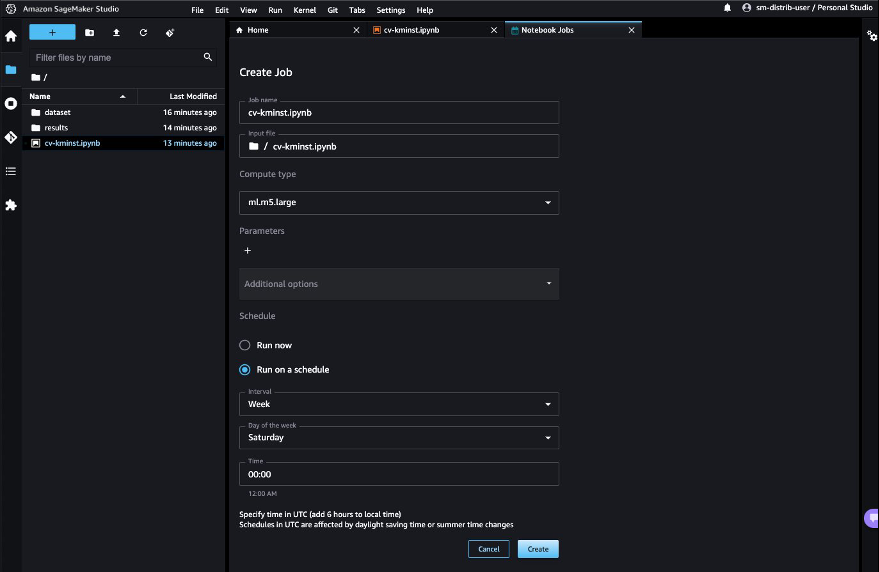
将笔记本安排为作业
实验完成后,SageMaker 会提供多种选项来生产您的笔记本,例如训练作业和 SageMaker 流水线。其中一个选项是使用
在 Studio 中,选择笔记本作业图标以启动笔记本作业。如果您已在笔记本电脑上本地安装了笔记本作业扩展程序,则也可以直接从笔记本电脑上安排笔记本电脑。请参阅
笔记本作业自动使用开源发行版的 ECR 图像 URI,因此您可以直接安排笔记本作业。
选择 “ 按计划 运行 ” ,选择时间表(例如每周星期六),然后选择 “ 创建”。 如果您想 立即查看结果,也可以选择 “立即 运行 ”。
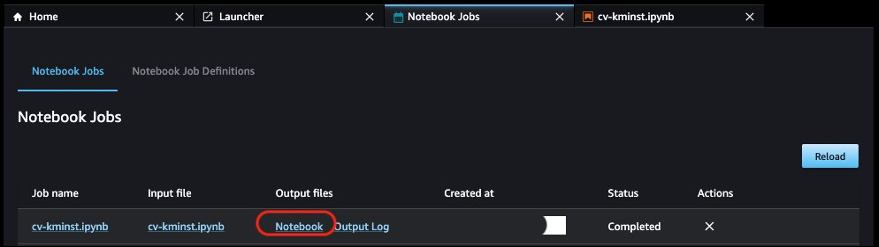
第一个笔记本作业完成后,您可以直接从 Studio 用户界面查看笔记本输出,方法是在 “ 输出文件 ” 下选择 “ 笔记本 ” 。
其他注意事项
除了将公开的 ECR 映像直接用于机器学习工作负载外,开源发行版还具有以下优势:
- 用于构建镜像的 Dockerfile 已公开供开发人员浏览和构建自己的镜像。您也可以将此映像继承为基础映像,并安装自定义库以获得可复制的环境。
-
如果你不习惯 Docker,更喜欢在你的 JupyterLab 环境中使用 Conda 环境,我们会为每个已发布的版本提供一个
env.out 文件。您可以使用文件中的说明创建自己的 Conda 环境,该环境将模仿同一个环境。例如,请参阅 CPU 环境文件cpu .env.out。 - 您可以使用图像的 GPU 版本来运行与 GPU 兼容的工作负载,例如深度学习和图像处理。
清理
完成以下步骤来清理您的资源:
-
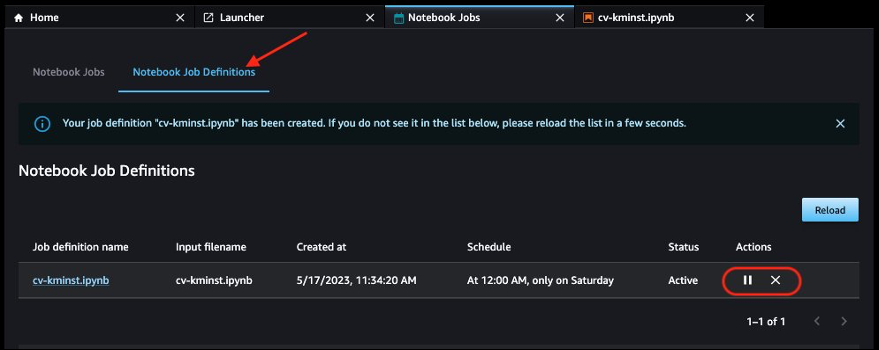
如果您已安排笔记本按计划运行,请在 “
笔记本作业定义
” 选项卡上暂停或删除该计划,以避免为将来的作业付费。
-
关闭所有 Studio 应用程序以避免为未使用的计算使用量付费。有关说明,请参阅
关闭和更新 Studio 应用程序 。 - 或者,如果您创建了 Studio 域,请将其删除。
结论
在机器学习生命周期的不同阶段维护可重复的环境是数据科学家和开发人员面临的最大挑战之一。通过 SageMaker 开源发行版,我们提供了一个包含最常见机器学习框架和包相互兼容版本的映像。该发行版也是开源的,它使开发人员可以透明地了解软件包和构建流程,从而更轻松地自定义自己的发行版。
在这篇文章中,我们向您展示了如何在本地环境、Studio 上使用发行版以及作为训练任务的容器。此功能目前处于公开测试阶段。我们鼓励您尝试一下,并在
作者简介
 杜尔加·苏里
是亚马逊 SageMaker Service SA 团队的机器学习解决方案架构师。她热衷于让每个人都能使用机器学习。在 亚马逊云科技 工作的 4 年中,她帮助企业客户建立了 AI/ML 平台。当她不工作时,她喜欢骑摩托车、神秘小说,还喜欢和她5岁的哈士奇一起长途跋涉。
杜尔加·苏里
是亚马逊 SageMaker Service SA 团队的机器学习解决方案架构师。她热衷于让每个人都能使用机器学习。在 亚马逊云科技 工作的 4 年中,她帮助企业客户建立了 AI/ML 平台。当她不工作时,她喜欢骑摩托车、神秘小说,还喜欢和她5岁的哈士奇一起长途跋涉。
 Ketan Vijayvargiya
是亚马逊网络服务 (亚马逊云科技) 的高级软件开发工程师。他的重点领域是机器学习、分布式系统和开源。工作之余,他喜欢把时间花在自我托管和享受大自然上。
Ketan Vijayvargiya
是亚马逊网络服务 (亚马逊云科技) 的高级软件开发工程师。他的重点领域是机器学习、分布式系统和开源。工作之余,他喜欢把时间花在自我托管和享受大自然上。
*前述特定亚马逊云科技生成式人工智能相关的服务仅在亚马逊云科技海外区域可用,亚马逊云科技中国仅为帮助您发展海外业务和/或了解行业前沿技术选择推荐该服务。