我们使用机器学习技术将英文博客翻译为简体中文。您可以点击导航栏中的“中文(简体)”切换到英文版本。
使用 PyTorch 模型动物园创建亚马逊 SageMaker 模型
部署经过训练的高质量机器学习 (ML) 模型来执行批量或实时推理是为客户创造价值的关键部分。但是,机器学习实验过程可能很乏味——有许多方法需要大量时间才能实施。这就是为什么预训练的机器学习模型(如
这篇博客文章演示了如何在 SageMaker 中使用 PyTorch 模型库中的对象检测模型执行机器学习推断。来自 PyTorch 模型库的预训练机器学习模型是现成的,可以轻松地用作 ML 应用程序的一部分。按照本博客文章中概述的步骤,可以轻松地将这些机器学习模型设置为
我们举一个端到端的示例,从加载 Faster R-CNN 对象检测模型权重,到将其保存到
解决方案概述
这篇博客文章将介绍以下步骤。有关所有步骤的完整工作版本,请参阅
_pytorch_model_sagemaker.ipynb
- 步骤 1:设置
- 第 2 步:从 PyTorch 模型库加载机器学习模型
- 步骤 3 保存机器学习模型工件并将其上传到 Amazon S3
- 步骤 4:构建 ML 模型推理脚本
- 第 5 步:启动 SageMaker 批量转换作业
- 步骤 6:可视化结果
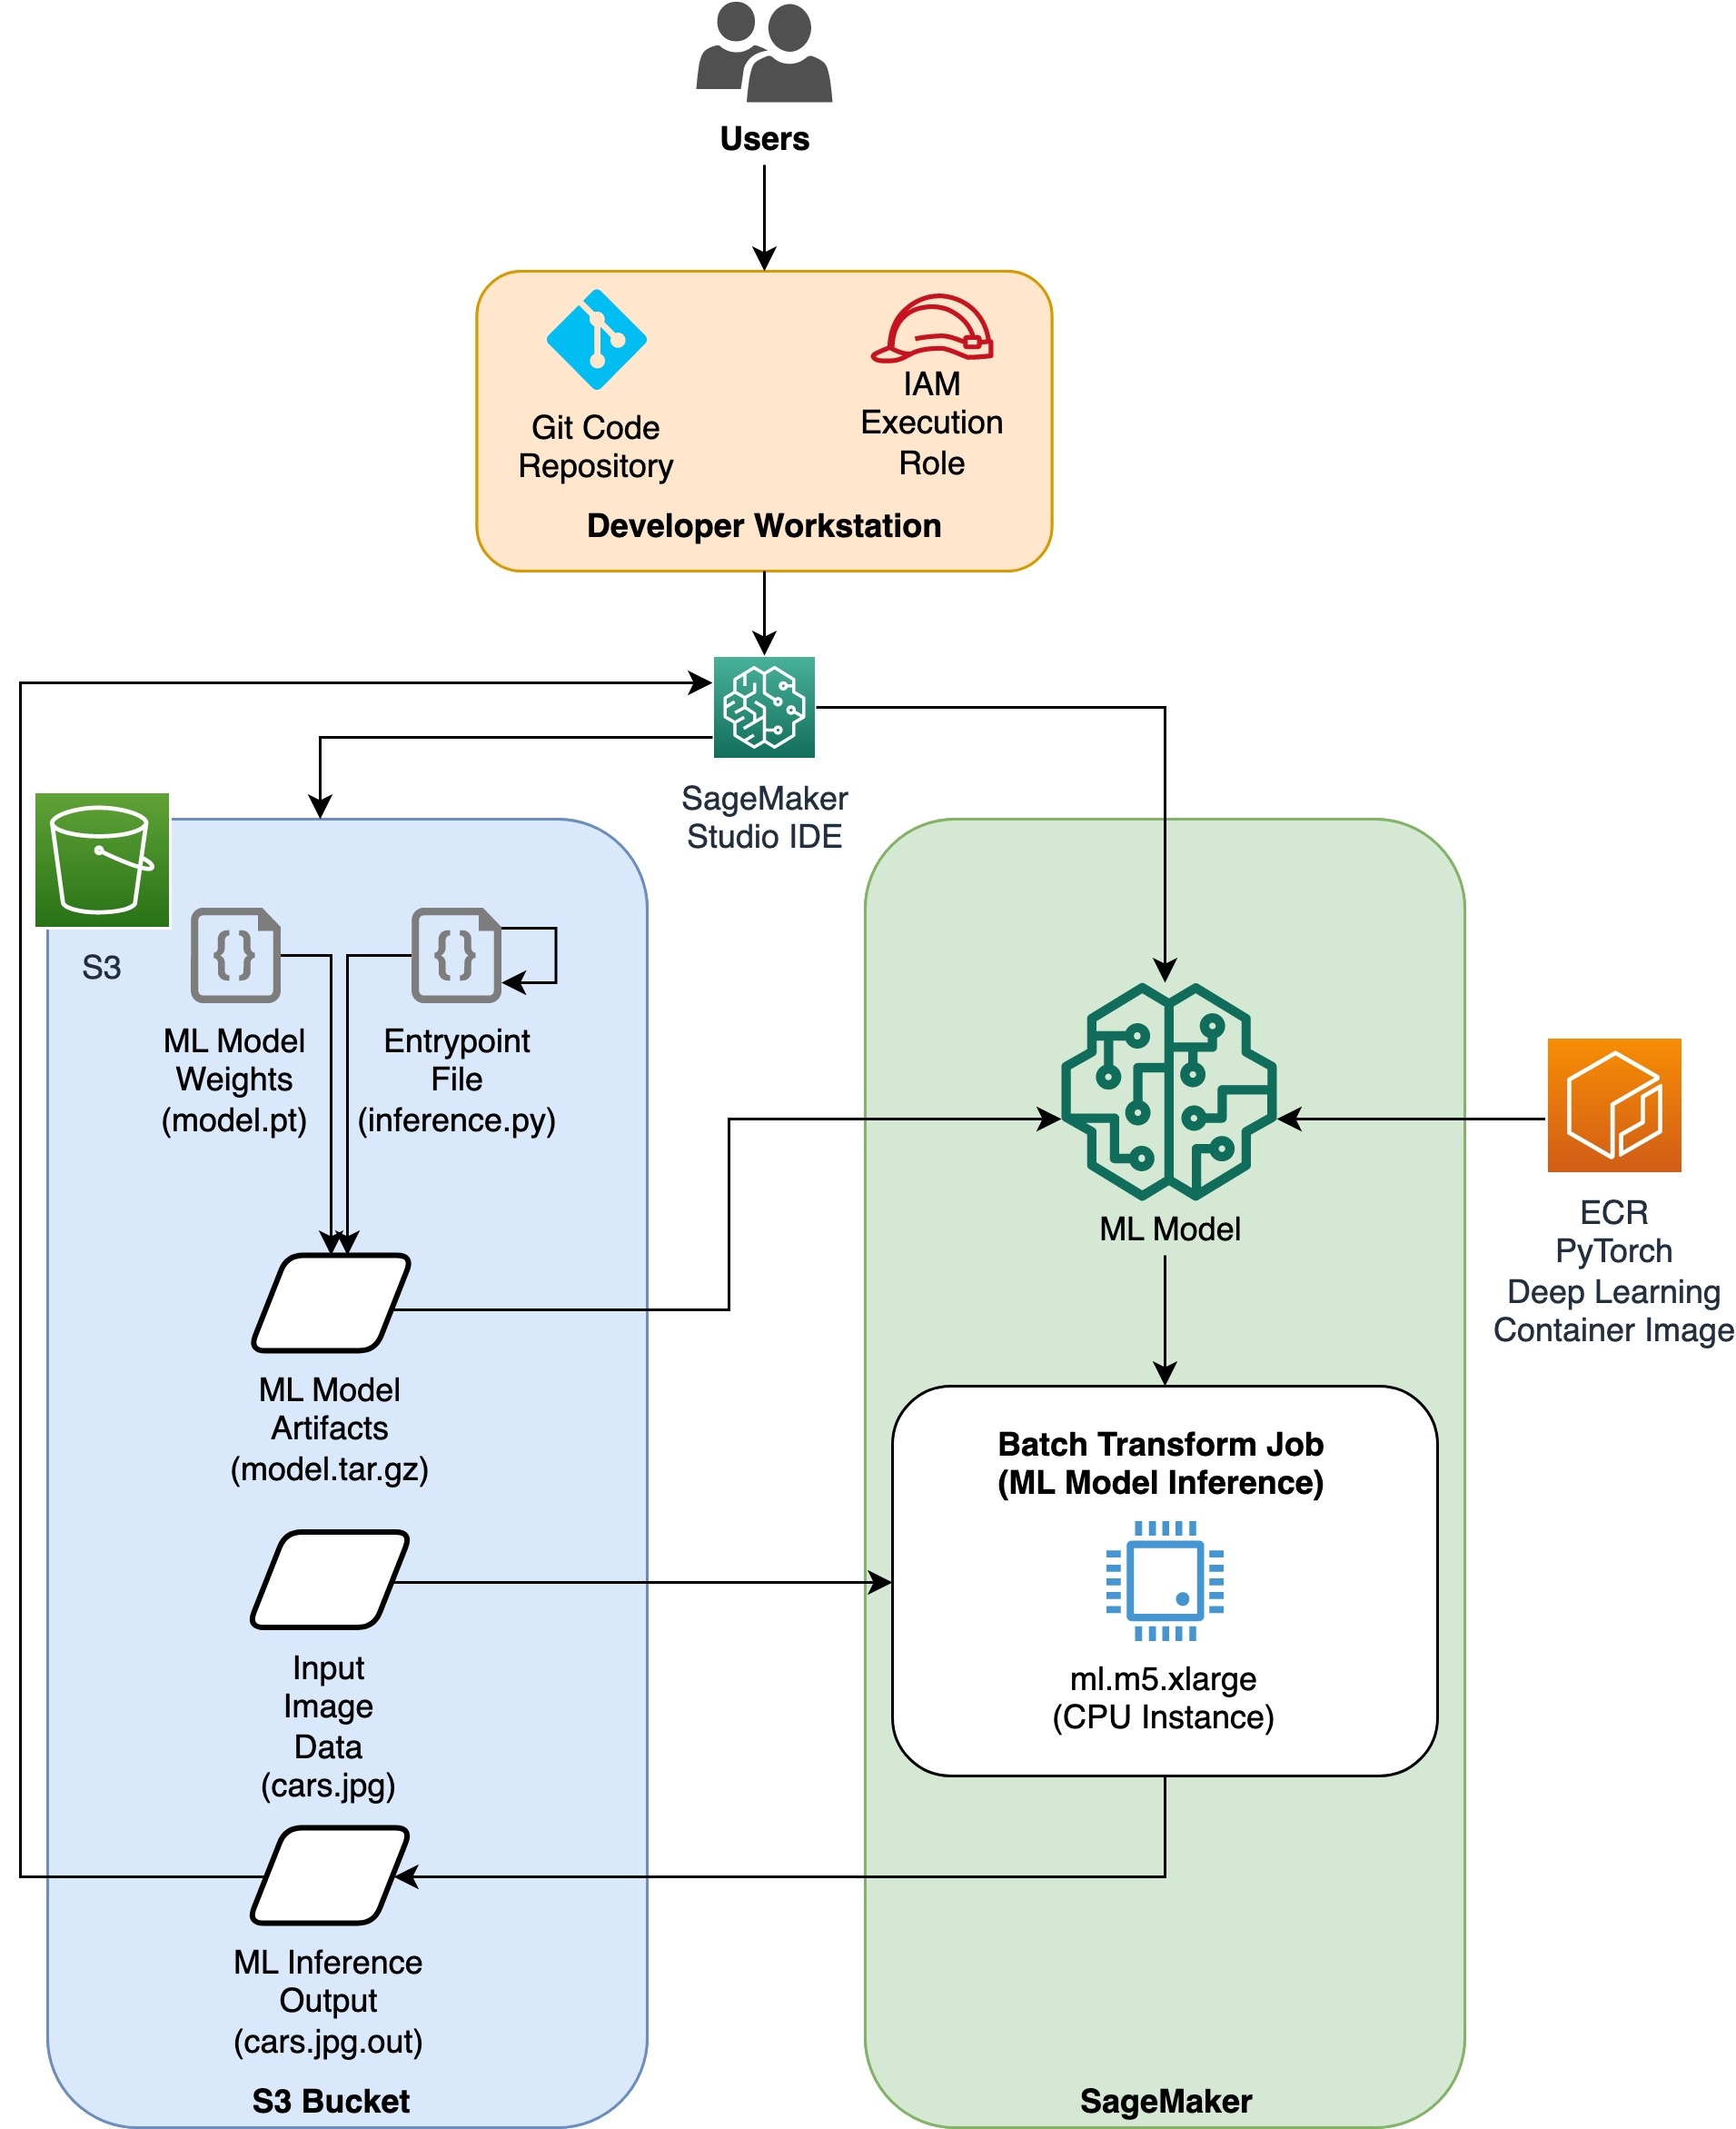
架构图
目录结构
可以在此
这是我们使用的工作流程。以下所有步骤都将引用此结构中的模块。
pytorch_model_sagemaker.ipynb 以加载和保存模型权重,创建 SageMaker 模型对象,最后将其传递给 SageMaker 批量转换作业。要自带机器学习模型,请更改笔记本的 “步骤 1:设置” 部分中的路径,并在 “步骤 2:从 PyTorch 模型库” 部分加载机器学习模型中加载新模型。以下步骤的其余部分将保持不变。
inference.py
作为入口点文件,并包含 create_
步骤 1:设置
IAM 角色
SageMaker 在由 SageMaker 管理的基础架构上执行操作。SageMaker 只能执行笔记本附带的 SageMaker IAM 执行角色中定义的允许操作。有关创建 IAM 角色和管理 IAM 权限的更详细文档,请参阅 A
上面的代码获取了笔记本实例的 SageMaker 执行角色。这是我们为 SageMaker 或 SageMaker Studio 笔记本实例创建的 IAM 角色。
用户可配置的参数
以下是构建和启动 SageMaker 批处理转换作业所需的所有可配置参数:
第 2 步:从 PyTorch 模型库加载机器学习模型
接下来,我们从 PyTorch 模型库中指定一个物体检测模型并保存其 ML 模型权重。通常,我们使用.pt 或.pth 文件扩展名保存 PyTorch 模型。下面的代码片段从 PyTorch 模型动物园下载了预训练的 Faster R-CNN Resnet50 ML 模型:
模型 = torchvision.models.detection.fasterrcnn_resnet50_fpn(预训练=True)
SageMaker 批量转换需要一些模型权重作为输入,因此我们将预训练的机器学习模型保存为 model.pt。如果我们想加载自定义模型,则可以将另一个 PyTorch 模型中的模型权重保存为 model.pt。
第 3 步:将机器学习模型工件保存并上传到 Amazon S3
由于我们将使用 SageMaker 进行 ML 推断,因此我们需要将模型权重上传到 S3 存储桶。我们可以使用以下命令来完成此操作,也可以直接将文件下载并拖放到 S3 中。以下命令将首先将
中的文件组压缩为 tarball,然后将模型权重从我们的本地计算机复制到 S3 存储桶。
注意
:要运行以下命令,您需要 安装
接下来,我们将输入图像复制到 S3。以下是图像的完整 S3 路径。
我们可以使用另一个 aws s3 cp 命令将此映像复制到 S3。
步骤 4:构建 ML 模型推理脚本
现在我们将浏览我们的入口点文件
inference.py
模块。我们可以使用 pytorchModel 类部署在 SageMaker 之外训练的 PyTorch 模型。首先,我们对 pytorchModelZoo 对象进行实例化。然后,我们将构造一个 inference.py 入口点文件,使用 SageMaker 批量转换对托管在 Amazon S3 中的样本数据进行机器学习推断。
理解 pytorchModel 对象
SageMaker
要启动 pytorchModel 类,我们需要了解以下输入参数:
-
名称:型号名称;为了保持唯一性,我们建议使用模型名称+日期时间或随机字符串+日期时间。 -
模型_数据:打包的 ML 模型工件的 S3 URI。 -
entry_point:用户定义的 Python 文件,供推理 Docker 映像用来定义传入请求的处理程序。该代码定义了模型加载、输入预处理、预测逻辑和输出后处理。 -
framework_version:需要设置为 1.2 或更高版本才能启用 PyTorch 模型的自动重新打包。 -
source_dir:入口点文件的目录。 -
角色:发出 亚马逊云科技 服务请求的 IAM 角色。 -
image_uri:使用这个 Amazon ECR Docker 容器镜像作为机器学习模型计算环境的基础。 -
sagemaker_session:Sagemaker 会话。 -
py_version:要使用的 Python 版本
以下代码片段将 PytorchModel 类实例化,以便使用预训练的 PyTorch 模型进行推理:
了解入口点文件 (inference.py)
入口点参数指向一个名为 inference.py 的 Python 文件。
此入口点定义模型加载、输入预处理、预测逻辑和输出后处理。它补充了在预构建的 PyTorch
Inference.py
将包含以下函数。
model_fn、 input_fn 、p redict_fn
和 output_fn 函数
来覆盖 默认的 PyTorch 推理
处理程序。
-
model_fn:进入推理图像中包含静态模型检查点的目录。从指定路径打开并加载模型并返回 PyTorch 模型。 -
input_fn:将传入请求(request_body)的负载和传入请求的内容类型(request_content_type)作为输入。处理数据解码。需要根据模型期望的输入调整此函数。 -
predict_fn:根据在 input_fn 中反序列化的数据调用模型。使用加载的 ML 模型对反序列化对象执行预测。 -
output_fn:将预测结果序列化为所需的响应内容类型。将从 predict_fn 函数获得的预测转换为 JSON、CSV 或 NPY 格式。
第 5 步:启动 SageMaker 批量转换作业
在此示例中,我们将通过 SageMaker 批量转换作业获得 ML 推理结果。当我们想要从数据集获得一次推论而无需永久端点时,批量转换作业最有用。我们实例化了一个 Sagemaker.Trans
请参阅 createTransformJob 上有关
步骤 6:可视化结果
SageMaker 批量转换任务完成后,我们可以从 Amazon S3 加载机器学习推理输出。为此,请导航到
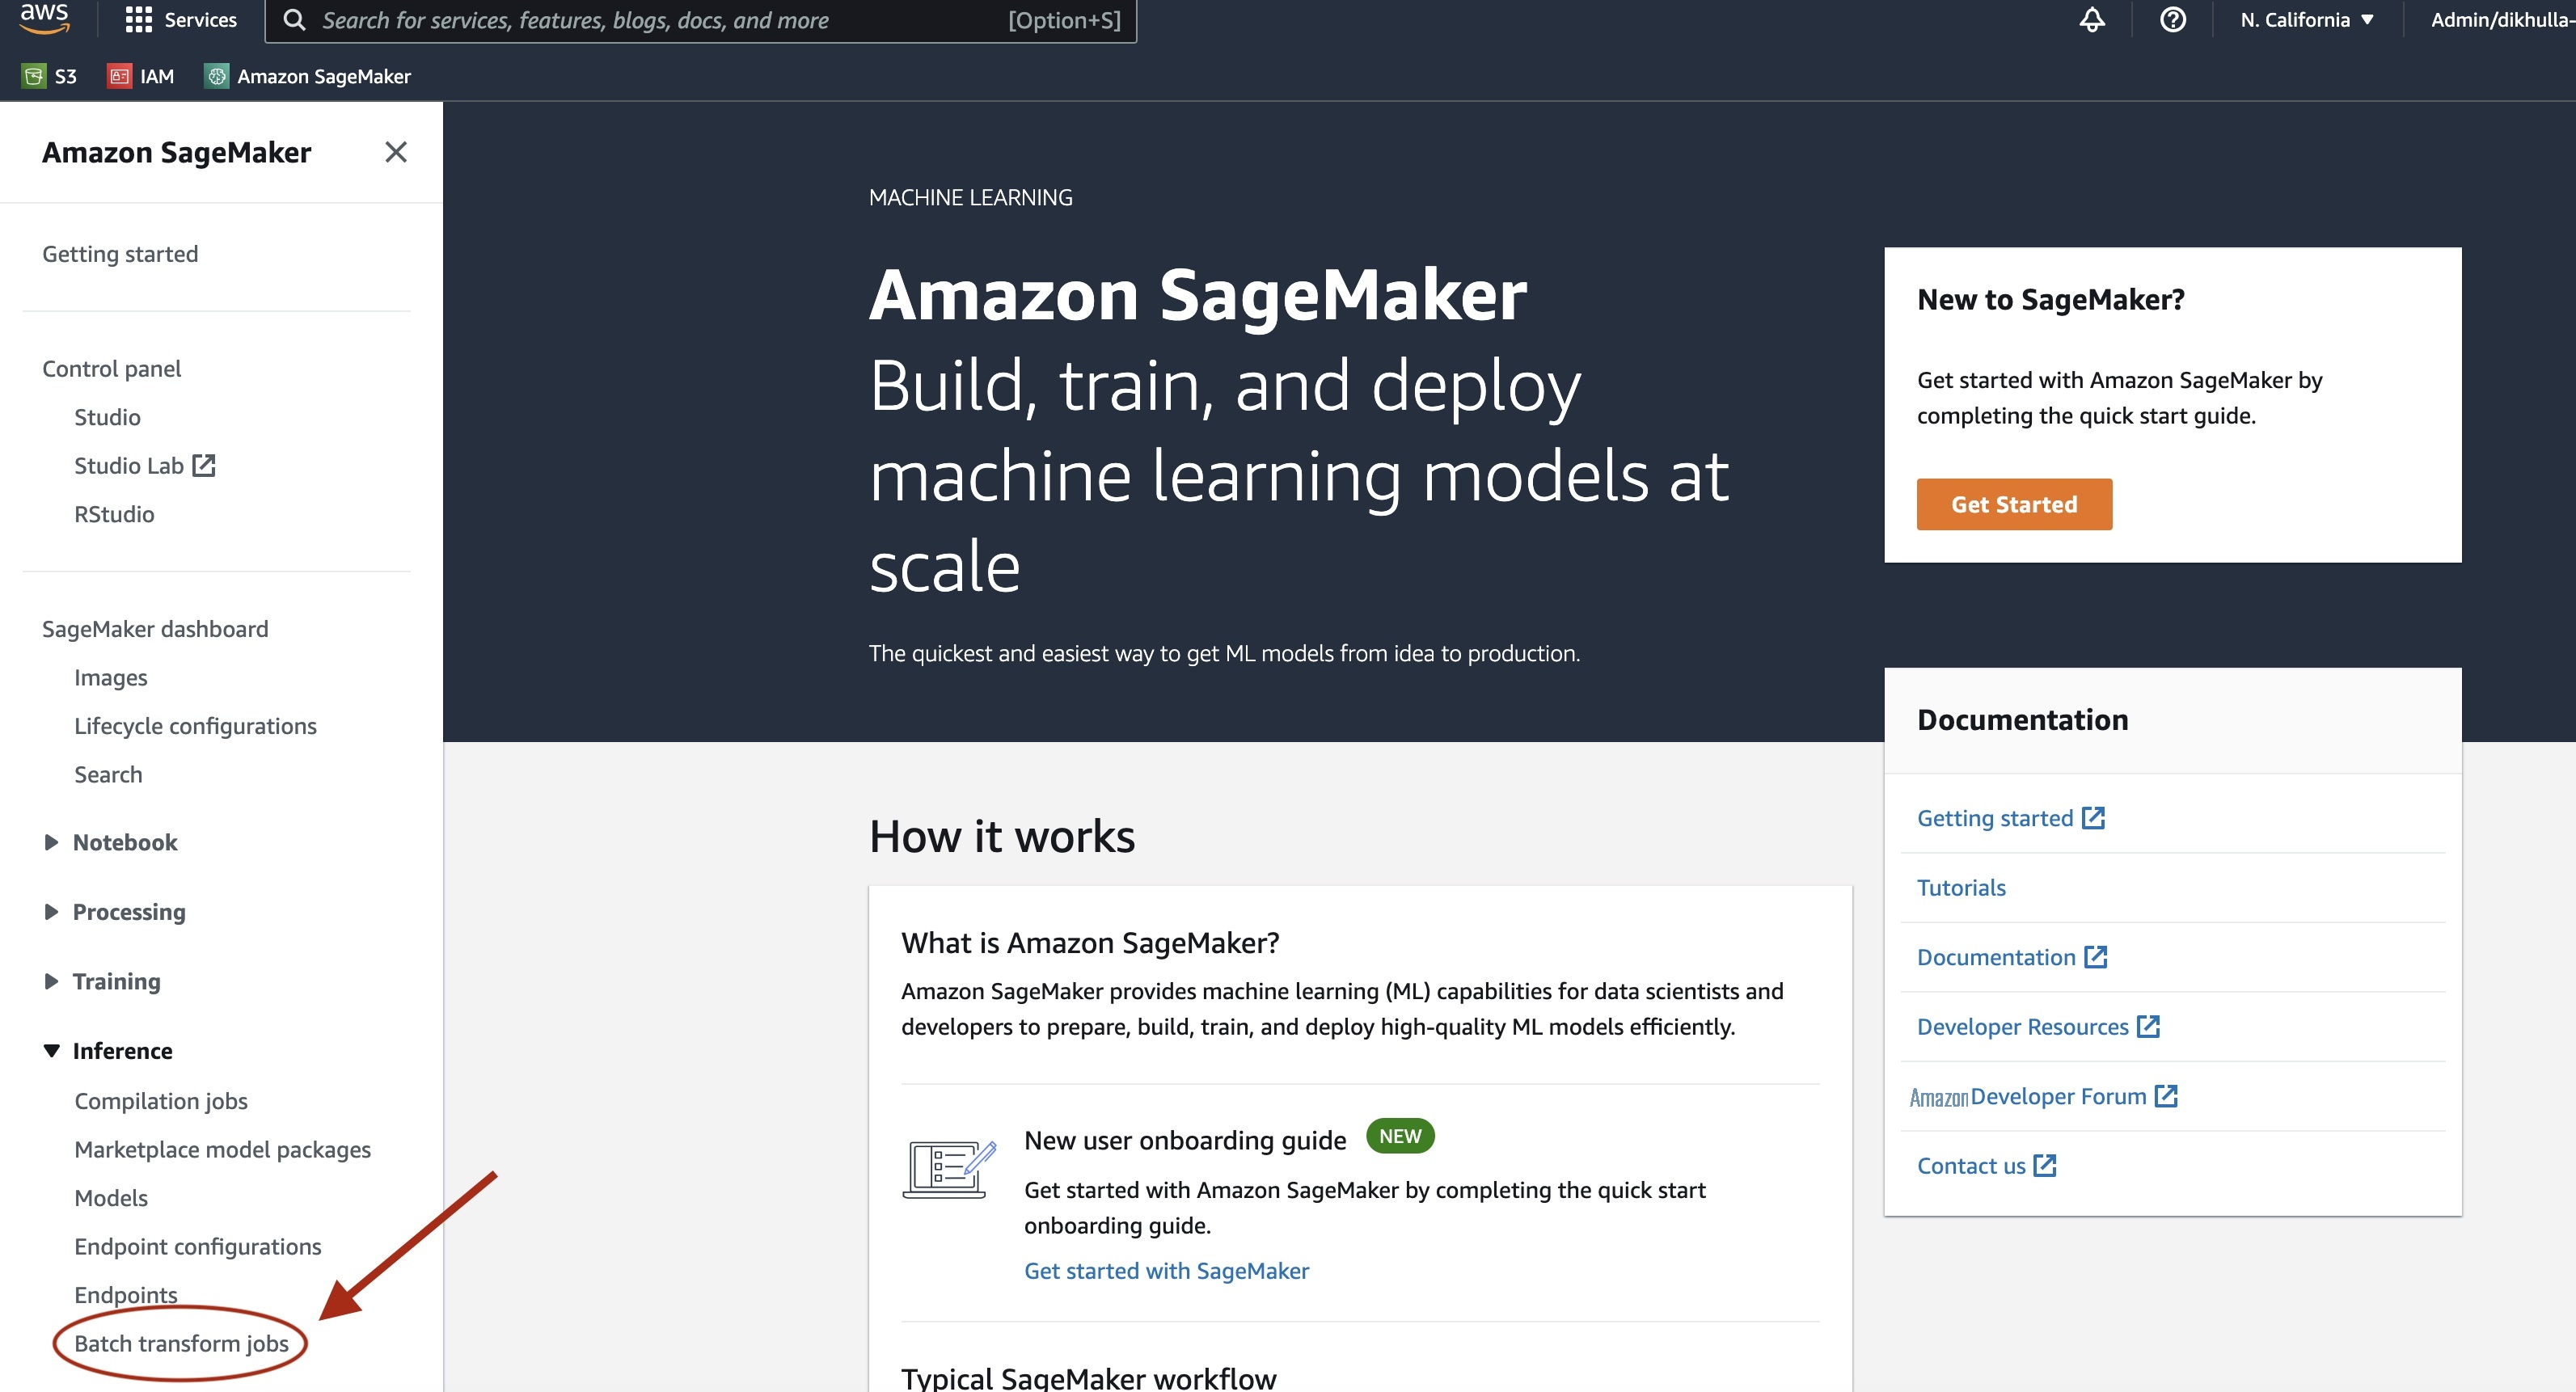
选择 批量转换 后 ,请参阅列出所有 SageMaker 批量转换作业的网页。我们可以查看最近任务执行的进度。

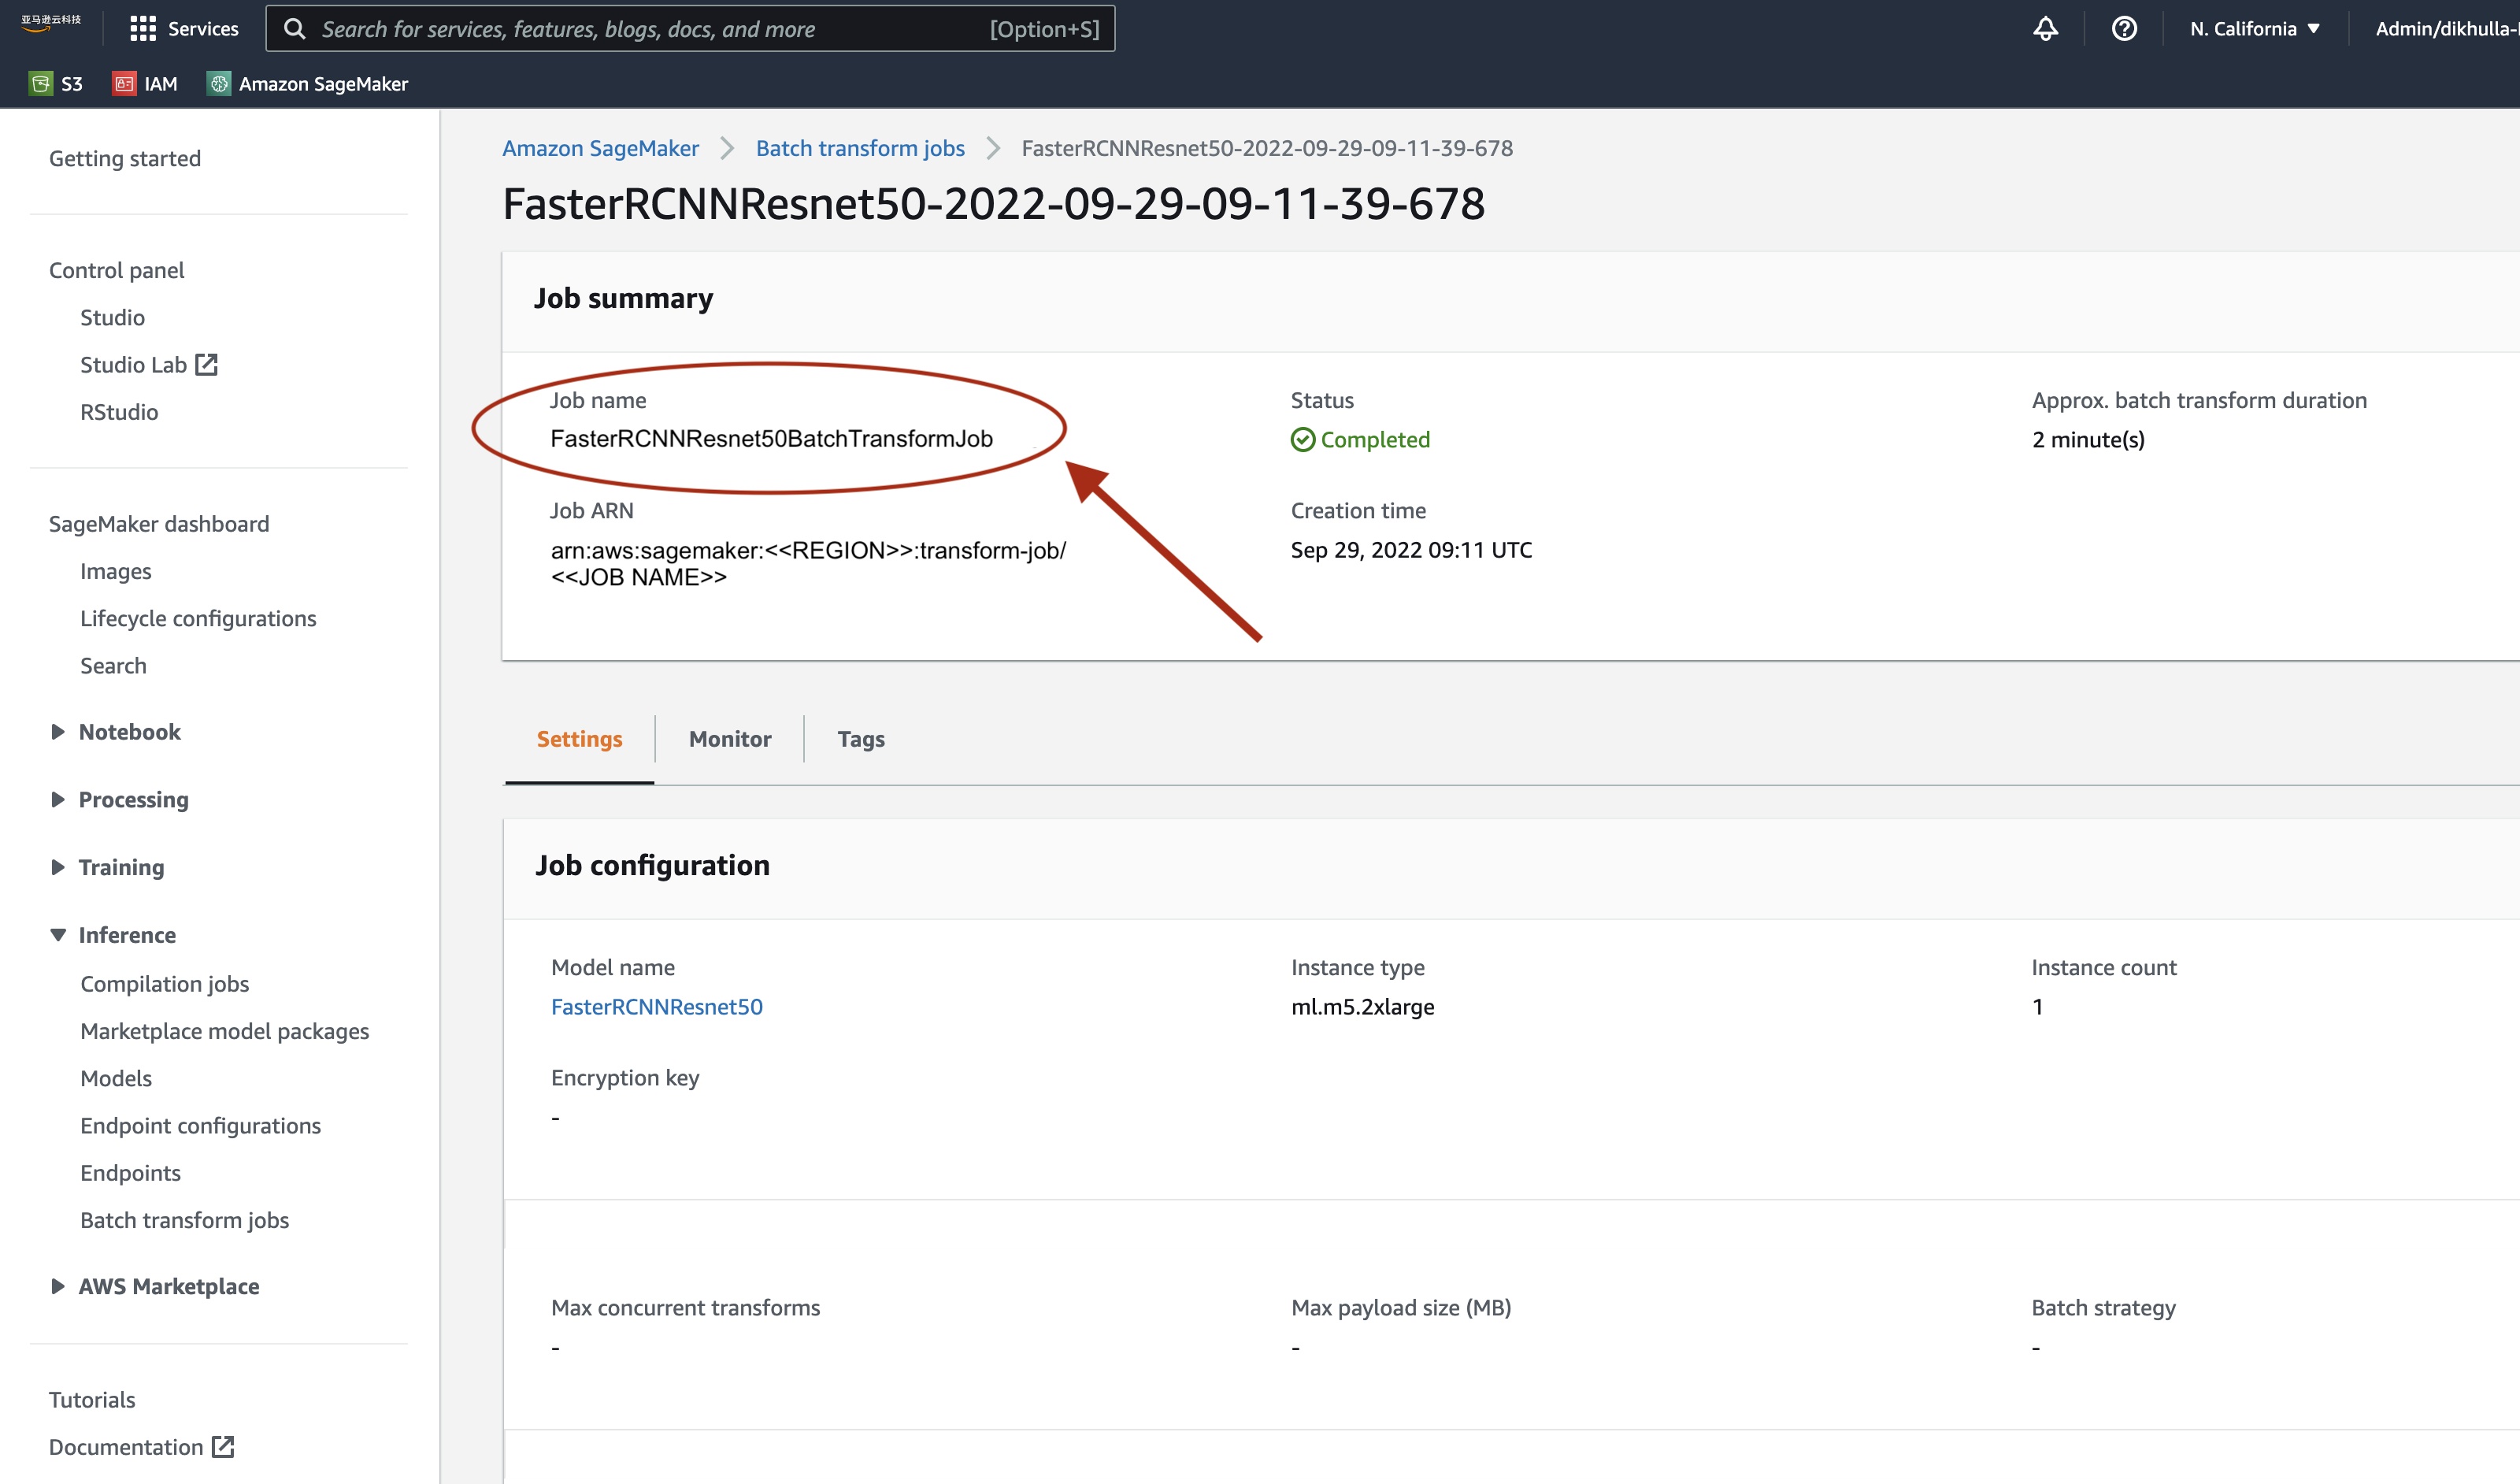
首先,该作业的状态将为 “进行中”。完成后,看到状态更改为 “已完成”。

状态标记为已完成后,我们可以单击作业来查看结果。该网页包含任务摘要,包括我们刚刚执行的作业的配置。
在 输出数据配置 下 ,我们将看到 S3 输出路径。我们将在此处找到 ML 推理输出。
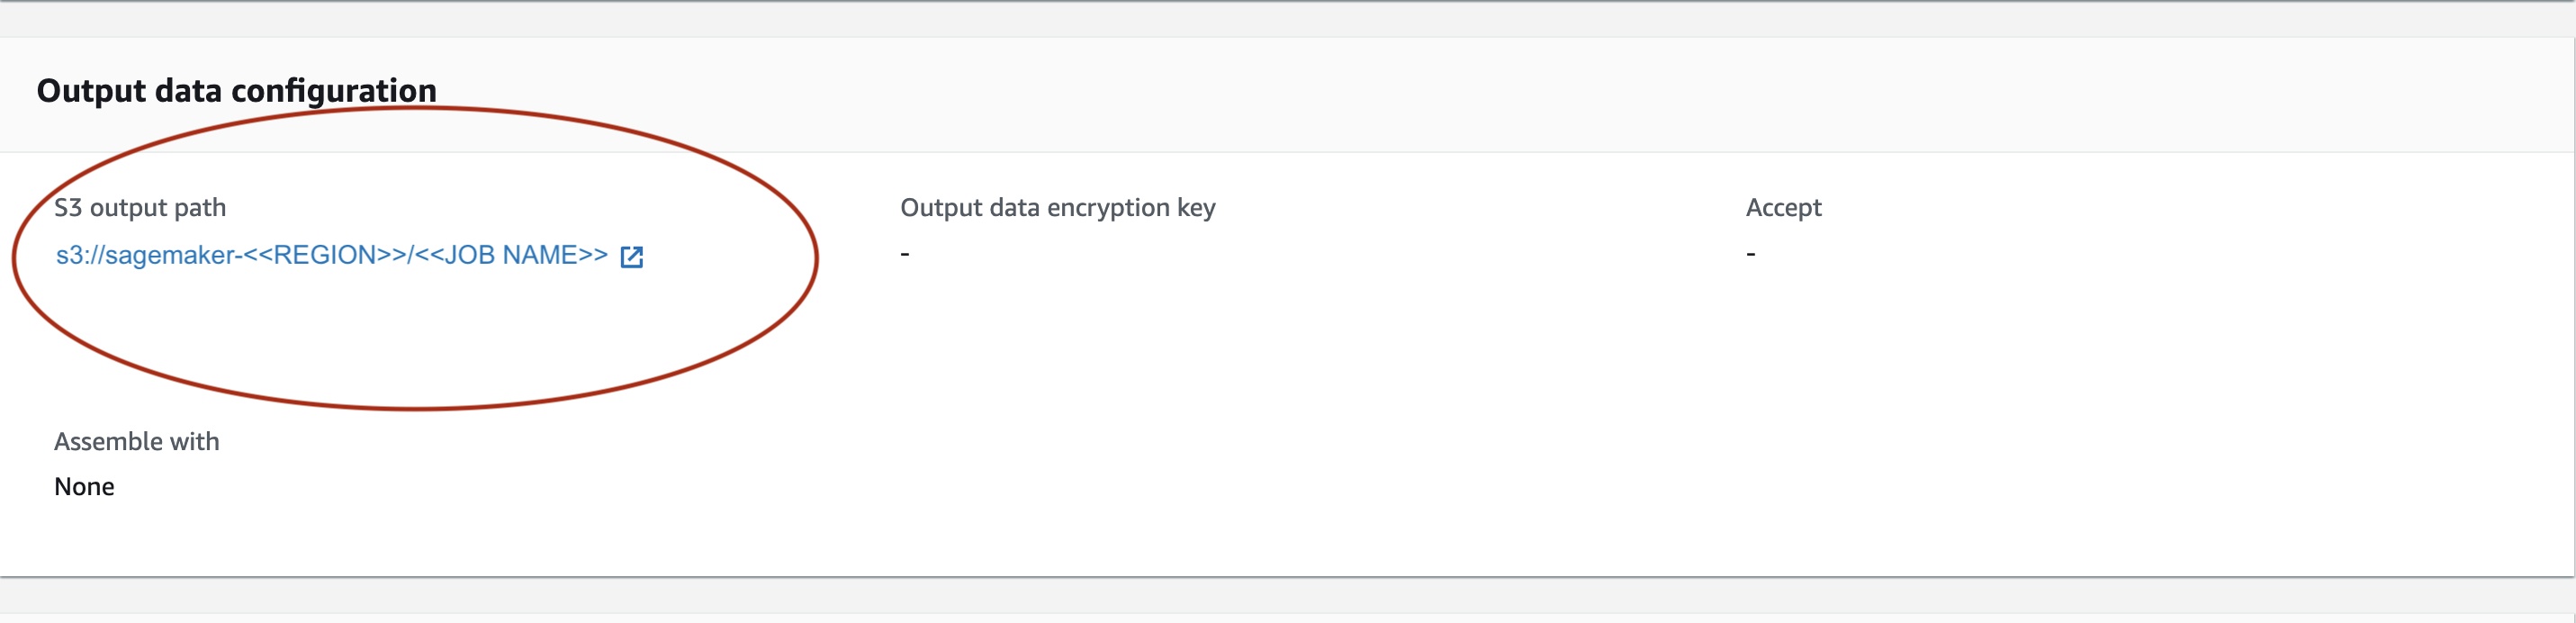
选择 S3 输出路径并查看 [image_name]。[file_type] .out 文件,其中包含我们的输出数据。我们的输出文件将包含映射列表。输出示例:
接下来,我们处理这个输出文件并可视化我们的预测。下面我们指定我们的置信度阈值。我们从
-
方框(floaTensor [N,4]):以[x1、y1、x2、y2]格式显示的预测方框,其中0 <= x1 < x2 <= W 和 0 <= y1 < y2 <= H,其中是图像的高度W是图像的宽度 ,H -
标签(
Int64Tensor [N]):每次检测的预测标签 -
分数(
张量 [N]):每次检测的预测分数
有关输出的更多详细信息,请参阅
模型输出包含具有相应置信度分数的边界框。我们可以通过移除模型不确信的边界框来优化误报的显示。以下代码片段处理输出文件中的预测,并在分数高于我们的置信度阈值的预测上绘制边界框。在此示例中,我们将概率阈值
CONF_THRESH
设置为 .75。
最后,我们将这些映射可视化以了解我们的输出。

注意 :如果图像未显示在笔记本中,请在 JupyterLab 左侧的目录树中找到它,然后从那里将其打开。
运行示例代码
要查看完整的工作示例,请克隆
结论
在这篇博客文章中,我们展示了使用 PyTorch Model Zoo 中的物体检测模型使用 SageMaker 批量转换执行机器学习推理的端到端示例。我们介绍了加载 Faster R-CNN 对象检测模型权重、将其保存到 S3 存储桶、编写入口点文件以及理解 PytorchModel API 中的关键参数。最后,我们部署了模型并执行了机器学习模型推断,对模型输出进行了可视化,并学习了如何解释结果。
作者简介
 Dipika Khullar
是
Dipika Khullar
是
 Marcelo Aberle
是 亚马逊云科技 AI 组织的一名机器学习工程师。他在
Marcelo Aberle
是 亚马逊云科技 AI 组织的一名机器学习工程师。他在
 Ninad Kulkarni
是
Ninad Kulkarni
是
 Yash Shah
是
Yash Shah
是
*前述特定亚马逊云科技生成式人工智能相关的服务仅在亚马逊云科技海外区域可用,亚马逊云科技中国仅为帮助您发展海外业务和/或了解行业前沿技术选择推荐该服务。