我们使用机器学习技术将英文博客翻译为简体中文。您可以点击导航栏中的“中文(简体)”切换到英文版本。
在云端构建云:在亚马逊 EC2 上运行 Apache CloudStack,第 1 部分
本博客由
SDE II — 客户工程 亚马逊云科技
的马克·罗杰斯撰写
。
如何将一朵云放在另一片云中?一些使
CloudStack 可以与许多虚拟机管理程序一起使用。本文中的说明将在 Linux 上使用基于内核的虚拟机 (KVM)。KVM 将在较低级别管理虚拟机,而 CloudStack 将管理 KVM。
先决条件
本文中的大多数信息应该适用于一系列的CloudStack版本。我在 CentOS 7 上以 CloudStack 4.14 为目标。我还测试了 CloudStack 版本 4.16 和 4.17,我推荐它们。
你需要了解 CloudStack 的基础知识。本文的范围是让CloudStack和亚马逊云科技和平共处。一旦CloudStack开始运行,我假设你会从那里开始处理事情。有关安全和其他最佳实践的信息,请参阅
让事情变得更容易
我写
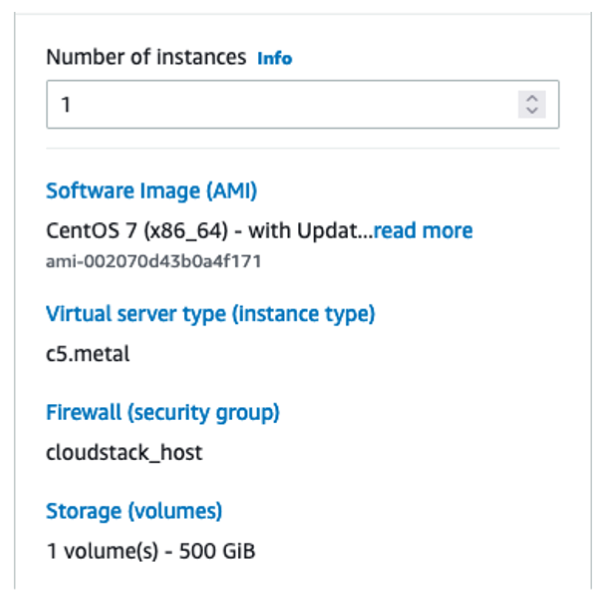
亚马逊 EC2 实例类型
我喜欢 c5.metal,因为它是最便宜的金属类型之一,而且每 vCPU 的成本很低。它有 96 个 vCPU 和 192 GiB 的内存。如果你在上面运行 20 个虚拟机,每个 4 个 CPU 内核和 8 GiB 内存,那么你仍然有 16 个 vCPU 和 32 GiB 可以在操作系统、CloudStack 和 MySQL 之间共享。使用CloudStack的超额配置功能,如果虚拟机运行轻负载,则可以容纳更多的虚拟机。
联网
最大的挑战是网络。亚马逊云科技 知道应该存在哪个 IP 和 MAC 地址,也知道它们应该属于哪台机器。它会屏蔽任何不符合其网络行为理念的流量。同时,CloudStack假设它发明的任何 IP 或 MAC 地址都应该可以正常运行。当 CloudStack 为 亚马逊云科技 子网上的虚拟机分配地址时,它们的网络流量会被阻止。
你可以通过在运行 CloudStack 的实例上启用网络地址转换 (NAT) 来解决这个问题。如果它符合您的需求,这是一个很好的解决方案,但它会使您的 Amazon VPC 中的其他计算机难以联系您的虚拟机。我推荐一种不同的方法。
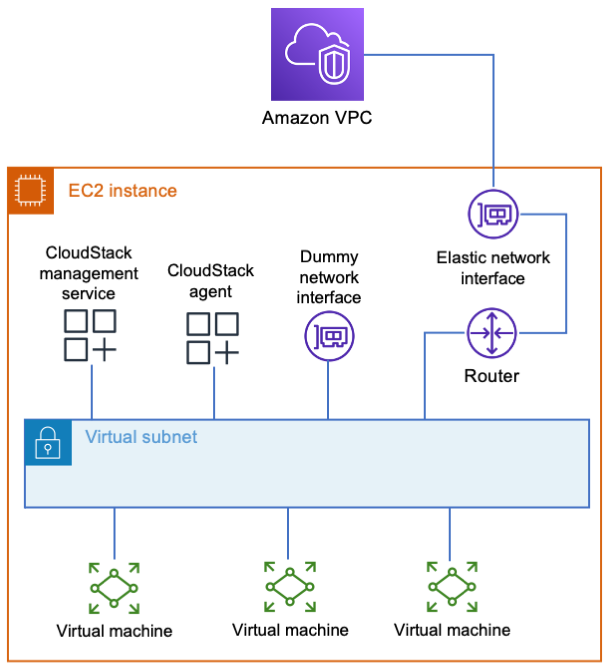
尽管 亚马逊云科技 限制了你可以使用其第 2 层网络做什么,但它非常乐意让你运行自己的第 3 层路由器。您的 EC2 实例可以充当通往 亚马逊云科技 管辖范围之外的新虚拟子网的路由器。该实例与 亚马逊云科技 集成,就像 VPN 设备一样,将流量路由到需要去的任何地方。CloudStack 可以在虚拟子网中做任何想做的事,每个人都很高兴。
我所说的虚拟子网是什么意思?这是一个仅存在于 EC2 实例内部的子网。它由连接到 Linux 网桥的逻辑网络接口组成。整个子网存在于单个 EC2 实例中。它不能很好地扩展,但很简单。在我的下一篇文章中,我将介绍一个更复杂的设置,即覆盖多个实例,允许水平扩展。
简单的方法
简单的方法是将所有内容放在一个 EC2 实例中,包括数据库、文件存储和虚拟子网。由于所有内容都存储在本地,因此应分配足够的磁盘空间以满足您的需求。500 GB 足以支持一些基本虚拟机。为您的实例创建或选择一个安全组,允许用户访问 CloudStack 用户界面(TCP 端口 8080)。安全组还应允许您从虚拟机访问您将提供的任何服务。
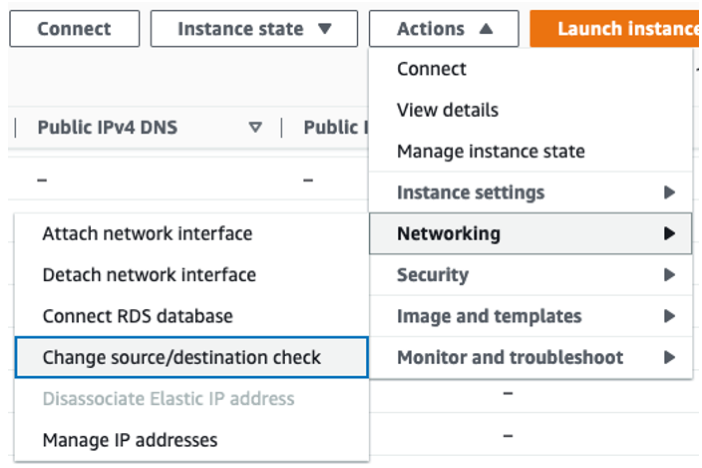
拥有实例后,配置 亚马逊云科技 将其视为路由器。
-
在 A
WS 管理控制台 中前往 Amazon EC2 。 -
选择您的实例,然后
停止源/目标检查 。
3。更新子
a. 转到 VPC 设置,然后选择路由表。
b. 确定需要访问 CloudStack 的子网的表。
c. 在每个表中,添加指向新虚拟子网的路由。路由目标应该是您的 EC2 实例。
4。根据您的网络需求,您可能还需要向传输网关、VPN 端点等添加路由。
由于所有内容都将在一台服务器上,因此创建虚拟子网仅需创建 Linux 桥接即可。CloudStack 必须找到连接到网桥的网络适配器。因此,添加一个具有
yum install -y bridge-utils net-tools

# The bridge must be named cloudbr0.

cat << EOF > /etc/sysconfig/network-scripts/ifcfg-cloudbr0
DEVICE=cloudbr0
TYPE=Bridge
ONBOOT=yes
BOOTPROTO=none
IPV6INIT=no
IPV6_AUTOCONF=no
DELAY=5
STP=yes
USERCTL=no
NM_CONTROLLED=no
IPADDR=$virtual_host_ip_address
NETMASK=$virtual_netmask
DNS1=$dns_address
EOF

# Create a dummy network interface.
cat << EOF > /etc/sysconfig/modules/dummy.modules
#!/bin/sh
/sbin/modprobe dummy numdummies=1
/sbin/ip link set name ethdummy0 dev dummy0
EOF

chmod +x /etc/sysconfig/modules/dummy.modules
/etc/sysconfig/modules/dummy.modules

cat << EOF > /etc/sysconfig/network-scripts/ifcfg-ethdummy0
TYPE=Ethernet
BOOTPROTO=none
NAME=ethdummy0
DEVICE=ethdummy0
ONBOOT=yes
BRIDGE=cloudbr0
NM_CONTROLLED=no
EOF

# Turn the instance into a router

echo 'net.ipv4.ip_forward=1' >> /etc/sysctl.conf
sysctl -p

# Must kill dhclient or the network service won't restart properly.
# A reboot would also work, if you’d rather do that.

pkill dhclient
systemctl restart network
CloudStack 必须知道使用哪些 IP 地址进行服务间通信。它将通过将计算机的完全限定域名 (FQDN) 解析为地址来进行选择。以下命令可以让你选择正确的命令。您必须为 $virtual_host_ip_address 提供一个值。
hostnamectl set-hostname cloudstack.localdomain

echo "$virtual_host_ip_address cloudstack.localdomain" >>
/etc/hosts
您可以按照
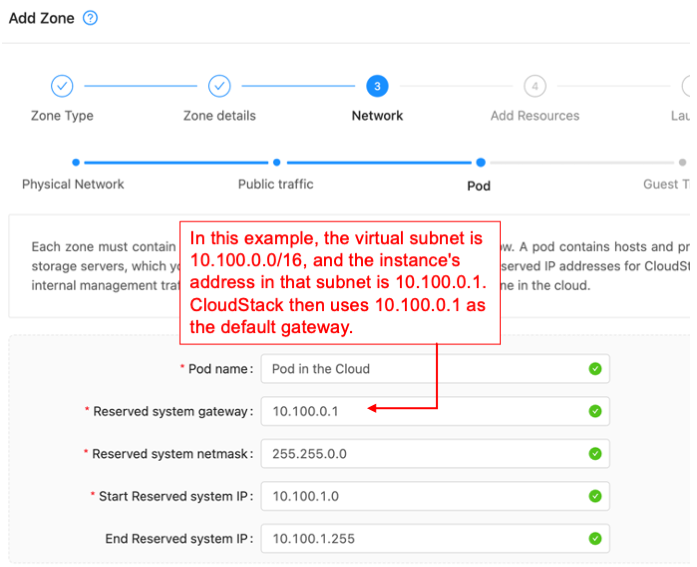
请记住,CloudStack 只能直接连接到您的虚拟网络。EC2 实例是将虚拟子网连接到 Amazon VPC 的路由器。在配置 CloudStack 时,请使用实例的虚拟子网地址作为默认网关。
要从您的工作站访问 CloudStack,您需要连接到您的 VPC。这可以通过
如果你只是在试用 CloudStack,那么我建议你在不需要的时候停止实例,这样可以省钱。做到这一点的安全方法是:
- 在 CloudStack 用户界面中禁用您的区域。
- 将主存储器置于维护模式。
- 等待切换到维护模式完成。
- 停止 EC2 实例。
当你准备好重新开启所有功能时,只需撤消这些步骤即可。如果你在CloudStack中有任何虚拟路由器,那么你可能也需要启动这些虚拟路由器。
清理
如果你使用我的 CloudFormation 模板,请
结论
让 CloudStack 在 亚马逊云科技 上运行还不错。最难的部分就是知道怎么做。这里介绍的设置非常适合小型设施,但它只能垂直扩展。在我的下一篇文章中,我将向你展示如何创建可水平扩展的装置。我们将构建一个跨多个实例的覆盖网络,而不是使用存在于单个 EC2 实例中的虚拟子网。它将使用更多的组件和功能,包括一些可能对你来说是新的组件和功能。我希望你觉得它有趣!
现在你可以创建一个简单的设置,试一试吧!我希望你玩得开心,并在此过程中学到新的东西。用你的实验结果发表评论。
“Apache”、“Apache CloudStack” 和 “CloudStack” 是阿帕奇软件基金会的商标。
*前述特定亚马逊云科技生成式人工智能相关的服务仅在亚马逊云科技海外区域可用,亚马逊云科技中国仅为帮助您发展海外业务和/或了解行业前沿技术选择推荐该服务。