我们使用机器学习技术将英文博客翻译为简体中文。您可以点击导航栏中的“中文(简体)”切换到英文版本。
使用 亚马逊云科技 Step Functions 将传统的机器学习代码引入亚马逊 SageMaker
成千上万的 亚马逊云科技 客户使用 亚马逊云科技 机器学习 (ML) 服务通过完全托管的基础设施和工具来加速 ML 开发。对于一直在本地开发机器学习模型的客户,例如本地桌面,他们希望将其传统机器学习模型迁移到 亚马逊云科技 云,以充分利用 亚马逊云科技 上可用的最全面的机器学习服务、基础设施和实施资源集。
传统代码
在这篇文章中,我们分享了一种可扩展且易于实施的方法,即使用Am
解决方案概述
在此框架中,我们将容器中的遗留代码作为
我们假设有两个角色参与:数据科学家和mLops工程师。数据科学家负责将代码手动迁移到 SageMaker 中,也可以将其从 亚马逊云科技 CodeCommit 等代码存储库中克隆
mLOps 工程师负责构建 Step Functions 工作流程,我们可以重复使用该工作流程来部署数据科学家开发的具有适当参数的自定义容器。Step Functions 工作流程可以根据需要进行模块化以适应用例,也可以仅包含一个步骤即可启动单个流程。为了最大限度地减少迁移代码所需的工作量,我们确定了三个模块化组件来构建功能齐全的部署流程:
- 预处理
- 推断
- 后处理
下图说明了我们的解决方案架构和工作流程。
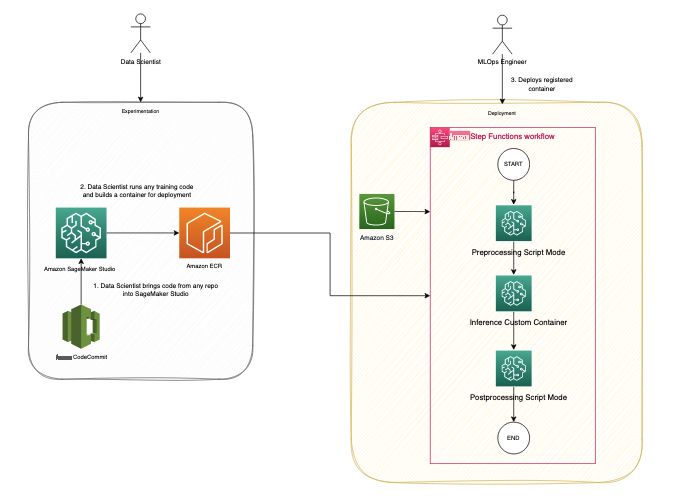
此解决方案涉及以下步骤:
- 数据科学家 persona 使用 Studio 通过从代码存储库中克隆来导入遗留代码,然后将代码模块化为遵循机器学习生命周期步骤(预处理、推断和后处理)的独立组件。
-
这位数据科学家使用 Studio,特别是 SageMaker 提供的
Studio Image Build CLI 工具来构建 Docker 镜像。此 CLI 工具允许数据科学家直接在 Studio 中构建映像,并自动将映像注册到 Amazon ECR 中。 - mLOps 工程师使用注册的容器映像,并使用 Step Functions 为特定用例创建部署。Step Functions 是一项无服务器工作流程服务,可以通过使用亚马逊州语言直接控制 SageMaker API。
SageMaker 处理作业
让我们来了解一下
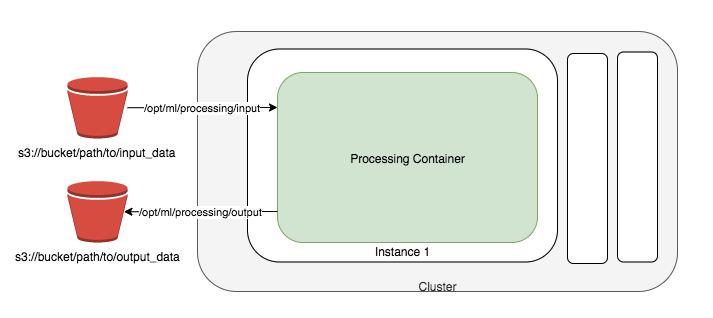
SageMaker 获取您的脚本,从
SageMaker 处理作业使用 Docker 容器入口点脚本设置您的处理映像。
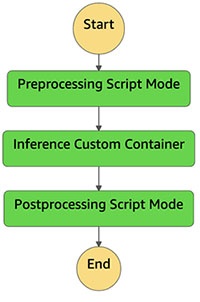
在此示例中,我们构造了一个自定义容器并使用 SageMaker 处理作业进行推理。预处理和后处理作业使用脚本模式和预先构建的 scikit-learn 容器。
先决条件
要关注这篇文章,请完成以下必备步骤:
-
创建工作室域名。有关说明,请参阅使用快速设置
登录 Amazon SageMaker 域名 。 - 创建 S3 存储桶。
-
将提供的
GitHub 存储库 克隆 到工作室中。
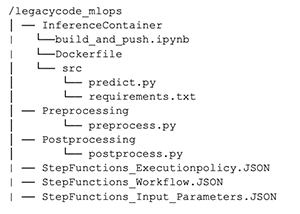
GitHub 存储库分为不同的文件夹,这些文件夹对应于机器学习生命周期的各个阶段,便于导航和管理:
迁移旧代码
在此步骤中,我们作为数据科学家,负责迁移遗留代码。
我们首先打开
build_and_p
ush.ipynb 笔记本。
笔记本中的初始单元将指导您安装
在运行生成命令之前,务必确保运行命令的角色具有必要的权限,如 CLI
参见以下代码:
为了简化你的旧代码,可以将其分成三个不同的 Python 脚本,分别是 preprocessing.py、predict.py 和 postprocessing.py。通过将代码转换为从主函数调用的函数,遵循最佳编程实践。确保导入了所有必需的库,并更新了 requirements.txt 文件以包含所有自定义库。
整理完代码后,将其与需求文件一起打包到 Docker 容器中。您可以使用以下命令轻松地在 Studio 中构建容器:
默认情况下,该图像将被推送到一个名为 sagemakerstudio 的 ECR 存储库,其标签为 latest。此外,还将使用 Studio 应用程序的执行角色以及默认 SageMaker Python SDK S3 存储桶。但是,使用相应的 CLI 选项可以轻松更改这些设置。参见以下代码:
现在,容器已经构建并在 ECR 存储库中注册,是时候更深入地研究如何使用它来运行 predict.py 了。我们还向你展示了使用预建的 s
生产容器
在此步骤中,我们充当 mLOps 工程师,负责生产上一步中构建的容器。
我们使用步骤函数来协调工作流程。Step Functions 可以非常灵活地将各种服务集成到工作流程中,从而适应旧系统中可能存在的任何现有依赖关系。这种方法可确保所有必要组件无缝集成并按所需顺序运行,从而形成高效有效的工作流程解决方案。
Step Functions 可以直接通过亚马逊国家语言控制某些 亚马逊云科技 服务。要了解有关使用步骤函数及其与 SageMaker 集成的更多信息,请参阅使用步骤函数
预处理
SageMaker 提供了多个用于运行自定义代码的选项。如果您只有一个没有任何自定义依赖关系的脚本,则可以将该脚本作为 Bring Your Own 脚本 (BYOS) 运行。
查看
推断
您可以使用 “
/opt/ml
本地路径运行,您可以在配置中指定处理输入及其本地路径。然后,处理作业将工件复制到本地容器并启动作业。作业完成后,它会将 ProcessingOutputs 的本地路径中指定的对象复制到其指定的外部位置。
查看
后处理
您可以使用 “步骤函数 createProcessingJob” 步骤运行后处理脚本,就像运行预处理脚本一样。运行后处理脚本允许您在推理作业完成后执行自定义处理任务。
创建 “步进函数” 工作流程
为了快速进行原型设计,我们使用了步进函数
通过选择 “用 代码 编写工作流程”,可以在 Step Functions 控制台上创建新的 Step Functions 状态机 。

Step Functions 可以查看您使用的资源并创建角色。但是,您可能会看到以下消息:
“如果适用于 SageMaker 的 RoLearn 来自路径,则 Step Functions 无法生成 IAM 策略。在状态机定义中对 SageMaker RoLearn 进行硬编码,或者选择具有相应权限的 Step Functions 的现有角色来调用 SageMaker。”
要解决这个问题,您必须为 Step Functions 创建 A
下图说明了数据和容器映像流入 Step Functions 工作流程每个步骤的流程。
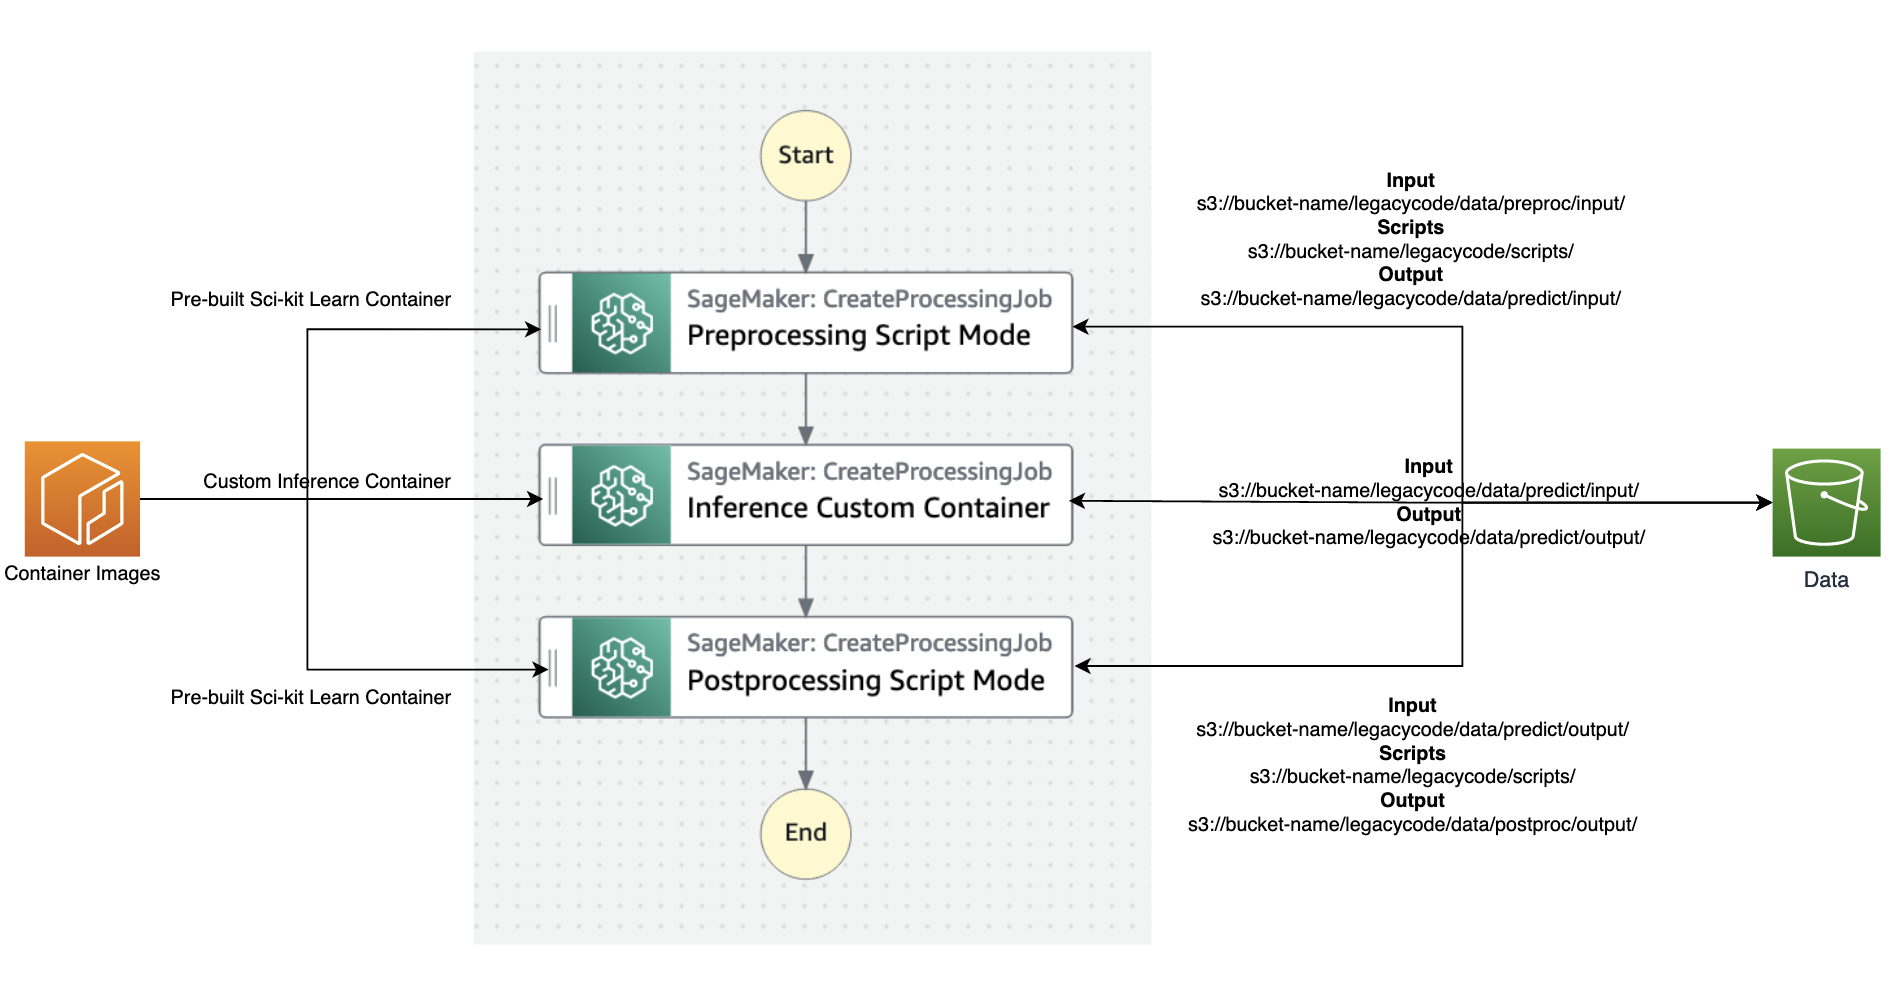
以下是步骤函数中初始化所需的最低参数列表;您也可以参考
- input_uri — 输入文件的 S3 URI
- output_uri — 输出文件的 S3 URI
- code_uri — 脚本文件的 S3 URI
- cu@@ stom_image_uri — 您已构建的自定义容器的容器 URI
- scikit_image_uri — 预建的 scikit-learn 框架的容器 URI
- ro le — 运行作业的执行角色
- instance_t ype — 运行容器所需的实例类型
- volume_siz e — 容器所需的存储卷大小
- max_run time — 容器的最大运行时间,默认值为 1 小时
运行工作流程
我们将遗留代码分解为可管理的部分:预处理、推理和后处理。为了支持我们的推理需求,我们构建了一个配备必要库依赖关系的自定义容器。我们的计划是利用步进函数,利用其调用 SageMaker API 的能力。我们已经展示了两种使用 SageMaker API 运行自定义代码的方法:使用预建图像并在运行时生成自定义脚本的 SageMaker 处理作业,以及使用自定义容器的 SageMaker 处理作业,该容器打包了运行自定义推理所需的工件。
下图显示了 Step Functions 工作流程的运行情况。
摘要
在这篇文章中,我们讨论了从本地开发环境迁移旧版 ML Python 代码和实现标准化 mLOps 程序的过程。使用这种方法,您可以轻松地转移数百个模型并整合所需的企业部署实践。我们提供了两种在 SageMaker 上运行自定义代码的不同方法,您可以选择最适合自己需求的一种。
如果您需要高度可定制的解决方案,建议使用自定义容器方法。如果你有基本脚本并且不需要创建自定义容器,如前面提到的预处理步骤所述,你可能会发现使用预构建的映像来运行自定义脚本更合适。此外,如果需要,您可以应用此解决方案对传统模型训练和评估步骤进行容器化,就像本文中推理步骤的容器化一样。
作者简介
 Bhavana Chirumamilla
是 亚马逊云科技 的高级驻地架构师,对数据和机器学习操作充满热情。她带来了丰富的经验和热情,可以帮助企业制定有效的数据和机器学习策略。在业余时间,Bhavana 喜欢与家人共度时光,参与各种活动,例如旅行、远足、园艺和看纪录片。
Bhavana Chirumamilla
是 亚马逊云科技 的高级驻地架构师,对数据和机器学习操作充满热情。她带来了丰富的经验和热情,可以帮助企业制定有效的数据和机器学习策略。在业余时间,Bhavana 喜欢与家人共度时光,参与各种活动,例如旅行、远足、园艺和看纪录片。
 Shyam Namavaram
是亚马逊网络服务 (亚马逊云科技) 的高级人工智能 (AI) 和机器学习 (ML) 专业解决方案架构师。他热情地与客户合作,通过提供技术指导并帮助他们在 亚马逊云科技 上创新和构建安全的云解决方案,加速他们采用 AI 和 ML。他专门研究人工智能和机器学习、容器和分析技术。工作之余,他喜欢运动,喜欢徒步旅行体验大自然。
Shyam Namavaram
是亚马逊网络服务 (亚马逊云科技) 的高级人工智能 (AI) 和机器学习 (ML) 专业解决方案架构师。他热情地与客户合作,通过提供技术指导并帮助他们在 亚马逊云科技 上创新和构建安全的云解决方案,加速他们采用 AI 和 ML。他专门研究人工智能和机器学习、容器和分析技术。工作之余,他喜欢运动,喜欢徒步旅行体验大自然。
 李庆伟
是亚马逊网络服务的机器学习专家。在他破坏了顾问的研究补助金账户并未能兑现他所承诺的诺贝尔奖之后,他获得了运筹学博士学位。目前,他帮助金融服务和保险行业的客户在 亚马逊云科技 上构建机器学习解决方案。在业余时间,他喜欢阅读和教学。
李庆伟
是亚马逊网络服务的机器学习专家。在他破坏了顾问的研究补助金账户并未能兑现他所承诺的诺贝尔奖之后,他获得了运筹学博士学位。目前,他帮助金融服务和保险行业的客户在 亚马逊云科技 上构建机器学习解决方案。在业余时间,他喜欢阅读和教学。
 Srinivasa Shaik 是位于波士顿的 A
WS 的解决方案架构师。他帮助企业客户加快云之旅。他对容器和机器学习技术充满热情。在业余时间,他喜欢与家人共度时光、烹饪和旅行。
Srinivasa Shaik 是位于波士顿的 A
WS 的解决方案架构师。他帮助企业客户加快云之旅。他对容器和机器学习技术充满热情。在业余时间,他喜欢与家人共度时光、烹饪和旅行。
*前述特定亚马逊云科技生成式人工智能相关的服务仅在亚马逊云科技海外区域可用,亚马逊云科技中国仅为帮助您发展海外业务和/或了解行业前沿技术选择推荐该服务。