我们使用机器学习技术将英文博客翻译为简体中文。您可以点击导航栏中的“中文(简体)”切换到英文版本。
在亚马逊 EKS 上使用 DPDK 自动配置数据包加速
数据包加速是实现工作负载性能效率的关键组件。数据包加速可让您优化工作负载,以获得最大吞吐量、高网络带宽、最小延迟和降低成本。电信、媒体和娱乐、机器人和物联网 (IOT) 等行业一直是使用
SRIOV 可在虚拟化环境中实现基于硬件的加速,从而提供更高的 I/O 性能、更低的 CPU 利用率、更高的每秒数据包数 (PPS) 性能和更低的延迟。DPDK 提供基于软件的开发套件,该套件绕过操作系统 (OS) 内核并减少了数据包处理开销,从而提高了性能并降低了延迟。
在这篇博客中,我们将详细解释如何在
概述
亚马逊
现在您已经启用了 SRIOV 的 AMI 和实例,接下来是在您的 Amazon EKS 工作节点上启用 DPDK 的自动化步骤。
先决条件
- VPC ID
- WokerNode 主接口 (eth0) 子网 ID :这是工作节点的主子网(用于 Kubernetes 主接口,即 aws-vpc-cni)。
- 多子网组 ID: 用于创建 DPDK/Multus 接口的多子网列表。在工作节点上创建接口的顺序与子网列表的顺序相同。
-
DPDK S3 存储桶:
这是在用户数据初始化期间调用 DPDK 脚本的地方。
这些脚本可以在 git 存储库中包含的 s3-content/用户数据支持文件 文件夹中找到。 -
Multus S3 存储桶:
这是存储压缩的 Multus
亚马逊云科技 Lambda 函数代码 的地方。 - EKS 集群: 所需的值是亚马逊 EKS 集群名称。
- EKS 安全组: 与 Amazon EKS 集群一起创建的安全组 ID。
在工作节点上设置 DPDK
您的支持 DPDK 的工作负载拥有 DPDK 库来实现数据包加速。底层工作节点需要使用
- 安装 Linux 库、与 ENA 兼容的驱动程序以及 DPDK 和大型页面设置所需的补丁
- 根据工作负载要求配置 Linux sysctl
- 配置任何大页面配置,并根据您的 NUMA 配置为系统设置 CPUAffinity
- 启用工作负载使用的辅助接口
- 将您的辅助接口与 DPDK 驱动程序绑定,例如 vfio-pci 驱动程序
-
为
SRIOV-DP 插件准备配置文件 ,该插件 将接口的 PCIAddress 映射到资源名称
根据您的要求,您可以选择下一节中提到的两个选项之一来准备工作节点。
选项 1:使用 DPDK 设置的预构建 AMI
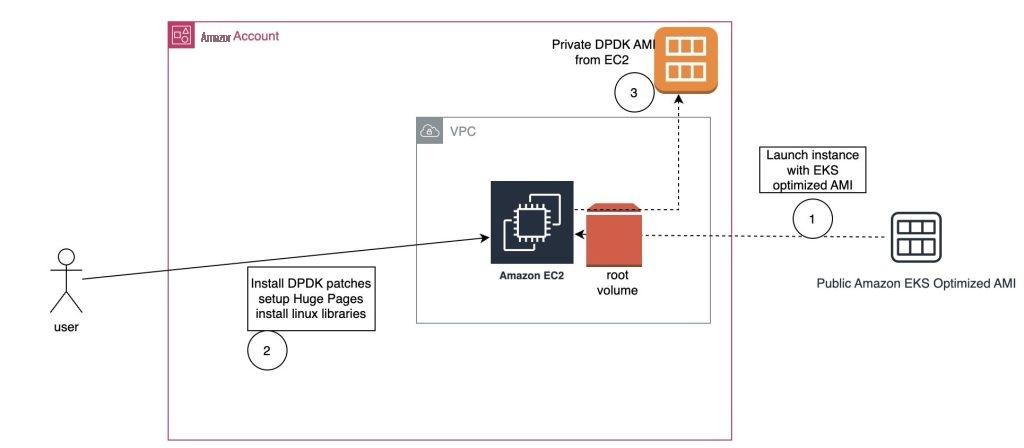
图 1:从 EKS 优化的 AMI 创建 DPDK AMI
在此选项中,如上图所示,您将使用所有必需的补丁、配置和操作系统级别设置来准备自定义 AMI。你可以使用亚马逊 EKS 优化版 Amazon Linux AMI 或任何其他支持 ENA 驱动程序的 Linux AMI 作为基础 AMI,然后创建 EC2 实例。节点启动后,您可以手动或使用您的 EC2 实例的用户数据执行 DPDK 配置部分中提到的步骤 1-3。安装和配置步骤完成后,您可以从根磁盘(
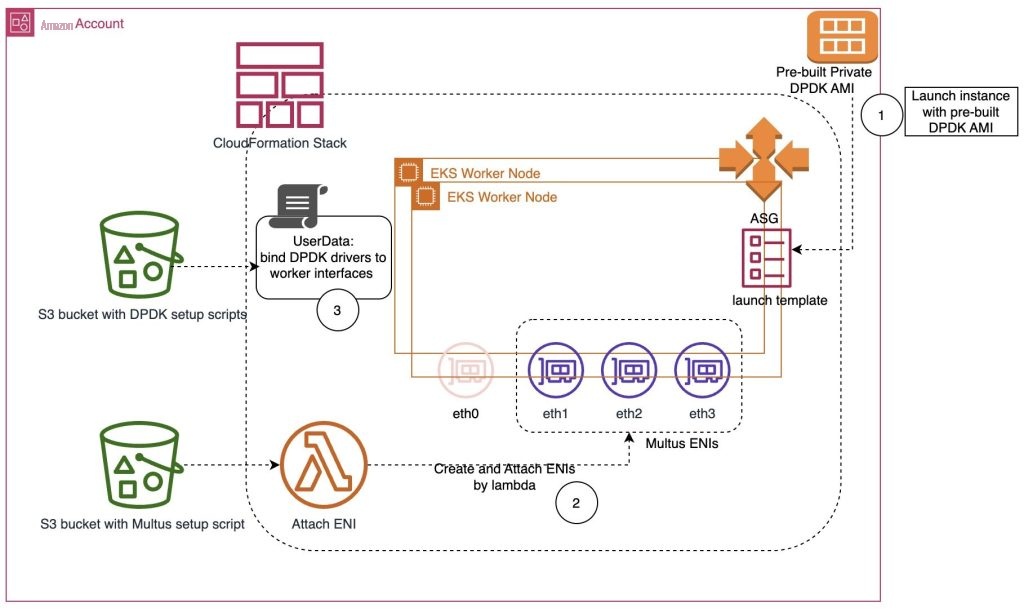
图 2:使用预先构建的 DPDK AMI 创建 EKS 节点组
为了准备 Amazon EKS 工作节点,您可以使用这个预先构建的 AMI 并执行 DPDK 配置部分中提到的步骤 4-6。由于这些步骤只是配置步骤,因此用户数据执行速度很快。它仍然使您可以灵活地决定要绑定 DPDK 的接口数量,并且您可以通过 SRIOV-DP 插件使用工作负载使用的计划资源名称来构建它。
这种方法的优点是启动时间短,因为安装步骤 (1-3) 已经包含在预先构建的自定义 AMI 中。此外,它还预先下载了软件包,因此无需在
选项 2:按需 DPDK 安装和配置
在此选项中,您将使用最新的亚马逊 EKS 优化版 Amazon Linux AMI 或任何其他支持 ENA 驱动程序的 Linux AMI,然后部署您的工作节点。您可以使用启动模板的用户数据自动执行上述 “DPDK 配置” 部分中提到的所有必要步骤。
您可以将软件包、补丁、帮助程序和配置脚本存储在私有 S3 存储桶中。在实例化期间,EKS Worker 节点从 S3 存储桶下载这些文件,并将其用于补丁安装、DPDK 设置和系统配置。此选项还使您可以灵活地决定要绑定 DPDK 的接口数量,并且您可以通过 SRIOV-DP 插件使用工作负载使用的计划资源名称来构建它。
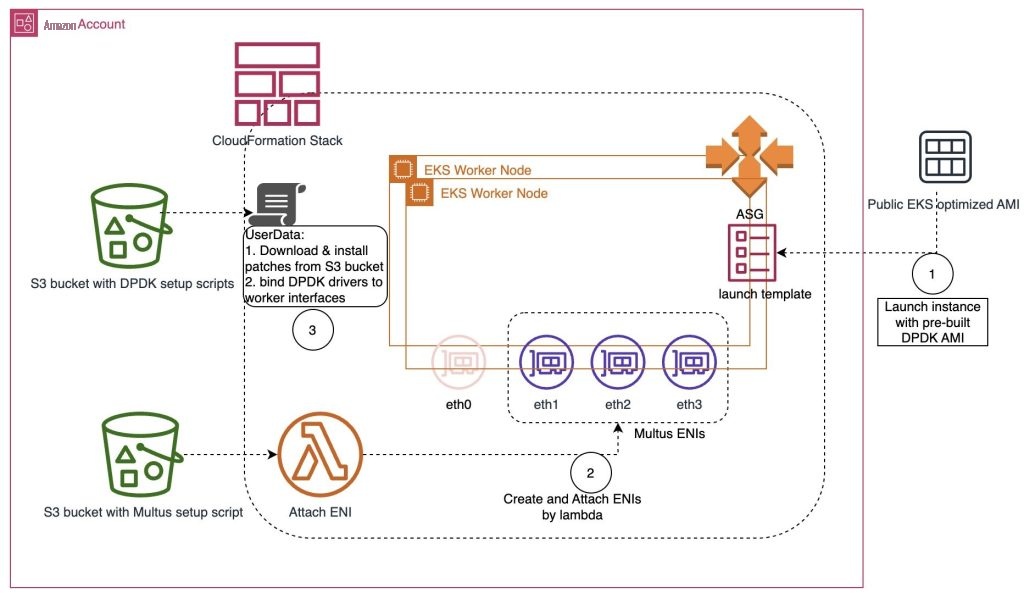
图 3:使用 EKS 优化的 AMI 创建 EKS 节点组并使用用户数据安装 DPDK 补丁
这种方法的优点是您不需要自定义 AMI,并且您的系统是使用最新的基础 AMI 为每个不同的用例动态准备的。此外,您不必管理多个自定义 AMI、跨多个账户共享、使用基本 AMI 上的安全补丁保持最新状态或维护 AMI 的多个版本。不同的要求,例如大页面配置和 DPDK 版本,是通过自动化动态处理的。这种方法的缺点是,与定制的 AMI 相比,启动时间略有增加,因为补丁是在启动时安装的。
请参阅
适用于支持 DPDK 的工作负载的亚马逊 EKS 集群适应 NodeGroup 的
亚马逊云科技-Auth Configmap
工作节点的 CloudFormation 堆栈完成后,您必须将工作节点的实例角色添加到 Amazon EKS 集群 aws-auth 配置映射中。这是工作节点加入 Amazon EKS 集群所必需的。使用以下命令语法添加实例角色(您可以从 CloudFormation 堆栈的输出部分获取实例角色 ARN)。
cat <<EOF | kubectl apply -f-
apiVersion: v1
kind: ConfigMap
metadata:
  name: aws-auth
  namespace: kube-system
data:
  mapRoles: |
    - rolearn: arn:aws:iam::xxxxxxxx:role/NG-workers-NodeInstanceRole-XXXXX
      username: system:node:{{EC2PrivateDNSName}}
      groups:
        - system:bootstrappers
        - system:nodes
EOF
SRIOV 设备插件设置
      - hostPath:
          path: /etc/pcidp/config.json
          type: ""
        name: config-volume
/etc/pcidp/config.json
是在创建节点组期间通过用户数据中的 /opt/dpdk/dpdk-resource-builder.py 脚本创建的。
你可以参考
您可以通过在 SRIOV 设备插件守护程序集的定义中使用节点选择器来控制 SRIOV 设备插件守护程序集的部署。确保将该节点选择器作为标签应用于启用 DPDK 的工作节点。这在只有部分节点组启用了 DPDK 的情况下很有用。对于工作节点上没有 /etc/pcidp/config.json 的非基于 DPDK 的节点组,这会导致在该工作节点上运行的 SRIOV 设备守护程序集容器出现故障。
在 CloudFormation 示例中,示例节点选择器 sriov=enabled 被用作基于 DPDK 的工作节点组的额外 Kubernetes 标签。以下片段反映了 dpdk-cnf-deployment/sriov
      nodeSelector:
        beta.kubernetes.io/arch: amd64
        sriov: enabled
在 Amazon EKS 上部署 DPDK 工作负载
部署示例应用程序以验证设置
在下面的示例中,使用了 VPP(矢量数据包处理器)CNF。VPP 是一种流行的数据包处理软件,支持 DPDK 进行数据包处理。VPP CNF 如何在 Amazon EKS 集群上运行的架构如下图所示:
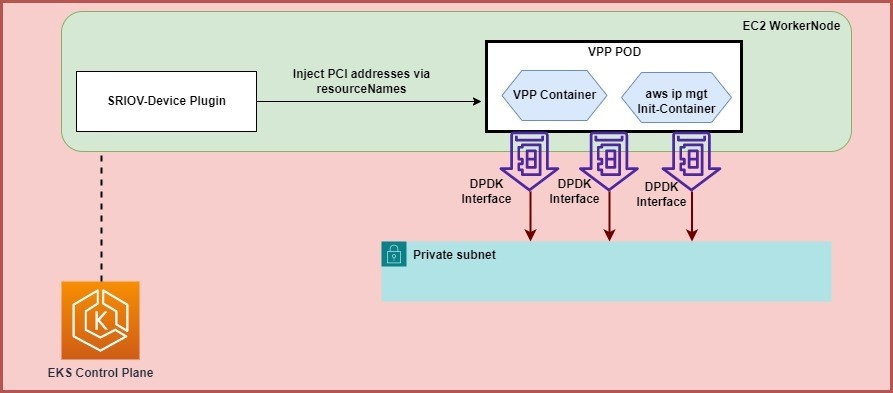
图 4:使用 SRIOV-DP 插件启用 DPDK 的接口的示例 VPP POD
已经创建了头盔图,其中包含部署示例 VPP POD 所需的参数。安装后 VPP Pod 的部署状态将在下一节中给出。
- 以下命令显示了环境变量,这些变量确认 sriov-device 插件已从 DPDK 接口注入了相应的 PCI 接口地址。
kubectl -n dpdk exec -ti deploy/core-vpp-dpdk printenv | grep PCI

PCIDEVICE_INTEL_COM_INTEL_SRIOV_NETDEVICE_3=0000:00:08.0
PCIDEVICE_INTEL_COM_INTEL_SRIOV_NETDEVICE_1=0000:00:06.0
PCIDEVICE_INTEL_COM_INTEL_SRIOV_NETDEVICE_2=0000:00:07.0
清理
为避免将来产生费用,请删除此博客中已部署的资源:
- 从 EC2 控制台中删除私有 DPDK AMI。
- 前往 CloudFormation 控制台并删除 EKS 节点组 CloudFormation 堆栈。
结论
在这篇博客中,我们提供了两个选项,可以自动配置 Amazon EKS 工作负载的 DPDK,从而在 Amazon EKS 上实现数据包加速。通过自动方法,您可以灵活地使用 DPDK 配置接口,或将其用作 Multus IPVLAN 接口。
试试来自
*前述特定亚马逊云科技生成式人工智能相关的服务仅在亚马逊云科技海外区域可用,亚马逊云科技中国仅为帮助您发展海外业务和/或了解行业前沿技术选择推荐该服务。