我们使用机器学习技术将英文博客翻译为简体中文。您可以点击导航栏中的“中文(简体)”切换到英文版本。
通过 Amazon Glue Iceberg REST 端点使用 PyIceBerg 访问亚马逊 S3 表中的数据
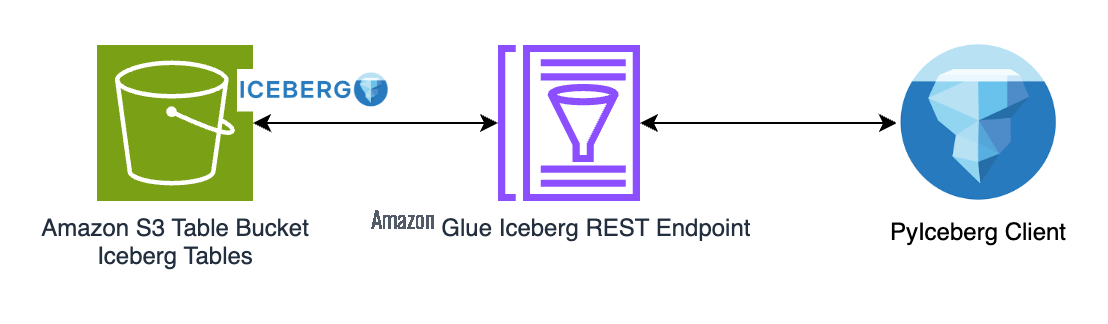
现代数据湖与多个引擎集成,可满足从 SQL 查询到流处理的各种分析需求。这种方法的一个关键推动因素是采用 Apache Iceberg 作为构建交易数据湖的开放表格式。但是,随着Iceberg生态系统的扩展,越来越多的引擎和语言带来了重大的集成挑战。每个引擎都需要自己的客户端才能连接到目录,目录是负责跟踪表元数据和演变的组件。这种分散的方法迫使开发人员管理多个目录集成,从而增加了管道的复杂性。缺乏标准化解决方案通常会导致数据孤岛、引擎间功能不一致以及分析现代化工作进展缓慢。
Amazon Glue Iceberg REST 终端节点通过提供用于与 Iceberg 表交互的标准接口来应对这些挑战。Glue Iceberg REST 端点完全符合 Iceberg REST 目录开放 API 规范,简化了互操作性。这使用户能够通过跨各种引擎、语言和平台的单一、统一的 REST API 与 Iceberg 表进行交互。再加上 Amazon S3 表的增强性能、自动表格维护和简化的安全功能,为用户在亚马逊云科技上构建和扩展数据湖奠定了坚实的基础。
在这篇文章中,我们演示了如何使用 PyIceberg 通过 Glue Iceberg REST 终端节点访问 S3 表中存储的 Iceberg 表,Amazon Lake Formation 管理存储凭证的售卖。PyIceBerg 是 Iceberg 项目的官方 Python 客户端,它为使用你首选的 Python 工具发现和查询冰山表提供了一个轻量级的解决方案。同样的数据消耗流程也可以应用于支持 Iceberg REST 目录规范的其他计算引擎,从而提供一致且高效的跨平台体验。
解决方案概述
这篇文章引用了用户使用本地 PyiceBerg 客户端执行一些基本数据转换的示例,例如表创建、数据提取、更新和时空旅行。该工作流程展示了一种常见的开发模式,即开发人员在大规模部署数据转换管道之前,使用本地环境对数据转换管道进行原型设计和迭代。
我们首先创建一个用于存储 Iceberg 桌子的桌桶。然后,我们配置 PyIceBerg 客户端,使其通过 Amazon Glue Iceberg REST 终端节点与 Iceberg 表进行交互。所有权限均使用 Lake Formation 进行集中管理。
先决条件
要继续操作,你需要进行以下设置:
1。您需要访问数据目录账户中的 Amazon Identity and Access Management (IAM) 角色,该角色是 Lake Formation 数据湖管理员。有关说明,请转到创建数据湖管理员。
2。确认你已经安装了 Python 3.7 或更高版本。检查是否安装了 pip3 版本为 22.2.2 或更高版本。
3.安装或更新到最新的亚马逊云科技命令行接口 (亚马逊云科技CLI)。有关说明,请参阅安装或更新最新版本的亚马逊云科技CLI。使用亚马逊云科技CLI 运行亚马逊云科技configure 命令以指向您的亚马逊云科技账户。
草率排练
以下步骤将引导您完成此解决方案。
第 1 步:创建表存储桶并启用 Glue 数据目录集成 S3 表:
1.1。使用管理员角色登录 Amazon S3 控制台,然后从导航面板中选择表存储桶,如下图所示。

1.2。选择 “启用集成”。成功集成后,您应该看到它已为您的表格存储桶启用,如下图所示。

1.3。从 Amazon S3 的左侧窗格中,选择表存储桶。选择 “创建桌上存储桶”。
1.4。在 “属性” 下,输入表存储桶名称为,pyiceberg-blog-bucket然后选择创建表存储桶。
第 2 步:为本地 PyiceBerg 环境创建 IAM 角色
你需要为 Pyiceberg 脚本创建 IAM 角色才能访问 Glue 和 Lake Formation API。为此,您需要创建以下策略和角色:
2.1。创建策略并将其命名irc-glue-lf-policy。以下是通过亚马逊云科技管理控制台执行此操作的一些步骤:
a. 登录控制台。
b. 打开 IAM 控制台。
c. 在控制台的导航窗格中,选择 “策略”,然后选择 “创建策略” 选项。
d. 在策略编辑器中选择 JSON 并粘贴以下策略。
i. 根据您的亚马逊云科技区域<region><account-id><s3_table_bucket_name>、<database_name>亚马逊云科技账户 ID、S3 表存储桶名称和数据库名称分别替换以下策略中的、、和。在本文myblognamespace的其余部分中,我们将用作数据库名称。
{
    "Version": "2012-10-17",
    "Statement": [
        {
            "Sid": "VisualEditor0",
            "Effect": "Allow",
            "Action": [
                "glue:GetCatalog",
                "glue:GetDatabase",
                "glue:GetDatabases",
                "glue:GetTable",
                "glue:GetTables",
                "glue:CreateTable",
                "glue:UpdateTable"
            ],
            "Resource": [
                "arn:aws:glue:<region>:<account-id>:catalog",
                "arn:aws:glue:<region>:<account-id>:catalog/s3tablescatalog",
                "arn:aws:glue:<region>:<account-id>:catalog/s3tablescatalog/<s3_table_bucket_name>",
                "arn:aws:glue:<region>:<account-id>:table/s3tablescatalog/<s3_table_bucket_name>/<database_name>/*",
                "arn:aws:glue:<region>:<account-id>:database/s3tablescatalog/<s3_table_bucket_name>/<database_name>"
            ]
        },
        {
            "Effect": "Allow",
            "Action": [
                "lakeformation:GetDataAccess"
            ],
            "Resource": "*"
        }
    ]
}
2.2。在 IAM 控制台中pyiceberg-etl-role按照以下步骤创建名为的角色。
a. 在控制台的导航窗格中,选择 “角色”,然后选择 “创建角色” 选项。
b. 选择 “自定义信任策略” 并粘贴以下策略。
i. 根据您的数据湖管理员 ARN <Admin_role> 在以下政策中替换<account-id>和。
{
    "Version": "2012-10-17",
    "Statement": [
        {
            "Effect": "Allow",
            "Principal": {
                "亚马逊云科技": "arn:aws:iam::<accountid>:role/<Admin_role>"
            },
            "Action": "sts:AssumeRole",
            "Condition": {}
        }
    ]
}
c. 选择 “下一步”,然后选择您之前在步骤 2a 中创建的名为的策略irc-glue-lf-policy。
d. 选择 “下一步”pyiceberg-etl-role,然后输入角色名。
e. 选择 “创建角色”。
创建角色时,需要使用 Lake Formation 定义对该角色的访问权限。
第 3 步:使用 Lake Formation 定义访问控制
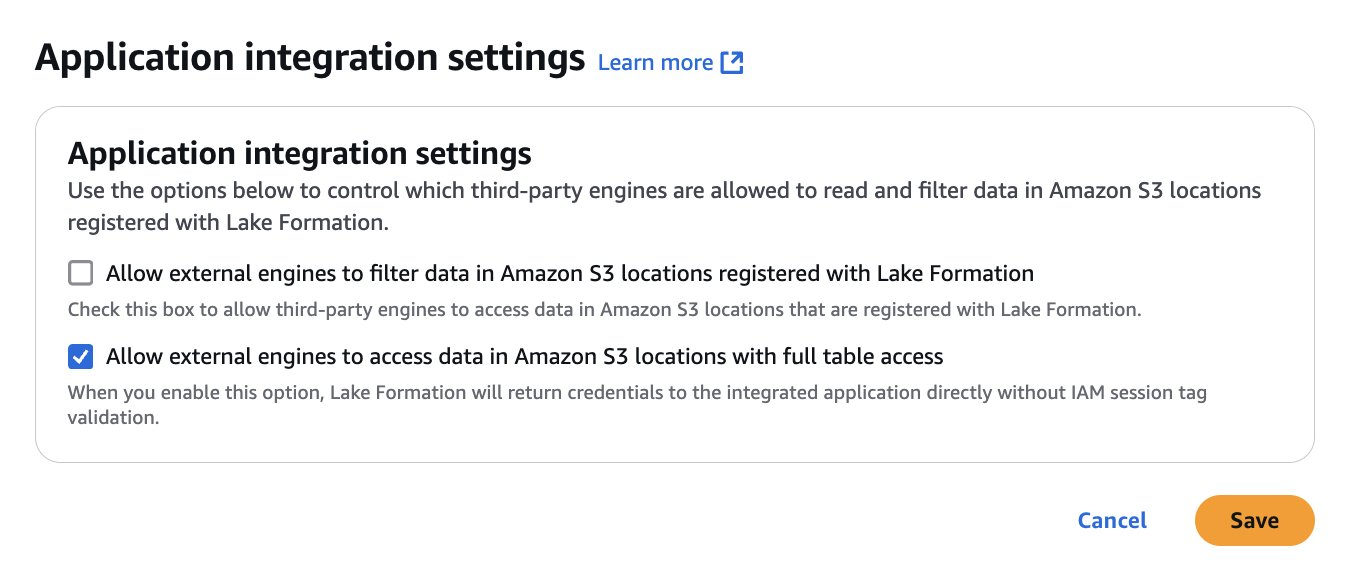
3.1。应用程序集成设置:
a. 在 Lake Formation 中,为外部引擎启用全表访问权限以访问数据。这允许第三方应用程序使用对所请求表具有完全权限 (ALL) 的 IAM 角色获取 Lake Formation 临时证书。
i. 以管理员用户身份登录并前往 Lake Formation。
二。在左侧窗格中,展开 “管理” 部分。
三。选择应用程序集成设置,然后选择允许外部引擎以全表访问权限访问 Amazon S3 位置中的数据。
iv。选择 “保存”,如下图所示。
3.2。创建数据库:
a. 在 Lake Formation 控制台导航窗格中,选择 “数据目录” 下的 “数据库”。
b. 选择 “创建数据库”,然后提供名称myblognamespace。
c. 从下拉列表中选择在步骤 1 (<accountid>:s3tablescatalog/pyiceberg-blog-bucket) 中创建的数据目录。
d. 选择 “创建数据库”。
e. 如果数据库未显示,请刷新浏览器。
创建数据库后,需要为 PyiceBerg 客户端在该数据库下创建和管理表时使用的角色设置 Lake Formation 授权。为此,您需要向提供数据库和表级别的权限pyiceberg-etl-role。
3.3。设置数据库级别权限:
向资源上的pyiceberg-etl-role角色授予以下权限,如下表所示。
a. 在 Lake Formation 控制台导航窗格中,选择数据权限,然后选择授予。
b. 在 “委托人” 部分中,选择 “IAM 用户和角色” 单选按钮,然后从下拉列表中选择pyiceberg-etl-role。
c. 在 LF 标签或目录资源部分中,选择命名数据目录资源:
i. 选择 “<accountid>:s3tablescatalog/pyiceberg-blog-bucket目录”。
二。选择 “mynamespace数据库”。
d. 选择 “创建表” 和 “描述” 以获得数据库权限。
e. 选择 “授权”。
3.4。设置表级权限:
a. 在 Lake Formation 控制台导航窗格中,选择数据权限,然后选择授予。
b. 在 “委托人” 部分中,选择 “IAM 用户和角色” 单选按钮,然后从下拉列表中选择pyiceberg-etl-role。
c. 在 LF 标签或目录资源部分中,选择命名数据目录资源:
i. 选择 “<accountid>:s3tablescatalog/pyiceberg-blog-bucket目录”。
二。为数据库选择 mynamespace。
三。为表格选择 ALL_TABLE S。
d. 选择 SUPER 以获得表权限。
e. 选择 “授权”。
现在,权限已经设置完毕,您可以设置本地 PyiceBerg 环境来使用 S3 表。
第 4 步:设置本地 PyiceBerg 环境
4.1。安装 Python 以及以下软件包:
pip install "pyiceberg[pandas,pyarrow]"

pip install boto3

pip install tabulate
4.2。配置亚马逊云科技CLI 以管理员用户身份登录本地计算机,并spark-etl-role使用以下命令进行假设:
aws sts assume-role --role-arn "arn:aws:iam::<accountid>:role/pyiceberg-etl-role" --role-session-name pyiceberg-etl-role
4.3。复制证书并替换以下占位符以配置环境变量。
export AWS_ACCESS_KEY_ID='<AccessKeyId>'
export AWS_SECRET_ACCESS_KEY='<SecretAccessKey>'
export AWS_SESSION_TOKEN='<SessionToken>'
export AWS_DEFAULT_REGION='<region>'
接下来,使用本地的 PyiceBerg 设置来创建表和加载数据,并执行基本查询。
第 5 步:运行 PyiceBerg 脚本
在这篇文章中,我们将逐步重点介绍关键步骤。你可以下载整个 Python 脚本并运行python blogcode_pyiceberg.py --table customer。
首先,我们导入一些库并初始化我们在整个脚本中使用的常量。
#!/usr/bin/env python3
from pyiceberg.catalog import load_catalog
import os
import pyarrow as pa
import pandas as pd
from pyiceberg.expressions import EqualTo
import boto3
import json
import argparse
from botocore.exceptions import ProfileNotFound
from datetime import datetime
from tabulate import tabulate

# Constants
REGION = 'us-east-2'
CATALOG = 's3tablescatalog'
DATABASE = 'myblognamespace'
TABLE_BUCKET = 'pyiceberg-blog-bucket'
我们使用 Glue Iceberg REST 端点初始化目录。
rest_catalog = load_catalog(
        $CATALOG,
        **{
            "type": "rest",
            "warehouse": f"{account_id}:s3tablescatalog/$TABLE_BUCKET",
            "uri": f"https://glue.{region}.amazonaws.com/iceberg",
            "rest.sigv4-enabled": "true",
            "rest.signing-name": "glue",
            "rest.signing-region": region
        }
    )
我们定义了一个表架构。
def create_customer_schema() -> pa.Schema:
    """
    Create and return the PyArrow schema for customer table.
    """
    return pa.schema([
        pa.field('c_salutation', pa.string()),
        pa.field('c_preferred_cust_flag', pa.string()),
        pa.field('c_first_sales_date_sk', pa.int32()),
        pa.field('c_customer_sk', pa.int32()),
        pa.field('c_first_name', pa.string()),
        pa.field('c_email_address', pa.string())
    ])
然后,我们使用以下架构创建一个表。
my_schema = create_customer_schema()
# Check if table exists before creating
        try:
            rest_catalog.create_table(
                identifier=f"{database_name}.{table_name}",
                schema=my_schema
            )
            print("Table created successfully")
        except Exception as e:
            print(f"Table creation note: {str(e)}")
我们将样本客户数据加载到表中。
def get_sample_customer_data() -> dict:
    return {
        "c_salutation": "Ms",
        "c_preferred_cust_flag": "NULL",
        "c_first_sales_date_sk": 2452736,
        "c_customer_sk": 1234,
        "c_first_name": "Mickey",
        "c_email_address": "mickey@email.com"
    }
sample_data = get_sample_customer_data()
        df = pa.Table.from_pylist([sample_data], schema=my_schema)
        table.append(df)
我们查询表。
tabledata = table.scan(
row_filter=EqualTo("c_first_name", "Mickey"),
limit=10
).to_pandas()
然后,我们更新该c_preferred_cust_flag列的值并显示更改。
condition = tabledata['c_preferred_cust_flag'] == 'NULL'
        tabledata.loc[condition, 'c_preferred_cust_flag'] = 'N'
        df2 = pa.Table.from_pandas(tabledata, schema=my_schema)
        table.overwrite(df2)
最后,我们显示快照历史记录。
print("\n⏰ Performing Time Travel Operations...")
        customer_snapshots = table.snapshots()
        print_snapshot_info(customer_snapshots)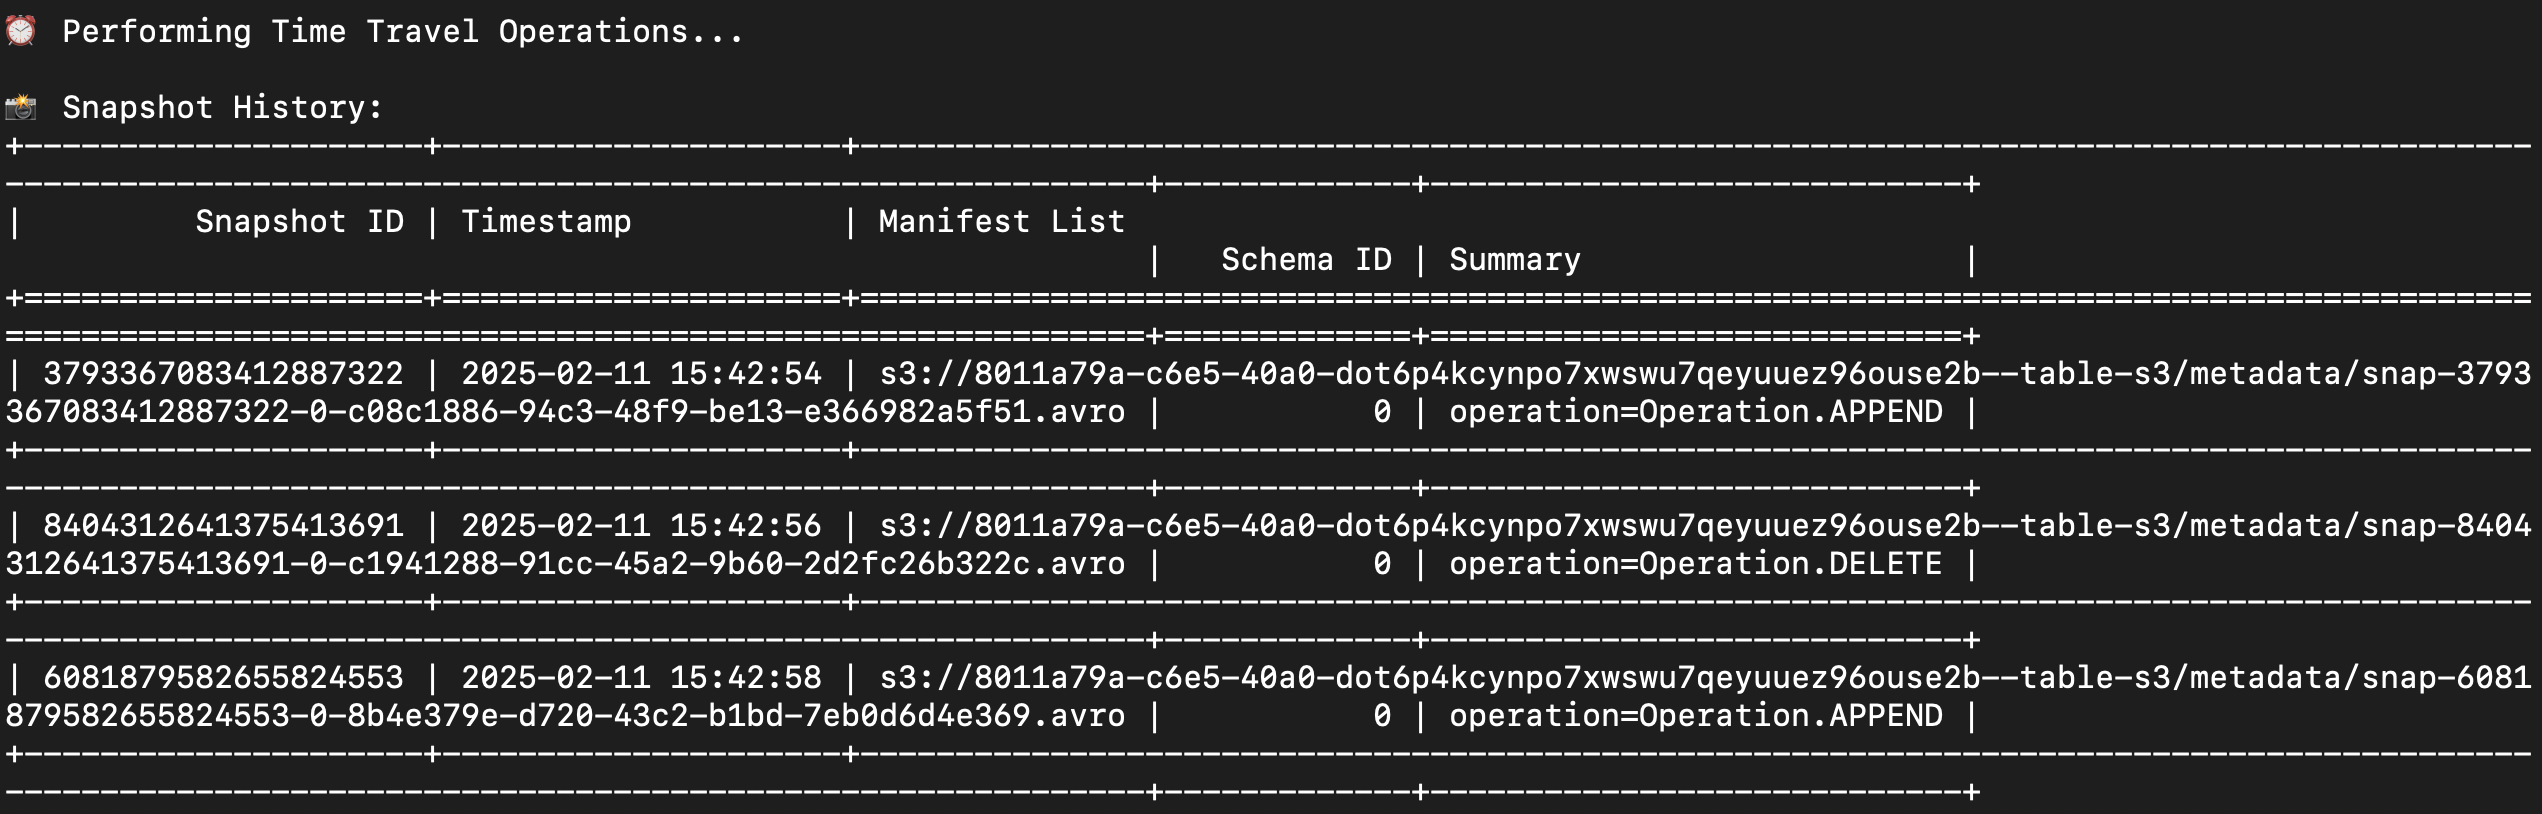
正在清理
要清理资源,请完成以下步骤:
- 删除 Amazon S3 表。
- 删除命名空间。
- 删除 S 3 表存储桶。
结论
在这篇文章中,我们展示了一个示例,说明如何使用 PyIceberg 使用 Amazon Glue Iceberg REST 端点在 S3 表中创建、加载和查询数据。将您的表格存储桶与Amazon Glue数据目录(预览版)集成后,您可以使用亚马逊Athena、Amazon Redshift和Amazon QuickSight等亚马逊云科技分析服务以及开源客户端(例如PyIceBerg)来查询和可视化数据。

Srividya Parthasarathy
Srividya Parthasarathy 是 Amazon Lake Formation 团队的高级大数据架构师。她与产品团队和客户合作,为他们的分析数据平台构建强大的功能和解决方案。她喜欢构建数据网格解决方案并与社区共享。

Dylan Qu
Dylan Qu 是一名专业解决方案架构师,专注于亚马逊云科技的大数据和分析。他帮助客户在亚马逊云科技上架构和构建高度可扩展、高性能和安全的基于云的解决方案。

Kalyan Kumar Neelampudi
Kalyan Kumar Neelampudi (KK) 是亚马逊云科技的专业合作伙伴解决方案架构师,专注于来自德克萨斯州奥斯汀的数据分析和生成式人工智能。作为亚马逊云科技合作伙伴的技术顾问,KK 帮助架构和实施尖端的数据分析和 AI/ML 解决方案,推动云技术的创新。当他不设计云解决方案时,KK 会保持积极的生活方式,享受羽毛球和泡菜球等竞技运动。

阿里特拉·古普塔
阿里特拉·古普塔是亚马逊云科技亚马逊S3团队的高级技术产品经理。他帮助客户在 Amazon S3 上构建和扩展多区域架构。居住在西雅图的他喜欢在业余时间下象棋和打羽毛球。
*前述特定亚马逊云科技生成式人工智能相关的服务仅在亚马逊云科技海外区域可用,亚马逊云科技中国仅为帮助您发展海外业务和/或了解行业前沿技术选择推荐该服务。